Introduction
Welcome back! In the last lesson, you designed and packaged your first lead magnet—a crucial step in creating a valuable asset to attract your target audience. You now have a professional .pdf or .zip file ready to be shared.
But how do you deliver it efficiently? Manually emailing the file to every new subscriber is not scalable and doesn't create a great first impression. This is where automation comes in.
This lesson focuses on exactly that: setting up an automated delivery system for your lead magnet using your platform's workflow features. Think of this as creating your first "if-then" statement for your business: IF a person signs up, THEN the system automatically sends them the lead magnet. This creates a seamless, professional experience for your audience and saves you an immense amount of time.
The Core of Automation: Triggers and Actions
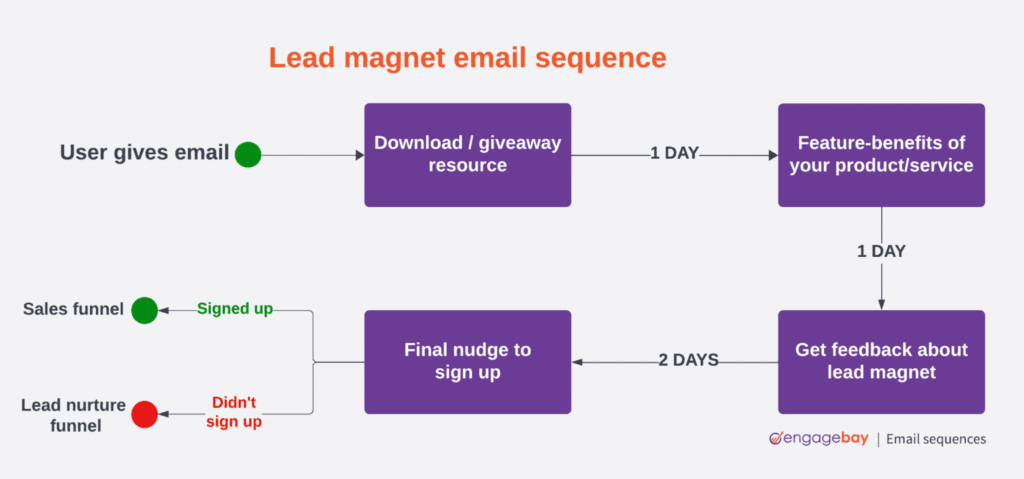
At its heart, email automation works on a simple principle: a trigger initiates an action.
- Trigger: An event that starts the automation. In our case, the trigger is someone "purchasing" your free lead magnet.
- Action: What happens after the trigger occurs. The action is sending an email that contains the download link for your lead magnet.
Today, we'll explore two primary ways to set this up. The first uses the built-in features of your e-commerce platform (Gumroad or Payhip), which is the most direct and budget-friendly approach. The second involves integrating a dedicated Email Service Provider (ESP), which offers more power and flexibility as you grow.
Method 1: Direct Delivery via Your E-commerce Platform
This is the most straightforward method and leverages the platform you've already set up. The core idea is to list your lead magnet as a product with a price of $0. When a user "buys" it for free, the platform handles the rest.
For Payhip Users
Payhip makes this process extremely simple. When you upload a digital product, the platform is designed to automatically email the file to the customer upon completion of the checkout process.
To set up your lead magnet delivery, let's review the process of adding a free product.
How to Build an Author Website FOR FREE (no coding) | Step by step tutorial with Payhip
The official Payhip channel has a tutorial that demonstrates this process. We'll focus on two key parts: adding a digital product and setting it up as a free lead magnet.
Watch the following two segments: 3:18 to 4:46: This section shows how to add a 'Digital Product'. Pay close attention to the part where the presenter says, "Payhip will automatically send this file to my customers as soon as they complete their purchases." This is the built-in automation we're leveraging. 9:42 to 10:33: This part explains how to use a product as a lead magnet by setting the price to '$0'. By combining these two steps—uploading your lead magnet file as a digital product and setting the price to zero—you create a fully automated delivery system.
So, for Payhip, the automation is essentially built-in. Once you list your lead magnet as a $0 digital product, your work is done. Anyone who "purchases" it will get an email from Payhip with the download link.
For Gumroad Users
Gumroad's process is similar but gives you more explicit control over the follow-up email through a feature called Workflows. This is a powerful tool for building automated email sequences.

First, you'll create a new product and set its price to allow for a free download. Then, you'll create a simple workflow to deliver it.
How to Use Gumroad to Build an Email List From Scratch
The article 'How to Use Gumroad to Build an Email List From Scratch' provides a perfect, step-by-step guide for this.
Read the sections 'Setting Up Your Lead Magnet' and 'Designing Automated Email Workflows for Nurturing'. Focus on these key steps: Creating the Free Product: How to set the price to $0 or use 'Pay What You Want' (by setting the price to $0+). Creating the Welcome Sequence: How to navigate to Posts > Workflows and create a new workflow. Setting the Trigger: How to set the trigger to 'Purchased specific product' and select your newly created lead magnet. Crafting the First Email: How to create the first email in the sequence, which will be sent immediately and contain the link to the product.
By following the steps in the article, you'll create a product and a one-step workflow that automatically sends an email to every new subscriber, delivering your lead magnet right away.
A Glimpse into Advanced Automation: Email Service Providers (ESPs)
While the built-in tools are great for starting, you'll eventually want more control over your email marketing. Dedicated ESPs like ConvertKit, BeeHiiv, or EmailOctopus offer advanced features:
- More complex automations (e.g., "if subscriber clicks link A, send email B").
- Subscriber segmentation (tagging users based on their interests).
- Detailed analytics on open rates and click rates.
- A/B testing of subject lines.
Given your interest in budget-friendly tools, let's explore how this works with two free-tier-friendly options.
Integrating Payhip with EmailOctopus
Payhip has a direct integration with EmailOctopus. The process involves connecting the two services with an API key (a concept you might be familiar with from your computer science classes).
This help article from Payhip walks through the integration process. You don't need to do this now, but it's important to understand the logic.
Skim through this guide to understand the workflow. Don't worry about following the steps right now. Just grasp the sequence: You create an EmailOctopus account. You generate a unique API Key in EmailOctopus. You paste this key into Payhip's Marketing > Mailing Lists section. You create a mailing list in EmailOctopus (e.g., 'Lead Magnet Subscribers'). In your Payhip product's advanced settings, you tell it to automatically add any customer who gets this product to your new EmailOctopus list. Once a subscriber is in EmailOctopus, you can then use EmailOctopus's automation tools to send them a welcome email sequence.
General ESP Automation with BeeHiiv
The logic is similar across most ESPs. A form submission triggers an automation. This video shows how to set up lead magnet delivery in BeeHiiv, another popular and modern ESP. The principles are transferable.
Lead Magnets With BeeHiiv: How To Deliver Them And Set Up Your Automations
Watch this tutorial from Blog Marketing Academy to see how automations are built within a dedicated ESP. This will give you a clear mental model of how these systems work.
Watch from 3:51 to 7:53. As you watch, identify the key components of the system: The Trigger: 'Signs up' to a specific form. The Condition: The sign-up must come from a specific source (the opt-in form for your lead magnet). The Action: 'Send them an email'. The Content: The email itself, which you write inside the automation builder and where you'd include the download link. Also, note the mention of the free plan alternative at 2:35: simply redirecting the user to a download page after they submit the form. This is a simple but less personal method.
Your Task: Automate Your Lead Magnet Delivery (25 minutes)
It's time to put this into practice. Your task is to set up the automated delivery for the lead magnet you created in the last lesson using the direct platform method.
Instructions:
-
Log into the e-commerce platform you set up (Gumroad or Payhip).
-
Follow the platform-specific instructions below:
-
If you are using Payhip:
- Go to the Products tab and click Add New Product.
- Select Digital Product.
- Upload your lead magnet file (
.pdfor.zip). - Give it a clear title (e.g., "Free Brand Color Checklist").
- Set the price to $0.
- Add a simple description and a cover image (you can use a mockup you might have made).
- Publish the product.
- Test it: Open the product link in an incognito browser window, "purchase" it for free using a different email address, and confirm that you receive an email from Payhip with the download link.
-
If you are using Gumroad:
- Go to the Products tab and click New product.
- Give it a name and select a product type (e.g., 'Digital product').
- Set the price to
$0+. This enables the "Pay What You Want" feature, allowing people to get it for free. - Upload your lead magnet file under the Content tab.
- Publish the product.
- Now, go to the Workflows tab and click New workflow.
- Name the workflow (e.g., "Lead Magnet Delivery").
- Set the Trigger to "On purchase of:" and select your new free product.
- In the first email step (sent
0hours after purchase), write a simple subject line and a short message. We will refine this email in the next lesson. For now, just make sure to include the link to the product. Gumroad provides a buttonInsert Product...that will add a link to the file they just "purchased." - Activate the workflow.
- Test it: Grab the public link to your product, open it in an incognito window, and get it for $0 using a different email. Confirm you receive your automated email.
-
Completing this task means you have a functioning, automated system to grow your email list.
Conclusion
Congratulations! You have now built a critical piece of infrastructure for your digital business. You've gone from having a static product file to a dynamic system that can automatically capture leads and deliver value 24/7.
Key Takeaways:
- Automation is built on triggers and actions. Understanding this simple model allows you to build complex systems.
- E-commerce platforms have powerful built-in tools. For lead magnet delivery, the native features of Payhip (automatic delivery) and Gumroad (Workflows) are more than sufficient to start.
- ESPs provide advanced control. As your needs grow, integrating with a service like EmailOctopus or BeeHiiv will give you more powerful tools for segmentation and building relationships with your audience.
- Always test your automations. A broken automation can lead to a poor user experience, so always run a test yourself to ensure everything works as expected.
Preview of the Next Lesson
Your system is now live, but the first email your subscribers receive is likely a generic transactional message or the basic one you just drafted. This is a missed opportunity. In our next lesson, we will focus on crafting your welcome email. You will learn how to write a compelling message that not only delivers the lead magnet but also introduces your brand, sets expectations, and begins to build a genuine connection with your new audience.