Introduction
Welcome back! In the last lesson, we focused on making your designs tangible and desirable by creating high-fidelity mockups in Photoshop and Photopea. That entire workflow was based on raster graphics—images made of pixels.
Today, we pivot to a different and equally important world: vector graphics. Unlike raster images, which lose quality when scaled, vectors are defined by mathematical paths, allowing them to be resized infinitely without any loss of detail. This makes them perfect for logos, illustrations, and especially icons.
This lesson addresses the learning outcome: Construct complex vector icons by combining and modifying geometric primitives with boolean operations. We'll explore the systematic process of starting with simple shapes like circles and squares and merging them into intricate, custom icons. This rule-based approach is a cornerstone of professional icon design.
Since you have experience with Adobe Illustrator and an interest in long-term, cost-effective tools, we'll cover techniques applicable to both Illustrator and the powerful, free alternative, Figma.
1. The Foundation: Geometric Primitives
Every complex vector icon, no matter how detailed it appears, is built from a handful of basic shapes known as geometric primitives. These are your fundamental building blocks:
- Rectangle (and its perfect-ratio sibling, the Square)
- Ellipse (and its perfect-ratio sibling, the Circle)
- Polygon
- Line
Think of these primitives as LEGO bricks. Individually, they are simple. But when combined in clever ways, they can form virtually anything. The key to unlocking this potential lies in a set of tools known as boolean operations.
2. Combining Shapes: Boolean Operations
Boolean operations are functions that take two or more overlapping shapes and merge them in a specific way to create a new, more complex shape. There are four fundamental operations you need to know.
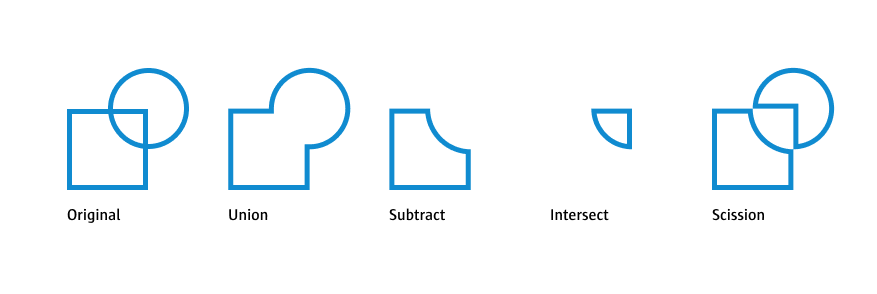
These operations are the core of today's lesson. While the names might differ slightly between software, the concepts are universal.
Boolean Operations in Figma
Figma is an excellent, browser-based tool for vector design and a great long-term option. Its implementation of boolean operations is very intuitive. The following resource from Figma's official documentation explains them perfectly.
FD4B: Combine shapes using boolean operations
Let's dive into the core of today's lesson. This official guide from Figma provides an excellent explanation of the four fundamental boolean operations. The animated examples make the concepts very clear.
Please read the section titled 'About boolean operations'. It starts with an overview and then has four subsections: 'Union', 'Subtract', 'Intersect', and 'Exclude'. Pay close attention to the animated GIFs for each one, as they perfectly illustrate what each operation does.
As you saw, Figma's boolean operations are non-destructive. This means the original shapes are preserved within a "boolean group," allowing you to go back and edit them at any time—a huge advantage for iterative design.
Boolean Operations in Adobe Illustrator
In Illustrator, you'll primarily use two tools for these operations: the Pathfinder panel and the Shape Builder tool. The Pathfinder panel offers direct buttons for the main boolean operations, while the Shape Builder tool provides a more interactive, free-form way to combine and subtract parts of shapes.
This video provides an excellent deep dive into how and when to use each tool in Illustrator.
Pathfinder vs Shape Builder – Pick the Right One & Save HOURS!
If you're working in Adobe Illustrator, these same concepts are handled by the Pathfinder panel and the powerful Shape Builder tool. This video from Dansky provides an excellent, in-depth comparison of when and why to use each one.
Watch the following segments to understand how Illustrator handles these operations: Unite (Pathfinder): 00:54 - 02:31 Minus Front (Pathfinder): 02:19 - 03:21 Intersect & Exclude (Pathfinder): 03:08 - 03:54 Shape Builder (Combine): 04:14 - 05:25 Shape Builder (Subtract): 05:14 - 06:29 Notice the analogy he uses: Pathfinder is a 'hammer' for big operations, and Shape Builder is a 'scalpel' for precise work. This is a very useful way to think about them.
3. Your Turn: Building Your First Icons
Now it's time to apply these concepts. Open either Figma or Illustrator and let's build a few simple icons from scratch. This exercise will solidify your understanding of how to construct complex forms from primitives.
Icon 1: Cloud (Union)
The cloud is a classic example of using the Union operation to merge simple shapes into an organic form.
- Create Primitives: Draw three or four circles of varying sizes. Overlap them in a way that resembles the top of a cloud.
- Add a Base: Draw a rectangle that covers the bottom half of the circle arrangement, creating a flat base.
- Combine: Select all the circles and the rectangle.
- In Figma, select Union Selection.
- In Illustrator, open the Pathfinder panel (
Window > Pathfinder) and click the Unite icon, or use the Shape Builder Tool to drag across all the shapes.
You should now have a single, unified cloud shape.
Icon 2: Crescent Moon (Subtract)
This icon is a perfect demonstration of the Subtract operation.
- Create Primitives: Draw a perfect circle.
- Duplicate: Make a copy of the circle (
Ctrl/Cmd + DorAlt/Option + drag). - Offset: Move the copied circle so it overlaps the original. The part of the original circle that remains visible will be your crescent moon.
- Combine: Select both circles.
- In Figma, select Subtract Selection. Make sure the circle on top in the Layers panel is the one you want to "cut out."
- In Illustrator, open the Pathfinder panel and click the Minus Front icon.
This simple, two-step process creates a perfectly clean crescent shape.
Challenge Icon: Gear (Union & Subtract)
Ready for a slightly more complex task? Let's build a settings gear icon.
- Create the Body: Draw a large circle.
- Create the Hole: Draw a smaller circle in the center of the large one. Use Subtract to cut the hole, creating a donut shape.
- Create the Teeth: Draw a small, narrow rectangle that extends from the outer edge of the donut.
- Duplicate & Rotate: Duplicate the rectangle and rotate it around the center of the donut. Most design software has features to repeat this transformation easily. (In Illustrator, you can use
Object > Transform > Rotatewith the "Copy" button, thenCtrl/Cmd + Dto repeat). Create 6 or 8 teeth. - Final Union: Select your main donut shape and all the rectangle "teeth". Use the Union operation to merge everything into a single, complete gear icon.
Conclusion
Today you've learned a fundamental principle of vector design: complex shapes are just combinations of simple ones. By mastering boolean operations, you've gained a systematic and repeatable method for creating clean, scalable icons and logos.
Key Takeaways:
- Vector graphics are built from geometric primitives like squares and circles.
- Boolean operations (Union, Subtract, Intersect, Exclude) are the core tools for combining these primitives into complex shapes.
- Figma uses a non-destructive boolean group system, offering great flexibility.
- Illustrator uses the Pathfinder panel for quick operations and the Shape Builder tool for more precise, interactive control.
- You can construct a huge variety of icons by strategically applying these few simple rules.
Preview of the Next Lesson:
We've successfully built icons by combining and modifying existing shapes. But what if you need to create a completely custom, free-form curve that can't be made from primitives? In our next lesson, we will tackle this by learning to master the Pen tool in Illustrator or Figma for creating precise, editable vector curves for custom illustrations. This is arguably the most powerful—and most challenging—tool in vector design, and mastering it will unlock a new level of creative freedom.