Introduction
Hello and welcome back! In our last lesson, you mastered a professional workflow for adapting a master design into a multi-device wallpaper pack. You now have a set of high-quality JPG files, which are the core of your first digital product.
However, a raw JPG file isn't what sells a product. To capture a customer's interest, you need to show them how your design looks in a real-world context. This is where mockups come in.
Today's lesson is all about presentation. We will focus on how to create high-fidelity product mockups using smart objects in Photoshop or Photopea. This skill is crucial for creating the compelling promotional images you'll use on your website and in your marketing.
We'll tackle this in two ways:
- The efficient, everyday method: Using pre-made professional mockup templates.
- The advanced, high-control method: Creating your own unique mockups from scratch.
Since you have access to Photoshop and are also interested in free, sustainable alternatives, all the techniques we cover today will work perfectly in both Photoshop and the web-based tool Photopea.
1. What is a Smart Object? The Heart of a Mockup
In the previous lesson, we briefly touched on Smart Objects as a way to work non-destructively in Photoshop. In the world of mockups, they are the central technology that makes everything work.
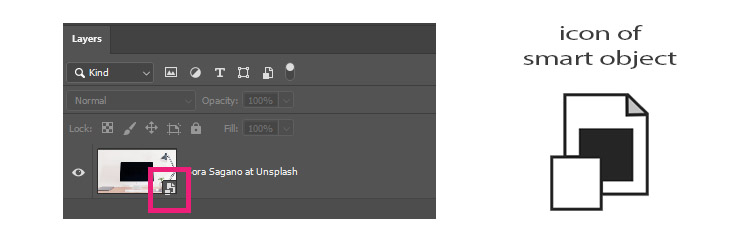
A Smart Object is a container that holds one or more layers. When you place your design inside this container, it automatically inherits all the transformations (like perspective, warping) and effects (like shadows, textures, lighting) that have been applied to the container.
The key is to identify the Smart Object layer in a mockup template. It's usually marked with a specific icon in the corner of the layer thumbnail.
2. The Fast and Efficient Method: Using Pre-made Templates
For most digital creators, building every mockup from scratch is not a good use of time. The standard professional workflow is to use pre-made mockup templates. These are typically PSD files created by photographers and designers that include pre-configured Smart Objects.

The process is incredibly simple: you find the Smart Object layer, double-click it, place your design inside, save, and the mockup updates automatically. Let's walk through the exact steps.
How To Create And Edit Mockups In Photopea
This article from Edits101 provides a fantastic, straightforward guide on how to work with mockup templates specifically in Photopea. It perfectly demonstrates the most common and efficient workflow you'll be using.
Please read two key sections from this article: First, jump to the heading "Best Websites to Download Free Mockups" and read through the "Free Mockup Websites" subsection. Bookmark a couple of these sites; they will be invaluable resources for you. Next, read the section under the heading "How to Edit Mockups In Photopea?" Follow the T-shirt example. The process is identical for any mockup: find the Smart Object, double-click, place your design, and save. Focus on understanding the simple, repeatable nature of this process.
Your Turn (Part 1): Use a Pre-made Mockup
Now, let's put this into practice with the wallpapers you created.
- Find a Mockup: Visit one of the free mockup sites mentioned in the article you just read (e.g., Anthony Boyd Graphics, Graphic Burger). Search for a "phone mockup" or "desktop mockup."
- Download and Open: Download a free mockup that you like. It will likely be a ZIP file containing a
.psdfile. Open this PSD file in either Photoshop or Photopea. - Place Your Design:
- Scan the Layers panel to find the Smart Object layer. It will usually be named something like "Your Design Here" or "Screen."
- Double-click the Smart Object thumbnail. A new tab will open with the placeholder design.
- Place one of your wallpaper JPGs into this new tab (
File > Open & Place...). Resize it to fill the canvas. You can hide or delete the original placeholder layer. - Save the Smart Object (
Ctrl + SorCmd + S).
- Export Your Image: Go back to the main mockup tab. You should see your wallpaper perfectly applied to the phone or computer screen. Export this as a JPG file (
File > Export As > JPG).
This workflow is your bread and butter for quickly creating beautiful product images.
3. The Advanced Method: Creating a Mockup from Scratch
While using templates is efficient, knowing how to create your own mockups gives you ultimate creative freedom. You can turn any photograph into a unique template that no one else has. This requires a more systematic, layered approach to achieve realism.
The core idea is to separate your design from the lighting and texture of the underlying object. You do this by using different blend modes to handle shadows and highlights separately.
The Only Way to Create Realistic Design Mockups! - Photoshop Tutorial
The YouTube channel PiXimperfect is one of the best resources for learning Photoshop. This video is a masterclass in creating a high-fidelity mockup. It's detailed, but it provides the kind of rule-based framework you appreciate.
Watch these key segments to understand the fundamental techniques for realism: Shadows with Multiply (04:09 - 05:06): Pay attention to how the Multiply blend mode integrates the design with the dark areas of the bag. Texture with Displacement (05:06 - 07:10): This is a critical step. Understand how a 'displacement map' is created from the base image to make your design wrap around the object's texture and folds. Realism with Blur (07:10 - 09:03): Notice how a subtle Gaussian Blur softens the design, making it look printed on fabric rather than digitally placed. Highlights with Screen (09:03 - 11:46): This is the counterpart to Multiply. See how the Screen blend mode is used with a mask to bring back the natural highlights and shine of the object.
These techniques—Multiply for shadows, Screen for highlights, Displace for texture, and Blur for softness—are the four pillars of creating a realistic mockup from scratch.
4. Your Turn (Part 2): Create Your Own Custom Mockup
It's time to build your own reusable template. A great first project would be to create a mockup for the minimalist poster you'll be designing for your dorm room.
- Find a Base Image: Go to a free stock photo site like Pexels or Unsplash and find a nice photo of an interior with a blank wall. Look for good, natural lighting.
- Create and Position the Smart Object:
- In Photoshop/Photopea, open your chosen photo.
- Use the Rectangle Tool to draw a rectangle on the wall where you want the poster to be.
- Right-click the rectangle layer and choose
Convert to Smart Object. - Use the Transform tool (
Ctrl + TorCmd + T), then right-click and chooseDistortorPerspectiveto match the corners of the rectangle to the perspective of the wall.
- Add a Placeholder Design: Double-click the Smart Object and place one of your wallpaper designs inside as a placeholder. Save and close it.
- Add Realism: Now, apply the techniques from the PiXimperfect video.
- Change the Smart Object's blend mode to
Multiply. It will look too dark. - Duplicate the Smart Object layer. Change the top copy's blend mode to
Screen. - Use masks and adjustments to refine the shadows and highlights, letting the natural light of the room affect your poster.
- (Optional but powerful): Create and apply a displacement map from the wall texture if the wall is textured (e.g., brick, concrete).
- Change the Smart Object's blend mode to
- Save Your Template: Save the entire file as a PSD. You now have a custom poster mockup template that you can reuse indefinitely!
Conclusion
Today you've acquired a vital skill for any digital creator: product presentation. You learned how to make your designs look tangible and professional, which is the key to turning a simple file into a desirable product.
Key Takeaways:
- Smart Objects are the engine of mockups. They are non-destructive containers that allow you to easily swap designs.
- Using pre-made templates is the most efficient workflow. It's fast, professional, and lets you focus on your design work.
- Creating your own mockups gives you ultimate creative control. The core techniques involve perspective transforms (
Distort,Warp), blend modes (Multiplyfor shadows,Screenfor highlights), and texture mapping (Displace). - Both workflows are fully achievable in professional software like Photoshop and powerful free tools like Photopea.
Preview of the Next Lesson:
We've spent a lot of time working with raster images in Photoshop. In the next module, we'll shift gears and dive into the world of vector graphics. Our first lesson will be: Construct complex vector icons by combining and modifying geometric primitives with boolean operations. You'll learn how to build scalable, clean graphics like icons from basic shapes, opening the door to creating a whole new category of digital products.