Introduction
Welcome back! In our last lesson, we focused on building complex icons by combining simple geometric primitives using boolean operations. This is a fantastic, rule-based method for creating many types of vector graphics. However, what happens when you need a shape that can't be made from circles and squares—a truly custom, organic curve?
This is where the Pen tool comes in. It is arguably the most powerful and fundamental tool in any vector design software, but it also has a reputation for being difficult to learn. This lesson is designed to demystify it completely.
Our goal is to master the Pen tool in Illustrator or Figma for creating precise, editable vector curves for custom illustrations. We won't just learn how to click; we will learn where to click and why, transforming the Pen tool from a source of frustration into your most reliable creative instrument. The principles we cover are universal, so you can apply them in Adobe Illustrator, Figma, or any other professional vector editor.
1. The Anatomy of a Vector Path
Before drawing, let's quickly review the components of a path created by the Pen tool. Understanding these parts is crucial for controlling your shapes. A vector path consists of two main elements:
- Anchor Points: These are the fixed points that define the start and end of any path segment. They are like pins holding a string to a board.
- Bezier Handles: Each anchor point on a curve has one or two handles. These handles control the shape and direction of the curve flowing into and out of the anchor point.

The fundamental rule for professional-looking vectors is to use as few anchor points as possible. More points create lumps and make editing difficult. A smooth, elegant curve is the result of well-placed points and carefully adjusted handles.
2. The Golden Rule: Place Points at the Extremes
The single biggest challenge when learning the Pen tool is knowing where to place your anchor points. The answer is a simple, systematic rule: place anchor points at the extremities of a curve.
Think of drawing a bounding box around a curve segment. You should place an anchor point wherever the curve touches the box—at its highest, lowest, leftmost, and rightmost points. This is sometimes called the "Box Method" or "Clock Method" (thinking of the 12, 3, 6, and 9 o'clock positions).
To see this principle in action, let's analyze how professionally drawn letterforms are constructed.
Master the Pen Tool in Adobe Illustrator
Professionals use a very deliberate and efficient method for placing points. This video from The Futur provides an excellent demonstration of this by deconstructing a typeface.
Watch the first 52 seconds (0:00 - 0:52). Notice the two key principles the instructor points out: 1) Use as few points as possible, and 2) Place points at the extremities of the curve.
By following this rule, you ensure that your handles will naturally be horizontal or vertical, making your curves much easier to control and edit.
3. The Mechanics: Two Methods for Drawing Curves
Now that you know where to click, let's cover how. There are two popular, systematic methods for creating curves. We'll explore both so you can find which one works best for you.
Method 1: The "Points First, Curves Later" Approach
This method is often easier for beginners because it separates the process into two distinct steps. It's less overwhelming and helps you focus on one thing at a time.
- Place Points: Using the Pen tool, single-click (do not drag) to place anchor points only at the extremities of your target shape. This will create a series of straight lines.
- Create Curves: Switch to the Anchor Point Tool (in Illustrator,
Shift + C) or select the points and use the Bend Tool (in Figma). Click on a straight line segment and drag to pull it into a curve. - Refine Handles: Switch to the Direct Selection Tool (the white arrow in Illustrator,
A) to select individual anchor points and fine-tune the length and angle of their Bezier handles.
This video from Ogden Designs provides a clear, concise demonstration of this workflow.
The EASIEST Pen Tool Tutorial Ever (Adobe Illustrator)
Let's watch a demonstration of the 'Points First, Curves Later' method. This approach is incredibly systematic and a great way to build confidence with vector drawing.
Watch from 1:28 to 4:43. The video covers the entire workflow: Placing Anchor Points (1:28 - 2:16): Notice how he first identifies and places anchor points only on the tangent lines of the shape. Creating Curves (2:16 - 3:02): See how he uses the Anchor Point Tool (Shift+C) to pull handles out from the points and create the curves. Refining the Shape (3:17 - 4:43): Finally, he uses the Direct Selection Tool (A) to adjust the handles for a perfect fit.
Method 2: The "Click and Drag" Approach
This is the more traditional—and ultimately faster—method, where you create the curves as you place the points. It requires more practice to master but offers a more fluid workflow once you're comfortable.
This is where modifier keys become essential. This cheat sheet is an excellent reference for the core Pen tool controls.
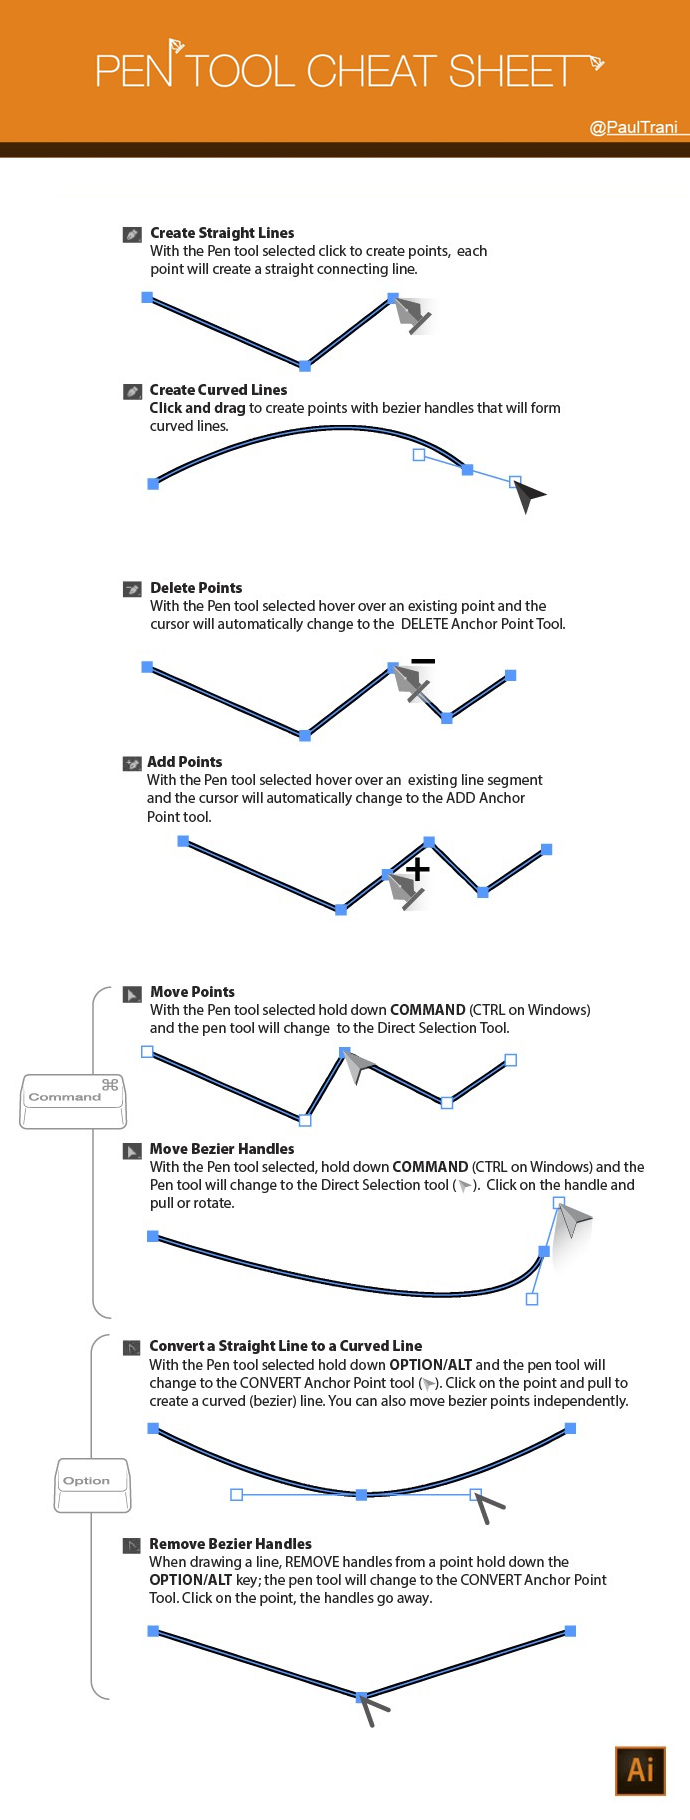
Here's the basic process:
- To start a curve: Click and drag in the direction you want the curve to go. This pulls out the first Bezier handle.
- To continue a smooth curve: Click and drag at the next extremity point. The tool will automatically create a smooth transition. Holding
Shiftwhile dragging will constrain your handles to 45° or 90° angles, which is critical for creating clean, predictable curves. - To create a sharp corner (a "cusp"): After creating a curve, you may need the next segment to go in a completely different direction.
- Option 1: Go back to the last anchor point and click it once. This removes the outgoing handle, allowing you to start a new line or curve from that point.
- Option 2 (More Control): Hold
Alt(Windows) orOption(Mac), click on the end of the handle you want to change, and drag it to a new direction. This "breaks" the handles, allowing them to move independently.
4. Your Turn: Practice Exercise
Practice is the only way to build muscle memory with the Pen tool. Let's trace a simple shape.
Exercise: Trace a Heart Shape
- Find a simple, clean heart shape online and place it on a locked layer in Illustrator or Figma with reduced opacity.
- On a new layer above it, select your Pen tool.
- Identify the Extremities: A heart has four key points:
- The sharp point at the bottom.
- The sharp dip in the top center.
- The far-left point of the curve.
- The far-right point of the curve.
- Trace the shape using either method:
- Method 1: Click to place the four anchor points. Then use the Anchor Point Tool/Bend Tool to pull out the curves. Refine with the Direct Selection tool.
- Method 2: Start at the bottom point. Click and drag horizontally (holding
Shift) to create the first set of handles. Move to the rightmost point, click and drag upwards. Continue around the shape, usingAlt/Optionto create the sharp corner at the top-center dip.
- Refine: Once the path is closed, use the Direct Selection Tool (
A) to make minor adjustments to your anchor points and handles until your path perfectly matches the template.
Don't worry if it isn't perfect on the first try. The goal is to internalize the process of placing points at the extremes and manipulating the handles.
Conclusion
You've now learned the professional, systematic approach to the Pen tool. By moving past random clicking and embracing a rule-based method, you've unlocked the true potential of vector illustration.
Key Takeaways:
- The logic of the Pen tool is based on Bezier curves, controlled by anchor points and handles.
- The most important rule for clean, editable paths is to use as few anchor points as possible.
- Always place your anchor points at the extremities (tangents) of a curve. This is the key to predictable and smooth results.
- Mastering the modifier keys—
Shiftto constrain angles andAlt/Optionto break handles—is essential for efficient workflow. - Consistent practice, especially by tracing letterforms and simple shapes, is the fastest way to build mastery.
Preview of the Next Lesson:
You can now create precise custom vector shapes from scratch. In the next lesson, we will focus on bringing these flat shapes to life. We will learn how to apply multi-step gradients and strokes to create depth and visual interest in vector artwork, turning your clean paths into visually rich illustrations.