In the last lesson, we explored PyTorch tensors, the fundamental data structures that will represent everything from meal images to complaint texts in your project. Now that you're comfortable creating and manipulating this data, it's time to build the engine that will process it: a neural network.
This lesson will guide you through defining your first neural network using PyTorch's torch.nn.Module. This is the blueprint for all models you will create, including the image and text classifiers for your Midday Meal Quality Monitoring project. We will cover the basic structure of a PyTorch model, how to define its layers, and how data flows through it.
Object-Oriented Programming and nn.Module
Given your background in computer science and experience with object-oriented languages like Java and Python, you're already familiar with concepts like classes, inheritance, and methods. PyTorch leverages these principles heavily. Every neural network you build will be a Python class that inherits from a base class called torch.nn.Module.
This nn.Module base class provides a vast amount of built-in functionality. It automatically tracks the model's parameters (weights and biases), allows you to easily move the model between the CPU and GPU, and manages the complex process of backpropagation. Your job is to define the specific architecture you need.
To get a solid conceptual grounding in how these OOP principles are applied in PyTorch, the following video provides an excellent overview.
Dive into Deep Learning – Lec 6: Basics of Object-Oriented Programming in PyTorch (torch.nn.Module)
This video from the "Dr. Data Science" channel clearly explains the object-oriented concepts that are essential for understanding nn.Module.
Please watch the following segments: Procedural vs. OOP: A quick refresher on why OOP is useful for building complex, reusable components like neural networks. Objects, Attributes, and Methods: This covers the core ideas of state (attributes like shape) and behavior (methods like reshape). Classes and Constructors: Explains how classes act as blueprints and how the __init__ method (constructor) initializes an object's state. Inheritance: This is the most crucial part. It explains how a "child" class can inherit and extend the functionality of a "parent" class, which is exactly what we do with nn.Module. PyTorch nn.Module Example: This section puts all the concepts together and shows how a neural network is defined by subclassing nn.Module.
The Anatomy of a PyTorch Model
As you saw in the video, every PyTorch model class you define has two essential methods that you must implement:
__init__(self): The constructor. This is where you define and initialize the building blocks (the layers) of your network. These layers are stored as attributes of the class (e.g.,self.layer1 = nn.Linear(...)).forward(self, x): This method defines the forward pass, dictating how data flows through the network. It takes an input tensorxand passes it through the layers you defined in__init__, returning the final output tensor.
This separation is powerful: you declare the components once in __init__ and then reuse them to describe the computational graph in forward.
The official PyTorch documentation provides a clear, concise guide to this structure.
This tutorial from the PyTorch documentation walks through the creation of a simple neural network.
Read the introduction and the first two main sections: Start at the beginning of the page, where it introduces the torch.nn namespace. Then, focus on the section "Define the Class". This section contains the core code structure for any nn.Module subclass, showing the __init__ and forward methods in action. Pay close attention to how the class is defined and instantiated.
Building a Simple Network: Step-by-Step
Let's solidify these concepts by building a simple, fully-connected neural network from scratch. While this model is basic, the principles apply directly to the more complex CNN you will build for image classification.
The following video provides a practical, code-along demonstration.
Create a Basic Neural Network Model - Deep Learning with PyTorch 5
This video by John Elder provides a friendly walkthrough of creating a basic neural network. It's useful because it also shows common mistakes and how to fix them.
Watch these key parts of the video: Imports: Shows the necessary imports (torch.nn and torch.nn.functional). Defining the Model Class: This part covers creating the class, inheriting from nn.Module, and defining the layers within the __init__ method. The instructor's explanation of in_features and out_features is very clear. Defining the Forward Pass: Here, he implements the forward method, showing how to pass the input data through the layers and apply an activation function (ReLU). Instantiating the Model: This demonstrates how to create an instance of the model and importantly, shows a common error made when forgetting super().__init__() and how to correct it.
Let's summarize the code structure from these resources. A simple network definition looks like this:
import torch
import torch.nn as nn
import torch.nn.functional as F


# 1. Define the class, inheriting from nn.Module
class SimpleNet(nn.Module):
    def __init__(self):


        # 2. Call the constructor of the parent class
        super().__init__()


        # 3. Define the layers (the building blocks)
        # A linear layer that takes 784 inputs and produces 128 outputs
        self.fc1 = nn.Linear(in_features=784, out_features=128)


        # Another linear layer that takes 128 inputs and produces 10 outputs
        self.fc2 = nn.Linear(in_features=128, out_features=10)


    # 4. Define the forward pass (the data flow)
    def forward(self, x):


        # Pass input x through the first linear layer
        x = self.fc1(x)


        # Apply the ReLU activation function
        x = F.relu(x)


        # Pass through the second linear layer to get the final output (logits)
        x = self.fc2(x)
        return x


# 5. Instantiate the model
model = SimpleNet()


# You can print the model to inspect its architecture
print(model)
Key Components Explained
nn.Linear(in_features, out_features): This is a standard fully-connected layer. It applies a linear transformation .in_featuresmust match the size of the input tensor, andout_featuresdefines the size of the output tensor.F.relu(x): This is the Rectified Linear Unit activation function. It introduces non-linearity, which is what allows a neural network to learn complex patterns. It simply converts all negative values in the tensor to zero.super().__init__(): As mentioned in the videos, this line is crucial. It calls the__init__method of the parentnn.Moduleclass, which sets up the internal machinery for tracking layers and parameters.
From a Simple Net to Your Project's CNN
The SimpleNet above uses only linear layers. The Convolutional Neural Network (CNN) you will build for your project's image classification task will use different types of layers, such as convolutional (nn.Conv2d) and pooling (nn.MaxPool2d) layers. However, the fundamental structure remains identical. You will define these layers in __init__ and orchestrate their flow in the forward method.
The diagram below shows a typical CNN architecture for image classification, similar to what you will build.
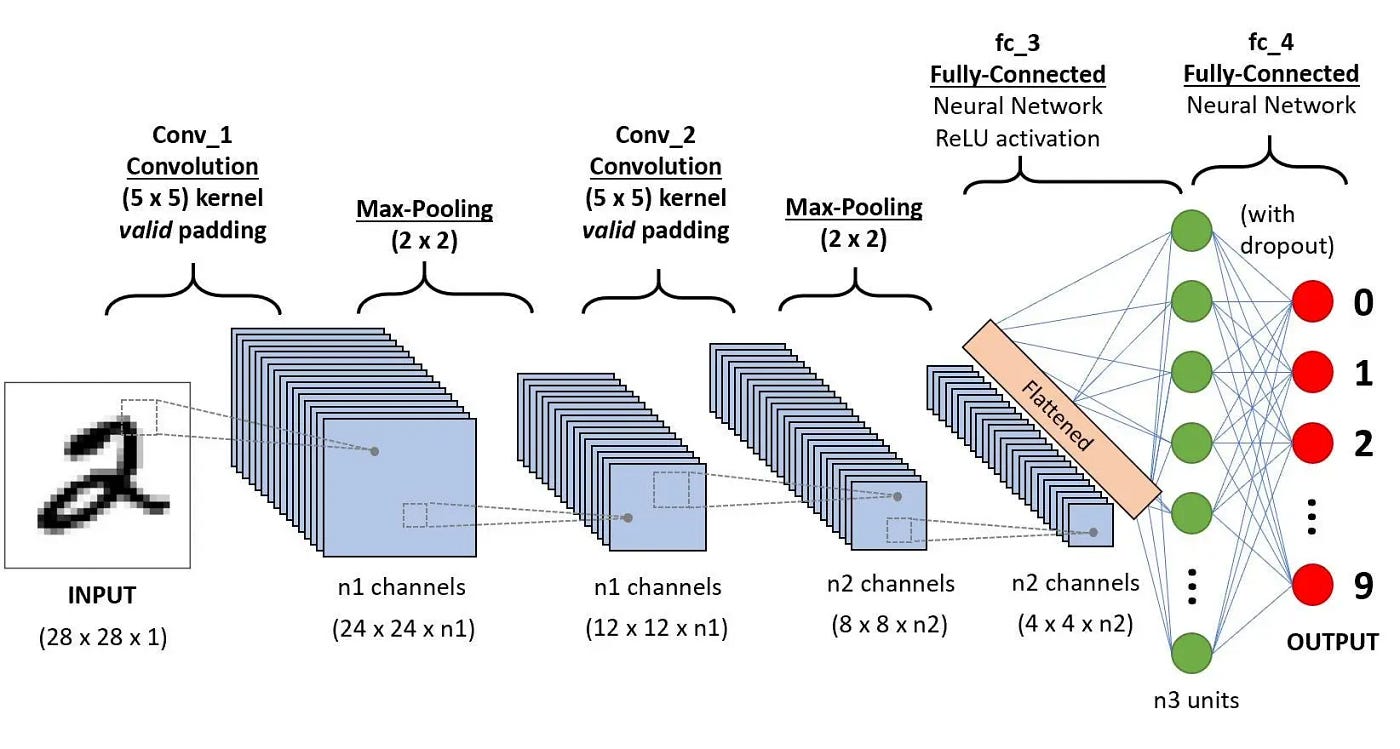
Notice the "Flattened" step in the diagram. This is where a layer like nn.Flatten() would be used to convert the 2D feature map from the convolutional layers into a 1D vector, ready to be processed by the fully-connected (fc) layers—just like the input to our SimpleNet. We will dive into the details of these specific layers in a future lesson.
Conclusion
In this lesson, you've learned the fundamental pattern for building any neural network in PyTorch. By subclassing torch.nn.Module, you can create custom architectures while leveraging PyTorch's powerful backend for parameter tracking and gradient computation.
Here are the key takeaways:
- All PyTorch models are classes that inherit from
nn.Module. - The
__init__method is used to define and initialize the network's layers. - The
forwardmethod defines how data flows through those layers. - This structure is modular, allowing you to combine different layer types (Linear, Convolutional, etc.) to build complex models like the CNN required for your project.
You now have the ability to define a model's structure. In the next lesson, we will cover how to move your tensors and your newly defined model to the GPU using .to(device). This is a crucial step to unlock the performance needed for training deep learning models efficiently.