Welcome back! In our previous lesson, we configured your environment to use GPU acceleration, a critical step for training the deep learning models required for your project. With your setup now optimized for performance, we can dive into the fundamental building block of PyTorch: the tensor.
Everything in PyTorch, from the image of a midday meal to the text of a parent's complaint, is represented as a tensor. Understanding how to create and manipulate these data structures is the most crucial skill you'll need for building your models. In this lesson, we will cover what tensors are and how to perform essential operations on them, including creation, arithmetic, indexing, and reshaping.
What is a Tensor?
At its core, a tensor is a multi-dimensional array. This concept should be familiar to you from your work with NumPy in your data science coursework. In fact, PyTorch tensors are so similar to NumPy arrays that you can often convert between them seamlessly. The key difference, and the reason we use tensors, is that they can be moved to the GPU to accelerate computations.
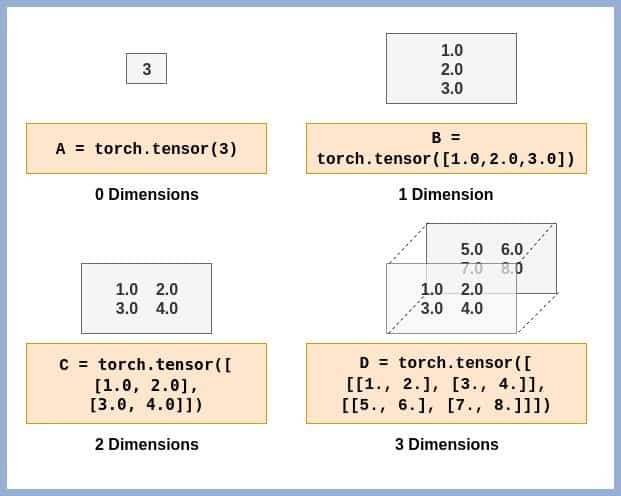
Let's visualize the different types of tensors you might encounter:
- A 0-dimensional tensor, or scalar, is just a single number (e.g.,
torch.tensor(7)). - A 1-dimensional tensor is a vector (e.g.,
torch.tensor([1, 2, 3])). This could represent a simple list of features. - A 2-dimensional tensor is a matrix (e.g.,
torch.tensor([[1, 2], [3, 4]])). A grayscale image can be represented this way. - A 3-dimensional tensor can represent a color image (height, width, color channels) or a sequence of text data.
- Higher-dimensional tensors are used for batches of data. For your project, a batch of color images would be a 4D tensor:
(batch_size, channels, height, width).
Creating Tensors
There are many ways to create a tensor in PyTorch. The best method depends on what you need to do. The following video provides a comprehensive overview of the most common initialization methods.
Complete Pytorch Tensor Tutorial (Initializing Tensors, Math, Indexing, Reshaping)
This video from the "Aladdin Persson" channel is an excellent, in-depth tutorial on PyTorch tensors. We will use it as a reference throughout this lesson.
To begin, watch the first major section covering tensor creation from Initialization methods. This will show you how to: Create a tensor from a Python list. Specify the data type (dtype) and device (device). Create tensors with specific values (torch.zeros, torch.ones, torch.rand). Create tensors from a range of numbers (torch.arange, torch.linspace).
As you saw in the video, you can create tensors in various ways. Let's summarize the key ones with a reading from the official PyTorch documentation for a more formal review.
Introduction to PyTorch Tensors
This official tutorial provides detailed explanations and code examples for tensor creation.
Please read the following sections: Start with Creating Tensors. This covers creating tensors from Python lists and using factory methods like torch.zeros() and torch.ones(). Review Tensor Shapes to understand the .shape property and _like() methods. Finally, read Tensor Data Types to see how to define a tensor's data type upon creation (dtype) or change it later (.to()).
To solidify this, here's a quick reference of the most common creation functions:
| Function | Description |
|---|---|
torch.tensor(data) |
Creates a tensor from a Python list or NumPy array. |
torch.zeros(shape) |
Creates a tensor of the given shape filled with zeros. |
torch.ones(shape) |
Creates a tensor of the given shape filled with ones. |
torch.rand(shape) |
Creates a tensor with random numbers from a uniform distribution on [0, 1). |
torch.randn(shape) |
Creates a tensor with random numbers from a normal distribution (mean 0, variance 1). |
torch.arange(start, end, step) |
Creates a 1D tensor with values in a range. |
Tensor Attributes and Dimensions
Once you have a tensor, you'll often need to check its properties. The most important attributes are:
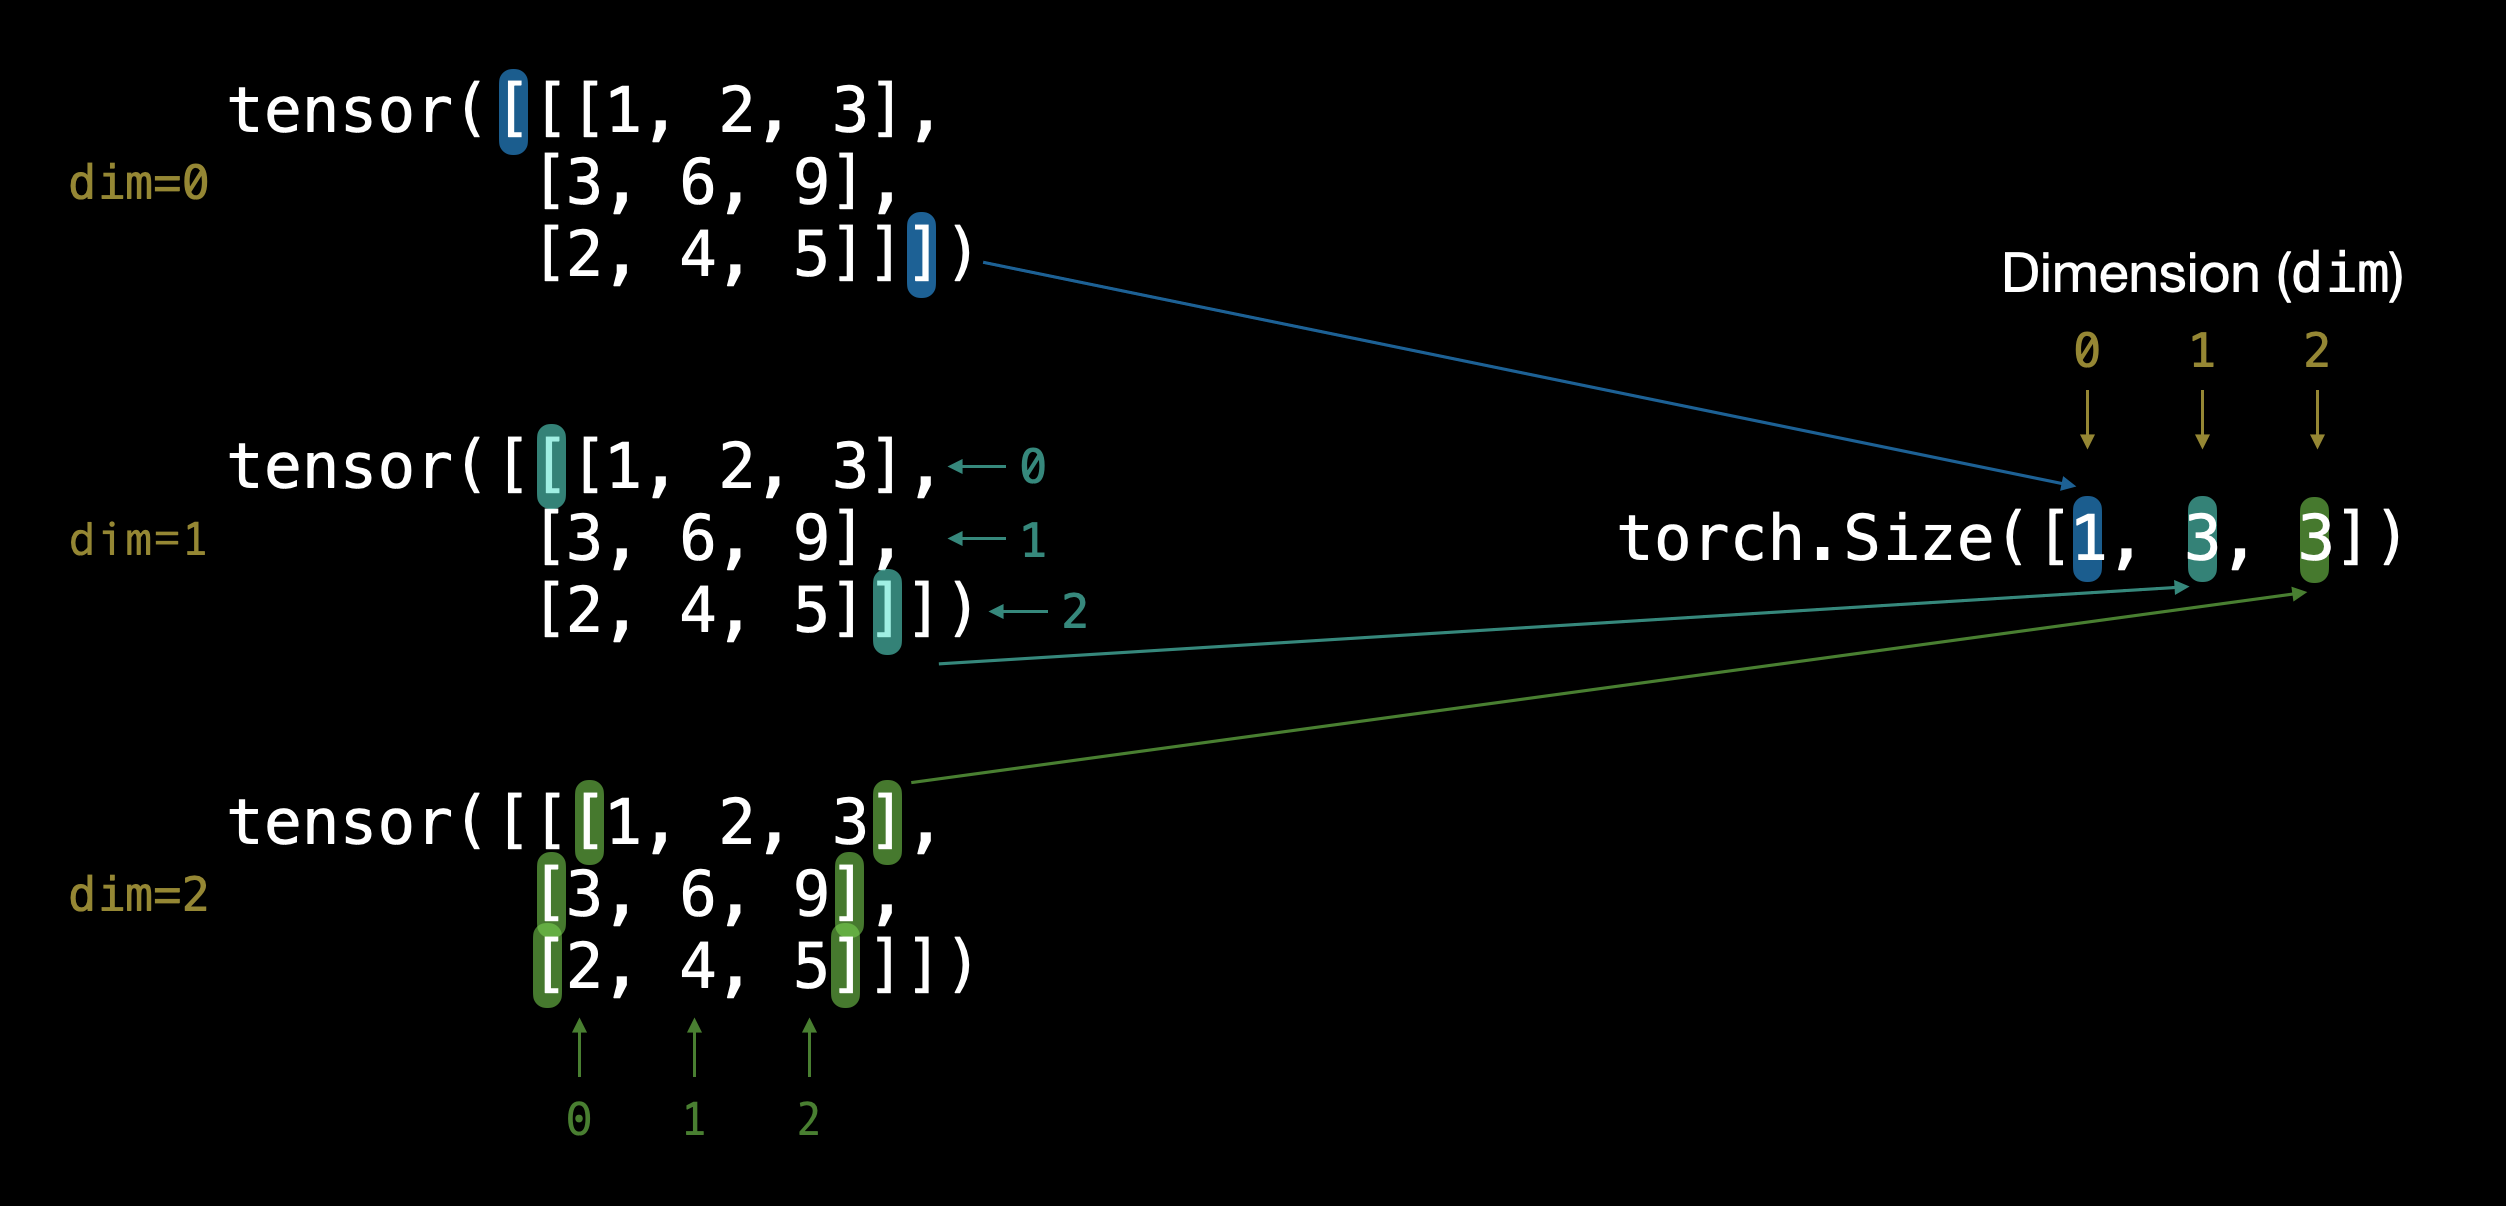
tensor.shape(ortensor.size()): Returns a tuple representing the size of each dimension.tensor.dtype: The data type of the elements (e.g.,torch.float32).tensor.device: The device the tensor is on ('cpu' or 'cuda').tensor.ndim: The number of dimensions.
Understanding how dimensions are indexed is crucial. For a 3D tensor, dim=0 refers to the "depth," dim=1 to the rows, and dim=2 to the columns.
Essential Tensor Operations
Now for the most important part: manipulating tensors. This includes arithmetic, indexing, and reshaping. These operations are the foundation of building and training neural networks.
Arithmetic and Broadcasting
PyTorch supports standard arithmetic operations, which are typically applied element-wise.
import torch

x = torch.tensor([1, 2, 3])
y = torch.tensor([9, 8, 7])


# Element-wise addition
z1 = x + y  # Result: tensor([10, 10, 10])


# Element-wise multiplication
z2 = x * y  # Result: tensor([9, 16, 21])


# Scalar operations
z3 = x * 2  # Result: tensor([2, 4, 6])
A powerful concept here is broadcasting. It allows you to perform operations on tensors of different, but compatible, shapes. PyTorch "stretches" the smaller tensor to match the shape of the larger one. For example, when you subtract a 1D tensor from a 2D tensor, the 1D tensor is subtracted from every row of the 2D tensor.
The video you watched earlier has an excellent explanation of both basic math and broadcasting.
Complete Pytorch Tensor Tutorial (Initializing Tensors, Math, Indexing, Reshaping)
Let's revisit the Aladdin Persson video for a practical demonstration of these operations.
Watch the segment from tensor math. Pay close attention to: Element-wise addition, subtraction, multiplication, and division. In-place operations (ending with _, e.g., add_). Matrix multiplication vs. element-wise multiplication. The explanation of broadcasting around the end.
Indexing and Slicing
If you're comfortable with Python list or NumPy array indexing, PyTorch will feel very familiar. You can select elements, rows, columns, and sub-tensors using standard bracket notation.
# Create a 2D tensor (a matrix)
x = torch.arange(1, 10).reshape(3, 3)


# tensor([[1, 2, 3],
#         [4, 5, 6],
#         [7, 8, 9]])


# Get the first row
print(x[0])  # tensor([1, 2, 3])


# Get the first column
print(x[:, 0]) # tensor([1, 4, 7])


# Get a sub-matrix
print(x[1:, 1:])


# tensor([[5, 6],
#         [8, 9]])


# Boolean indexing: get all elements greater than 5
print(x[x > 5]) # tensor([6, 7, 8, 9])
The following resource provides a hands-on look at these powerful manipulation techniques.
Manipulating Tensors in PyTorch
This article from MachineLearningMastery.com offers many practical code examples for tensor manipulation.
Focus on the section Manipulating Tensors. It provides clear examples of: Slicing using standard notation (a[1:, 2:4]). Adding a new dimension using None. Boolean indexing. Flattening (ravel) and reshaping. Transposing (.T). Stacking and splitting tensors.
Reshaping Tensors
Changing the shape of a tensor without changing its data is a very common task. For your project, you might flatten a 2D image into a 1D vector to feed it into a linear layer, or you might add a "batch" dimension to a single image.
reshape()orview(): Changes the shape of a tensor.reshape()is generally safer as it works even if the data isn't stored contiguously in memory (by creating a copy if needed).unsqueeze(dim): Adds a dimension of size 1 at the specified positiondim.squeeze(dim): Removes a dimension of size 1.permute(dims): Rearranges the dimensions of a tensor.
Let's return to the video for a final walkthrough of these crucial functions.
Complete Pytorch Tensor Tutorial (Initializing Tensors, Math, Indexing, Reshaping)
The final part of the video covers reshaping in detail.
Watch the segment on reshaping a tensor. This demonstrates view, reshape, cat (concatenate), unsqueeze, and squeeze. The explanation of the difference between view and reshape is particularly useful.
The NumPy Bridge
Given your background in data science, you're likely very familiar with NumPy. PyTorch and NumPy work together beautifully. You can convert a NumPy array to a PyTorch tensor and back with zero copying of the data in memory (if the data is on the CPU). This means the two objects will share the same underlying memory, and changes to one will affect the other.
import numpy as np


# From NumPy to PyTorch
numpy_array = np.ones(5)
pytorch_tensor = torch.from_numpy(numpy_array)


# From PyTorch to NumPy
tensor_to_convert = torch.ones(5)
numpy_array_back = tensor_to_convert.numpy()
This bridge is incredibly useful for integrating PyTorch into existing data science pipelines that rely on libraries like Scikit-learn or Pandas.
Conclusion
In this lesson, you've mastered the foundational data structure of PyTorch. Tensors are not just multi-dimensional arrays; they are the medium through which all data flows and all computations are performed in your neural networks, especially on the GPU.
Here are the key takeaways:
- Tensors are multi-dimensional arrays, similar to NumPy arrays but with GPU acceleration capabilities.
- You can create tensors from existing data, with specified values (zeros, ones, random), or from ranges.
- Essential tensor attributes include
.shape,.dtype, and.device. - Operations like arithmetic, indexing, and reshaping are fundamental for data manipulation and are performed using intuitive, NumPy-like syntax.
- Broadcasting is a powerful mechanism that simplifies operations on tensors of different shapes.
- Reshaping functions like
reshape,squeeze, andunsqueezeare vital for preparing data for different model layers.
You now have the tools to represent and manipulate the data for your project. In our next lesson, we will use this knowledge to define your first simple neural network using the torch.nn.Module class, bringing us one step closer to building your image and text classifiers.