In our previous lesson, we established a clean and isolated Conda environment for your project and installed the foundational libraries, including a CPU-only version of PyTorch. Now, we'll take a crucial step to accelerate your progress: upgrading PyTorch to leverage the power of a GPU. Given the scale of your project and the four-week timeline, training deep learning models on a CPU would be prohibitively slow. By enabling GPU support through CUDA, we can reduce training times from days to hours, a necessity for the iterative experimentation your project requires.
This lesson will guide you through installing PyTorch with CUDA support and writing a simple script to verify that your GPU is correctly recognized and ready for action.
Why GPU Acceleration is Non-Negotiable
For tasks like image recognition with CNNs and text analysis with BERT, the computations involve millions of matrix multiplications. CPUs, designed for sequential tasks, handle these one by one. GPUs, with their thousands of specialized cores, are designed for parallel processing and can perform these calculations simultaneously. This architectural difference leads to performance gains of 10x to 100x or more for deep learning workloads.
To understand the decision framework, let's consult a clear breakdown.
Install PyTorch on Windows, Linux and macOS in 2025
This article from Hugging Face provides a concise comparison between CPU and GPU versions of PyTorch.
Please read the table in the section CPU vs GPU PyTorch Build Decision Matrix. It clearly outlines why the GPU version is essential for the kind of model training you will be doing.
Demystifying the CUDA Stack
To make PyTorch use your GPU, it relies on NVIDIA's CUDA platform. This can seem complex, but the relationship is straightforward once you understand the key components:
- NVIDIA GPU: The physical hardware in your machine.
- NVIDIA Driver: System software that allows your operating system to communicate with the GPU.
- PyTorch with CUDA: A special build of PyTorch compiled to work with specific CUDA versions.
A common pitfall is believing you need to manually install NVIDIA's full CUDA Toolkit. For most use cases, including this project, this is not necessary. Modern PyTorch packages bundle the required CUDA runtime libraries. Your only responsibility is to ensure you have a compatible NVIDIA driver installed.
Install PyTorch on Windows, Linux and macOS in 2025
This article clarifies a very common point of confusion regarding the CUDA Toolkit.
First, read the key takeaway under the section The Driver, The Toolkit, and PyTorch. Then, reinforce this by reading the FAQ answer to Do I Need the Full CUDA Toolkit from NVIDIA?. This will save you from a lot of unnecessary setup steps.
Step 1: Check Your System's GPU and Driver
Before installing, you must identify which version of CUDA your system's driver supports. You can do this with a single command. Open your terminal (or Anaconda Prompt on Windows) and run:
nvidia-smi
This command queries the NVIDIA System Management Interface. If it runs successfully, you'll see a detailed table about your GPU. Pay close attention to the CUDA Version displayed in the top-right corner. This is the maximum version of the CUDA toolkit your driver supports. You can install a PyTorch build for this version or any version below it.

If the command fails, it likely means your NVIDIA drivers are not installed correctly, and you must resolve that before proceeding.
The following video demonstrates this check and the subsequent installation process on Windows.
How to Correctly Install PyTorch on GPU in Python and Windows
This video by Aleksandar Haber provides a clear, practical walkthrough of the entire GPU setup process on Windows.
Watch the segment from the beginning to see how to use the nvidia-smi command and interpret its output.
Step 2: Install PyTorch with CUDA Support
Now that you know your maximum supported CUDA version, you can install the correct PyTorch package. First, ensure you are in your project's Conda environment.
conda activate midday-meal
Next, uninstall the CPU-only version we installed previously to prevent any conflicts.
conda uninstall pytorch torchvision torchaudio cpuonly
Now, we will use the official PyTorch website's installation helper to generate the correct command for your system.
This is the official PyTorch installation guide. Using its configuration tool is the most reliable way to get the correct installation command.
Go to the PyTorch Get Started Locally page. In the interactive tool, make the following selections: PyTorch Build: Stable Your OS: Select your operating system (Windows/Linux/Mac) Package: Conda Language: Python Compute Platform: Select the CUDA version that is less than or equal to the version reported by nvidia-smi. For example, if nvidia-smi shows CUDA 12.4, you can safely select the CUDA 12.1 option. It's generally best to pick the highest available option that your driver supports. The tool will generate the precise conda install command for you. Copy it.
The command will look something like this (your specific CUDA version might differ):
conda install pytorch torchvision torchaudio pytorch-cuda=12.1 -c pytorch -c nvidia
Paste this command into your activated terminal and execute it. Conda will resolve the dependencies and install the GPU-enabled libraries. This may take several minutes.
For a visual guide of this selection and installation process, refer back to the video.
How to Correctly Install PyTorch on GPU in Python and Windows
This part of the video walks through using the PyTorch website's tool and running the installation command.
Watch the section from this point, where the presenter navigates the website, selects the correct options, and runs the generated pip command. The process is identical for conda.
Step 3: Verify GPU Availability
The final, critical step is to confirm that PyTorch can communicate with your GPU. You'll do this by running a small Python script.
Create a new file named verify_gpu.py and add the following code:
import torch


# Check if CUDA is available
is_available = torch.cuda.is_available()

print(f"CUDA available: {is_available}")

if is_available:


    # Get the number of GPUs
    device_count = torch.cuda.device_count()
    print(f"Number of GPUs: {device_count}")


    # Get the name of the current GPU
    current_device = torch.cuda.current_device()
    device_name = torch.cuda.get_device_name(current_device)
    print(f"Current device: {current_device}, Name: {device_name}")
else:
    print("CUDA is not available. PyTorch will run on CPU.")
Run this script from your terminal:
python verify_gpu.py
If your setup is correct, the output should show CUDA available: True and print the name of your graphics card.
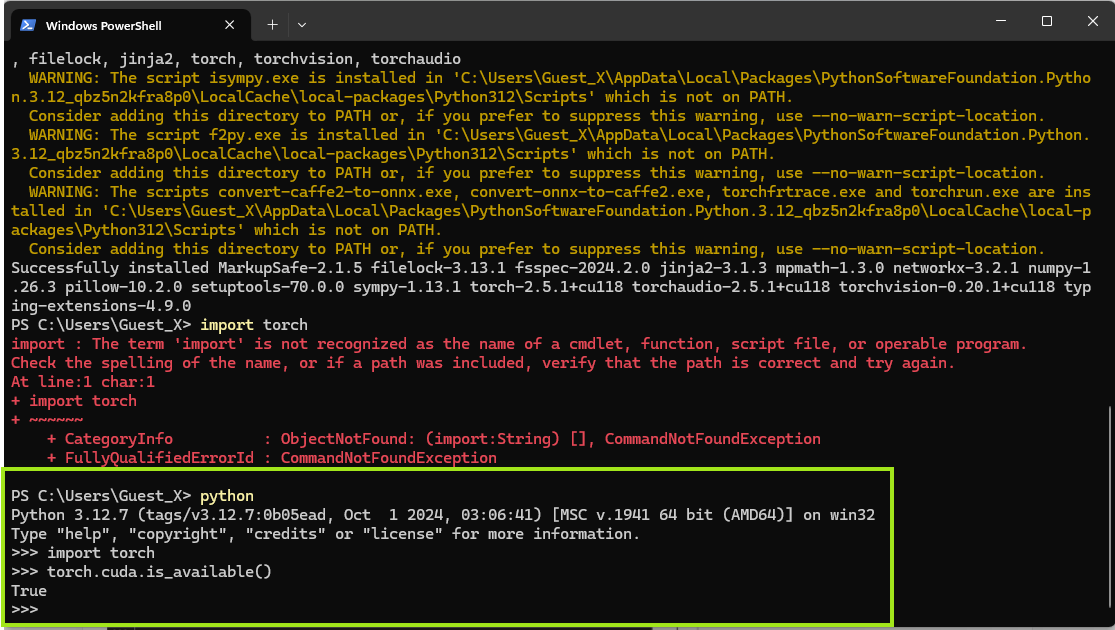
If torch.cuda.is_available() returns False, it indicates a problem. The most common cause is a mismatch between the PyTorch CUDA version you installed and the NVIDIA driver version on your system. Double-check your nvidia-smi output and reinstall the correct PyTorch package. The troubleshooting table in the Hugging Face article (LINK) can also be a helpful resource.
Conclusion
Congratulations! You have successfully configured your project environment for high-performance computing. This is a massive step forward and unlocks the ability to train complex models efficiently.
In this lesson, you have learned:
- The critical importance of GPU acceleration for deep learning.
- How to check your system's GPU and driver compatibility using
nvidia-smi. - The correct procedure for installing a GPU-enabled version of PyTorch using Conda.
- How to write a Python script to verify that PyTorch can successfully access your GPU.
With your environment now fully prepared and accelerated, we can move on to the building blocks of PyTorch. In the next lesson, you will learn about PyTorch Tensors, the fundamental data structure you'll use to represent all your data—from images to text embeddings—and perform computations on both the CPU and GPU.