Welcome to the first lesson of your personalized course for the Midday Meal Quality Monitoring project. Given your ambitious goals and the tight four-week timeline, our focus will be on practical, efficient steps to get you building and experimenting as quickly as possible. This initial lesson is foundational: we will set up a dedicated, isolated "workshop" for your project. This involves creating a virtual environment and installing the core libraries you'll need—PyTorch, Hugging Face, OpenCV, and GeoPandas.
A clean and reproducible environment is the cornerstone of any serious data science or software project. Your experience with tools like Docker has likely shown you the value of isolating dependencies to avoid conflicts and ensure your work can be replicated elsewhere. We will apply the same principle here using Conda, a powerful environment and package manager that is particularly well-suited for the complex dependencies in our tech stack.
Why We Need Virtual Environments
Before we dive into the setup, it's crucial to understand why we're taking this step. As you work on different projects, you'll find they often require different versions of the same library. Installing everything into your main system Python can quickly lead to version conflicts where upgrading a package for one project breaks another. Virtual environments solve this by creating isolated spaces for each project, each with its own set of libraries and dependencies.
To get a clear, visual understanding of this problem and how virtual environments solve it, please watch the following video from Luke Barousse.
Understanding Virtual Environments for Data Science / Data Analysis - P.4
This video provides an excellent explanation of why managing dependencies without virtual environments can cause problems and then demonstrates how to use Conda to create and manage isolated environments for different projects.
First, watch the section that illustrates the problem of package and version conflicts. This will solidify the motivation for using an environment. Next, watch the main segment explaining the solution with Conda. Pay close attention to the commands for creating (conda create), activating (conda activate), and installing packages within an environment.
Choosing and Installing Our Environment Manager: Miniforge
While standard Python offers venv, our project involves libraries like PyTorch and GeoPandas, which have complex dependencies beyond Python packages. Conda excels at managing these.
There are several ways to install Conda, but we will use Miniforge. It's a minimal installer that includes Python and Conda but avoids the pre-packaged bloat of the full Anaconda distribution. This reduces the chances of package conflicts down the line. It also defaults to using the conda-forge channel, a community-led repository that provides a vast and consistent collection of packages.
The following resource provides a compelling rationale for this choice and detailed, OS-specific installation instructions.
This guide explains why Miniforge is a strong choice for data science work and provides precise, step-by-step instructions to get it installed and configured correctly on your machine.
First, read the sections Why Miniforge? and An IMPORTANT Note on Pyenv to understand the benefits of this approach. Then, very carefully follow the step-by-step instructions in the Installation section that correspond to your operating system (macOS or Windows). Pay close attention to the final configuration steps, such as initializing conda for your shell, as these are critical for the setup to work correctly.
After completing the installation, close and reopen your terminal or Anaconda Prompt. You should see (base) at the beginning of your command prompt, indicating that Conda is active.
Creating Your Project Environment
With Miniforge installed, our next step is to create a dedicated environment for the Midday Meal project. We will name it midday-meal. This command creates a new, empty environment with a specific Python version.
In your terminal (or Anaconda Prompt on Windows), run the following command:
conda create -n midday-meal python=3.10
Conda will show you a list of packages to be installed and ask for confirmation. Type y and press Enter.
Once the environment is created, you need to "enter" it. This is called activating the environment:
conda activate midday-meal
Your command prompt should now change from (base) to (midday-meal), confirming that you are inside your new, isolated project environment. Any packages you install now will be confined to this space.
Installing the Core Libraries
Now that your environment is active, we can install the key libraries for your project. We'll do this in two steps to pull from the optimal channels.
- PyTorch (CPU Version): PyTorch is the deep learning framework we'll use to build our image and text models. For now, we will install the CPU-only version for simplicity. The official PyTorch website provides a configurator to generate the correct installation command. In the next lesson, we will replace this with a GPU-enabled version.

Run the following command, which comes directly from the PyTorch installation selector:
conda install pytorch torchvision torchaudio cpuonly -c pytorch
- Other Key Libraries: Next, we'll install the remaining libraries from the
conda-forgechannel.transformers: From Hugging Face, for using pretrained language models like BERT.opencv: A powerful library for computer vision tasks.geopandas: For working with geospatial data.
Run this command to install them all at once:
conda install -c conda-forge transformers opencv geopandas
This installation may take several minutes as Conda resolves and downloads all the necessary dependencies.
Verifying the Installation
After the installations are complete, it's good practice to verify that everything is in place. You can list all packages installed in the current environment with conda list.
To check for a specific package, you can pipe the output to grep (on macOS/Linux) or findstr (on Windows), or simply list the package name. For example, to verify GeoPandas is installed:
conda list geopandas
You should see an output similar to the one below, confirming the package name and its installed version.
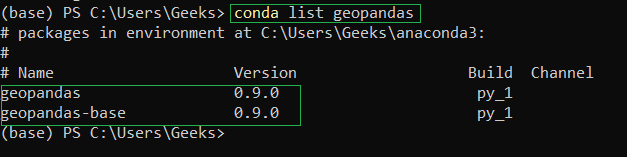
You can repeat this for pytorch, transformers, and opencv to ensure your environment is fully equipped.
Key Takeaways and Next Steps
In this lesson, you have successfully set up the entire software foundation for your project. The key steps were:
- Understanding the necessity of isolated virtual environments to manage dependencies.
- Installing Miniforge as a minimal and robust Conda distribution.
- Creating a dedicated Conda environment named
midday-meal. - Installing the core libraries for the project: PyTorch, Transformers, OpenCV, and GeoPandas.
You now have a clean, reproducible, and powerful environment ready for development.
In our next lesson, we will build upon this foundation by upgrading your PyTorch installation to support CUDA. This will allow you to leverage a GPU for significantly faster model training, a critical advantage given your project's timeline and computational demands.