Welcome back! In our previous lesson, we established the blueprint for building neural networks in PyTorch by subclassing torch.nn.Module. You now understand how to define the layers of a model in the __init__ method and orchestrate the flow of data in the forward pass.
This lesson addresses a crucial next step for your project: performance. Training the deep learning models you'll need for image and text analysis on a standard CPU would be prohibitively slow. To accelerate this process, we will leverage the parallel processing power of a Graphics Processing Unit (GPU). We will cover how to instruct PyTorch to move your data (tensors) and models between the CPU and GPU, a fundamental skill for any deep learning practitioner.
The Host-Device Architecture
Before diving into code, it's helpful to understand the underlying hardware architecture. In a typical machine set up for deep learning, the CPU (the "host") and the GPU (the "device") are distinct processors with their own dedicated memory. They communicate over a bus, like PCIe.
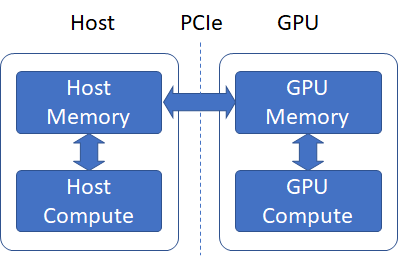
Because of this separation, any data or model parameters residing in the host's memory are not directly accessible to the device. To perform a computation on the GPU, you must first explicitly copy the necessary data from the CPU's RAM to the GPU's VRAM. This is a core concept in GPU programming and is managed seamlessly in PyTorch.
Setting the Device and Moving Tensors
To make your code flexible and runnable on machines with or without a GPU, the standard practice is to first check for GPU availability and define a device object. This allows you to write "device-agnostic" code that works in any environment.
The following video from the deeplizard channel provides a clear introduction to this concept.
PyTorch on the GPU - Training Neural Networks with CUDA
This video explains how to detect CUDA availability and demonstrates the critical rule that all tensors involved in an operation must be on the same device.
Please watch these two segments: First, watch how to detect if a CUDA-enabled GPU is available. This explains the motivation behind writing device-agnostic code. Next, watch the segment on tensor operations. It clearly shows the RuntimeError that occurs when you try to add two tensors that live on different devices (CPU and GPU).
As the video demonstrated, the essential steps are:
- Check if a CUDA-compatible GPU is available using
torch.cuda.is_available(). - Create a
torch.deviceobject that points to either"cuda"or"cpu". - Use the
.to(device)method to move a tensor to the specified device.
Here is the standard boilerplate code you will use at the beginning of your scripts:
import torch


# 1. Set the device
device = torch.device("cuda" if torch.cuda.is_available() else "cpu")
print(f"Using device: {device}")


# 2. Create a tensor (defaults to CPU)
x_cpu = torch.tensor([1, 2, 3])
print(f"Original tensor is on: {x_cpu.device}")


# 3. Move the tensor to the selected device
x_gpu = x_cpu.to(device)
print(f"Moved tensor is on: {x_gpu.device}")


# This would cause an error if the device is 'cuda':
# y = x_cpu + x_gpu
# RuntimeError: Expected all tensors to be on the same device...
The resource below provides a detailed textual walkthrough of these same concepts.
PyTorch in One Hour: From Tensors to Training Neural ...
This article by Sebastian Raschka offers a concise written guide to GPU computations in PyTorch.
Please read the section 9.1 PyTorch computations on GPU devices. Start from the introduction to the concept of a "device" and the .to() method. Pay close attention to the code block showing the RuntimeError when tensors are on different devices.

Moving Models to the GPU
Just like tensors, your neural network models must be moved to the target device. When you call model.to(device), PyTorch iterates through all the parameters (i.e., the weight and bias tensors of each layer) within the model and moves them to the specified device.
PyTorch on the GPU - Training Neural Networks with CUDA
The same video from deeplizard has an excellent explanation of what it means to move a network to a device.
Watch the segment from "what does it even mean to move a network". This will clarify that moving a model is fundamentally about moving its underlying parameter tensors, and that the model and its input data must reside on the same device.
Let's apply this to the SimpleNet class from our last lesson. The process is straightforward:
# Assume SimpleNet class is defined as in the previous lesson
# Assume 'device' is already defined


# 1. Instantiate the model (its parameters are on the CPU by default)
model = SimpleNet()
print(f"Model parameters are on: {next(model.parameters()).device}")


# 2. Move the entire model to the selected device
model.to(device)
print(f"Model parameters are now on: {next(model.parameters()).device}")


# 3. Create some dummy input data and move it to the device
input_tensor = torch.randn(1, 784).to(device)


# 4. Perform the forward pass on the GPU
output = model(input_tensor)
print(f"Output tensor is on: {output.device}")
Notice that the output of a model will be on the same device as the model's parameters and its input.
Updating the Training Loop for GPU Acceleration
Now we can combine these ideas to create a GPU-accelerated training loop. The strategy is simple but crucial:
- Move the model to the GPU once, before the training loop begins.
- Inside the training loop, for each batch of data you process, move that batch's features and labels to the GPU.
Moving data in batches (rather than the entire dataset at once) is essential for managing the GPU's memory, which is often more limited than the main system RAM.
The following resources demonstrate how to modify a standard training loop for GPU execution.
PyTorch in One Hour: From Tensors to Training Neural ...
This part of the Raschka article shows the exact, minimal changes needed to adapt a CPU training loop for the GPU.
Focus on the section 9.2 Single-GPU training. The code block here is the most important part. Compare it to a CPU-only loop and identify the three new lines: defining the device, moving the model with .to(device), and moving the features and labels inside the loop. Also, take note of the best practice recommendation for defining the device.
Here is another concise video demonstration of the same process.
Build Your First Pytorch Model In Minutes! [Tutorial + Code]
This clip from Rob Mulla's tutorial provides a quick, practical demonstration of adapting a training loop.
Watch from "modify this Loop". He defines the device, moves the model, and then moves the images and labels tensors inside the loop, summarizing the entire workflow we've discussed.
Conclusion
You now have the tools to harness your GPU for the heavy lifting required by your project. By ensuring your model and data are on the same device, you can dramatically speed up the training process for the CNNs and BERT models you'll be building.
Here are the key takeaways from this lesson:
- The CPU (host) and GPU (device) have separate memory, requiring explicit data transfer.
- The standard practice is to define a
deviceobject usingtorch.device("cuda" if torch.cuda.is_available() else "cpu")to make your code portable. - The
.to(device)method is used to move both tensors and entire models to the desired device. - For an efficient training loop, you move the model to the device once at the beginning, and you move each batch of data to the device within the loop's iterations.
In the next lesson, we will formalize the process of preparing and loading data. You'll learn how to use PyTorch's Dataset and DataLoader classes to create an efficient, batched data loading pipeline. This pipeline will be the source of the data batches that you now know how to move to the GPU for training.