Hello! In our last lesson, we demystified the inner workings of Convolutional Neural Networks (CNNs), exploring how components like convolutional layers, filters, and pooling layers work together to extract features from images. You now have the conceptual blueprint for the image-classifier you need to build.
Today, we'll bridge that theory with practice. Instead of building and training a massive CNN from scratch—a process that requires vast amounts of data and computational power—we will use a powerful and efficient technique called transfer learning. This lesson will guide you through loading a state-of-the-art, pretrained CNN from torchvision and adapting it to classify your meal quality images. This is a cornerstone skill for practical computer vision and will be the foundation of your first baseline model.
1. The Core Idea: Transfer Learning
Training a deep neural network from random initialization is like asking a newborn to perform calculus; it needs to learn everything from the most basic concepts upwards. For a CNN, this means learning to detect primitive features like edges and colors in the early layers, then combining them into textures, patterns, and eventually object parts in deeper layers. This process requires a massive dataset, like ImageNet with its 1.2 million labeled images.
Transfer learning allows us to shortcut this process. We can take a model that has already been trained on a large dataset and leverage its learned knowledge for our own, often smaller, dataset.
The intuition is that the feature-detection capabilities a model learns on general images (e.g., identifying edges, textures, shapes) are also useful for more specific tasks, like identifying food items in your meal photos. We reuse these learned feature extraction layers and only train a new, small classification part of the model that is specific to our task.
The video by Patrick Loeber provides a concise and clear introduction to this concept.
PyTorch Tutorial 15 - Transfer Learning
This video explains the "what" and "why" of transfer learning, setting the stage for our practical implementation.
Watch the introductory segment from the beginning. The speaker gives a great analogy and explains how a pretrained CNN can be adapted by modifying only its final layer.
The key benefits of this approach for your project are:
- Reduced Training Time: You don't need to train the entire network, which saves significant time.
- Improved Performance: The model starts with a strong foundation of learned features, leading to better results, especially with your limited annotated dataset.
- Lower Data Requirement: You can achieve good performance with a much smaller dataset than would be needed to train a model from scratch.
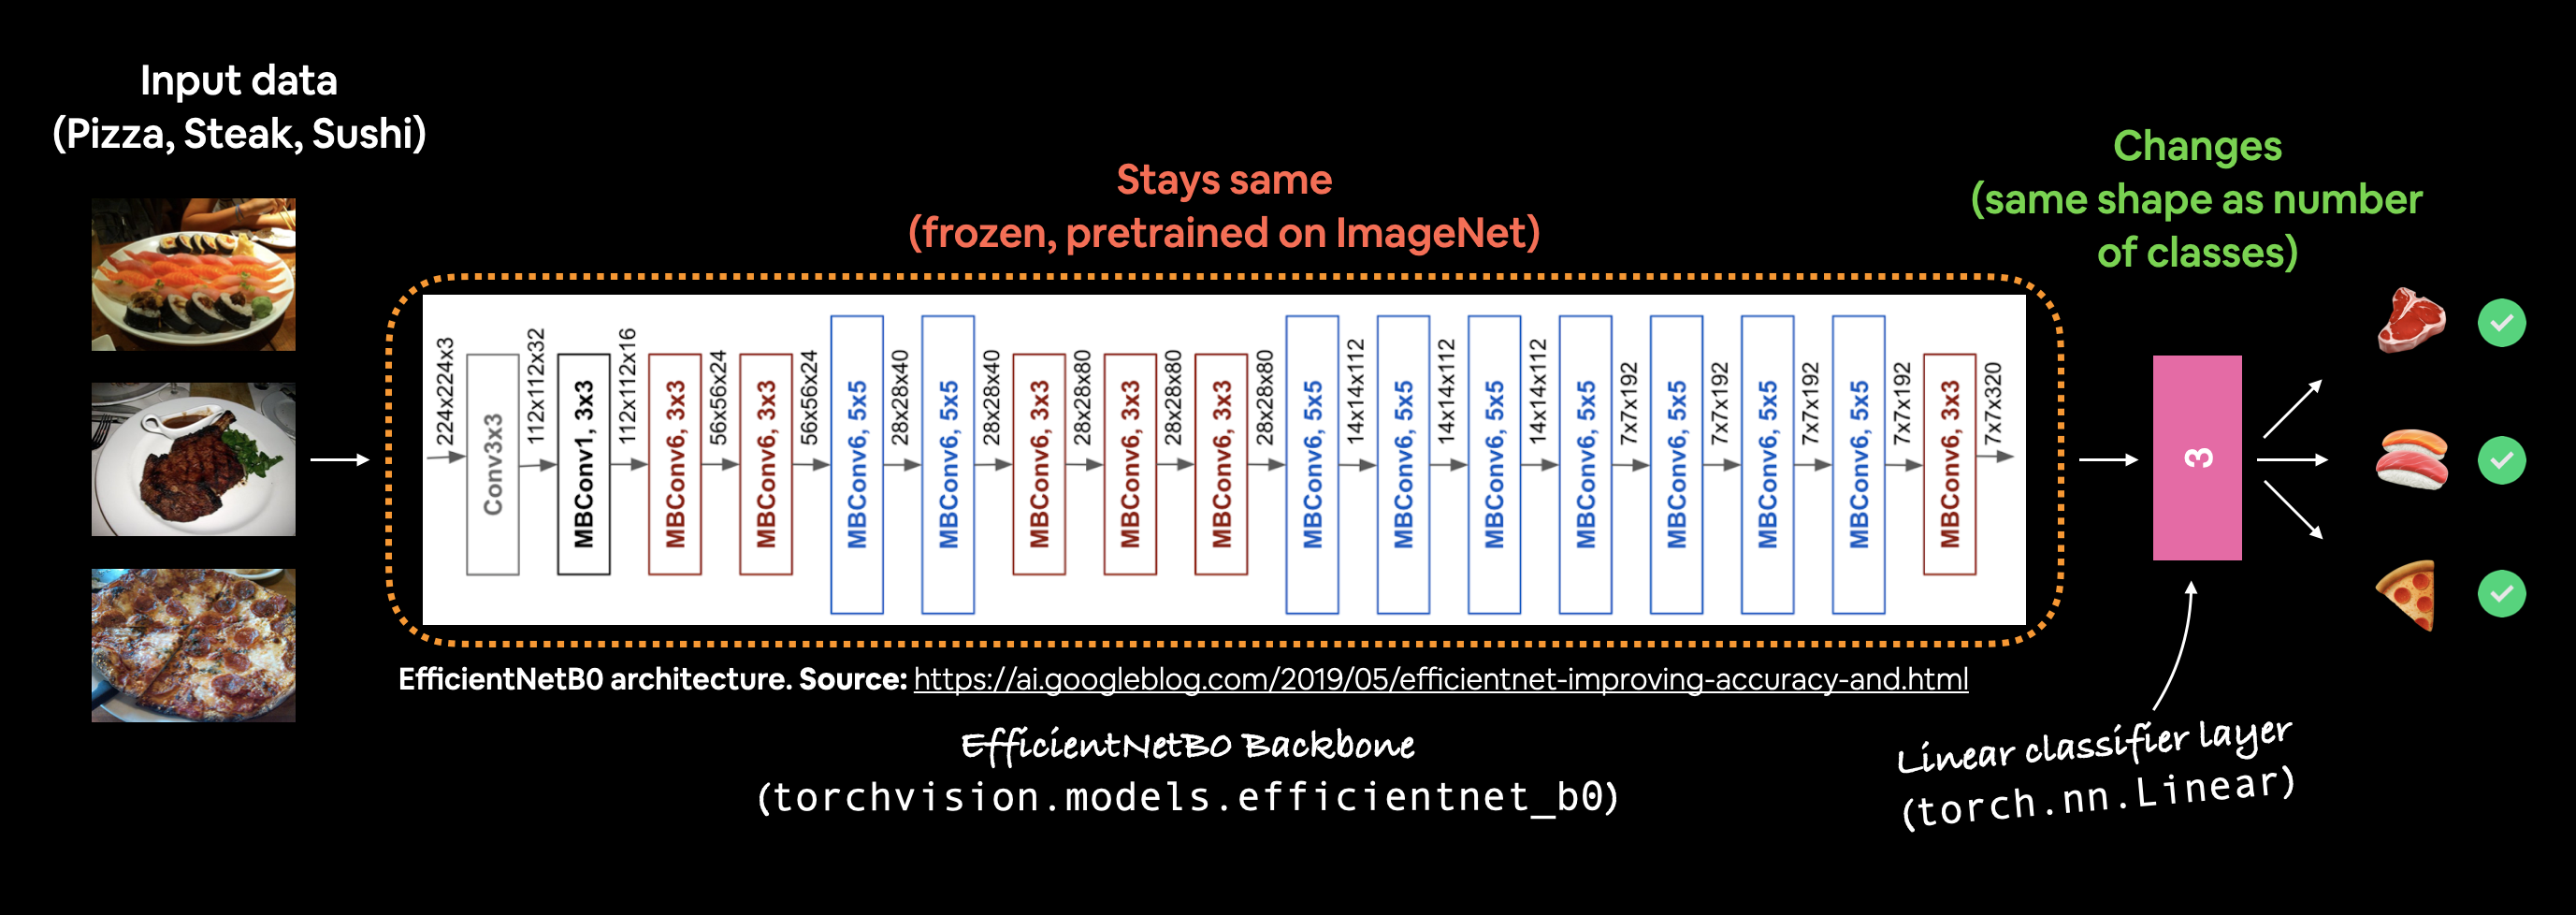
This is visually represented by reusing a pretrained model's core architecture and swapping out the final layers for a custom task.

2. Implementing Transfer Learning in PyTorch
PyTorch, through its torchvision library, makes transfer learning incredibly straightforward. torchvision.models provides easy access to dozens of pretrained models like ResNet, VGG, and EfficientNet. For this project, we'll use ResNet-50, a popular and powerful CNN architecture.
There are two main strategies for transfer learning:
- Feature Extraction: We "freeze" the weights of the entire pretrained model except for the final classification layer. We then train only this new layer. This is the fastest approach and works well when your new dataset is small.
- Fine-Tuning: We replace the final layer and then continue training ("fine-tuning") the weights of the entire model, or a portion of it, using a very low learning rate. This can lead to better results if you have a larger dataset.
For your baseline model, we will focus on the feature extraction strategy, as it's the most direct path to a working model.
3. Step-by-Step: Adapting a Pretrained ResNet-50
Let's walk through the code needed to prepare our model.
Step 1: Load the Pretrained Model
First, we load the ResNet-50 model with weights pretrained on the ImageNet dataset. torchvision.models makes this a one-line command.
import torch
import torch.nn as nn
import torchvision.models as models


# Use the recommended 'weights' parameter for modern PyTorch
weights = models.ResNet50_Weights.IMAGENET1K_V1
model = models.resnet50(weights=weights)


# You might also see the older 'pretrained=True', which still works
# model = models.resnet50(pretrained=True)
This model object now contains the full ResNet-50 architecture with all its learned weights. If you were to print model, you would see a long list of its layers. The final layer is what we're interested in:
...
(avgpool): AdaptiveAvgPool2d(output_size=(1, 1))
(fc): Linear(in_features=2048, out_features=1000, bias=True)
)
The final layer, named fc (fully connected), is a linear layer that takes 2048 input features from the preceding convolutional layers and outputs 1000 values, corresponding to the 1000 classes in ImageNet. Our task is different; we need to classify meals into categories like Good, Adequate, and Poor. Let's assume you have 3 classes.
Step 2: Freeze the Convolutional Base
Next, we'll implement the feature extraction strategy by "freezing" the parameters of all the existing layers. We do this by iterating through the model's parameters and setting their requires_grad attribute to False. This tells PyTorch not to compute gradients for these parameters during backpropagation, meaning they won't be updated during training.
# Freeze all the parameters in the network
for param in model.parameters():
    param.requires_grad = False
Step 3: Replace the Classifier Head
Now, we replace the original classifier with a new one suited for our task. The new layer will have requires_grad=True by default, so it will be trainable.
# Get the number of input features for the classifier
num_ftrs = model.fc.in_features


# Define the number of classes for your project
# (e.g., 'Good', 'Adequate', 'Poor')
num_classes = 3


# Create a new, unfrozen final layer and attach it to the model
model.fc = nn.Linear(num_ftrs, num_classes)


# Move the model to the GPU if available
device = torch.device("cuda" if torch.cuda.is_available() else "cpu")
model = model.to(device)
That's it! The model is now ready. The convolutional base will act as a fixed feature extractor, and only the weights of the final model.fc layer will be learned during training. This is a very efficient way to build your baseline.
The official PyTorch transfer learning tutorial provides an excellent guide that covers these steps.
Transfer Learning for Computer Vision Tutorial
This official PyTorch tutorial is the definitive guide for this topic. It demonstrates both finetuning and feature extraction strategies.
First, read the section on Finetuning the ConvNet. This shows how to load ResNet-18 and replace its final fc layer. Then, read the next section, ConvNet as fixed feature extractor, which shows the crucial step of freezing the network parameters by setting requires_grad = False. This second strategy is exactly what we are implementing for our baseline.
The following diagram illustrates our "feature extraction" strategy using a different model, but the principle is identical: the pretrained backbone is frozen, and a new, trainable linear layer is added for our specific classification task.
The video from "Code with Aarohi" also provides a great hands-on walkthrough of this entire process, from loading the data to freezing the layers and preparing the model for training.
L-5 | Image Classification Using ResNet-18 and Pytorch
This video provides a practical, code-focused demonstration of using a pretrained ResNet-18 for a custom image classification task.
Focus on the segment where the presenter loads the pretrained ResNet model. Pay close attention to how they freeze all layers except the final fully connected (fc) layer, and then modify that layer for their custom number of classes. This is a clear, practical example of the code we've just discussed.
Conclusion
In this lesson, you have learned how to leverage transfer learning, a fundamental technique in modern deep learning, to prepare a powerful image classification model for your project with minimal effort. You now know how to take a state-of-the-art model, pretrained on millions of images, and quickly adapt it for your specific task of meal quality analysis.
Here are your key takeaways:
- Transfer learning saves time and improves performance by reusing a model trained on a large, general dataset.
- The feature extraction strategy involves freezing the pretrained layers and training only a new, custom classifier head.
- In PyTorch, this involves loading a model from
torchvision.models, settingparam.requires_grad = Falsefor all existing parameters, and replacing the final layer (e.g.,model.fc) with a newnn.Linearlayer that matches your number of classes.
You have now built the architecture for your first baseline model. In our next lesson, you will put this model to work. We will fine-tune this pretrained CNN on your annotated meal images, implement the full training loop, handle potential class imbalance, and finally evaluate its performance.