Welcome back! In our previous lesson, you built a custom PyTorch Dataset and DataLoader, creating an efficient pipeline to load and preprocess your annotated meal images. With your data pipeline ready, we can now turn our attention to the model that will learn from this data. This lesson marks the beginning of your first baseline model: an image-only meal quality classifier.
We'll start by exploring the fundamental architecture for this task: the Convolutional Neural Network (CNN). Your project requires you to build a CNN for meal quality, so a solid conceptual understanding of its components is essential before you start coding. This lesson will explain the roles of convolutional layers, pooling layers, and feature maps. We'll focus on the intuition behind why CNNs are so effective for image tasks, which will provide the foundation for the hands-on implementation in our next session.
1. Why Not a Standard Neural Network?
Given your background in AI, you're likely familiar with standard fully-connected neural networks (also called Artificial Neural Networks, ANNs, or Multi-Layer Perceptrons, MLPs). In an MLP, every neuron in one layer is connected to every neuron in the next. While powerful, this architecture has two major drawbacks when applied to images:
- Computational Cost: A modest 224x224 pixel color image has input values. If the first hidden layer had 1000 neurons, you'd already have over 150 million weights (parameters) just for that one connection. This is computationally explosive and prone to overfitting.
- Loss of Spatial Information: To feed an image to an MLP, you must first "flatten" the 2D grid of pixels into a 1D vector. This process destroys the spatial relationships between pixels. The fact that a pixel is above or next to another is crucial information for understanding an image, but an MLP loses this context entirely.
The codebasics YouTube channel provides a great, simple explanation of these limitations and introduces why a new approach is needed.
Simple explanation of convolutional neural network | Deep Learning Tutorial 23 (Tensorflow & Python)
This video introduces the problems with using traditional ANNs for image recognition and sets the stage for CNNs.
Watch the first part of the video, which covers the disadvantages of ANNs for image tasks. Pay attention to the arguments about computational cost and the inability to handle shifted objects.
CNNs were specifically designed to overcome these issues by preserving spatial structure and efficiently learning from images.
2. The Core Components of a CNN
A CNN processes an image not as a flat vector, but as a 3D volume of pixels (width, height, and color channels). It uses specialized layers to build a hierarchy of features, starting with simple patterns and combining them into more complex concepts.

The three core building blocks of the feature extraction stage are convolutional layers, feature maps, and pooling layers. Let's break each one down.
2.1. Convolutional Layers and Filters
The heart of a CNN is the convolutional layer. Instead of connecting every input pixel to every neuron, this layer uses small, learnable filters (also called kernels) that slide across the image to detect specific features.
Think of a filter as a tiny magnifying glass trained to find one thing, like a vertical edge, a patch of a certain color, or a specific texture.
- How it works: The filter, which is a small matrix of weights, is placed over a patch of the input image. An element-wise multiplication between the filter's weights and the image pixel values is performed, and the results are summed up to produce a single number. This operation is a dot product.
- Feature Detection: If the pattern in the image patch closely matches the pattern the filter is looking for, the output value will be high. If it doesn't match, the value will be low.
- Learning: Crucially, the weights in these filters are not manually designed. They are the parameters that the network learns during training. Through backpropagation, the CNN automatically figures out which features (edges, corners, curves, etc.) are important for the classification task.
The following video and article explain this convolution operation with clear visualizations and numerical examples.
Simple explanation of convolutional neural network | Deep Learning Tutorial 23 (Tensorflow & Python)
This video continues by explaining the concept of filters and the convolution operation.
Watch the segment explaining filters and convolution, where the presenter shows how a filter slides over a digit to create a feature map. Then, skip to the end to understand the most important point: that these filters are learned automatically during training.
The Secret to Understanding CNNs: Convolution, Feature Maps ...
This article provides a very clear, step-by-step numerical example of the convolution operation.
Read section "1. Convolution — Detecting Features". Focus on the explanation of what a kernel is and follow the numerical example showing the element-wise multiplication and sum.
2.2. Feature Maps
When a single filter slides over the entire input image, it produces a 2D grid of output values. This output grid is called a feature map or activation map.
A feature map is essentially a map of where the filter's target feature was detected in the original image. High values in the feature map indicate a strong presence of that feature.
A single convolutional layer doesn't just use one filter; it uses many (e.g., 32, 64, or more). Each filter learns to detect a different feature, and each one produces its own unique feature map. The output of a convolutional layer is therefore a stack of these feature maps—a 3D volume that represents many different learned features.
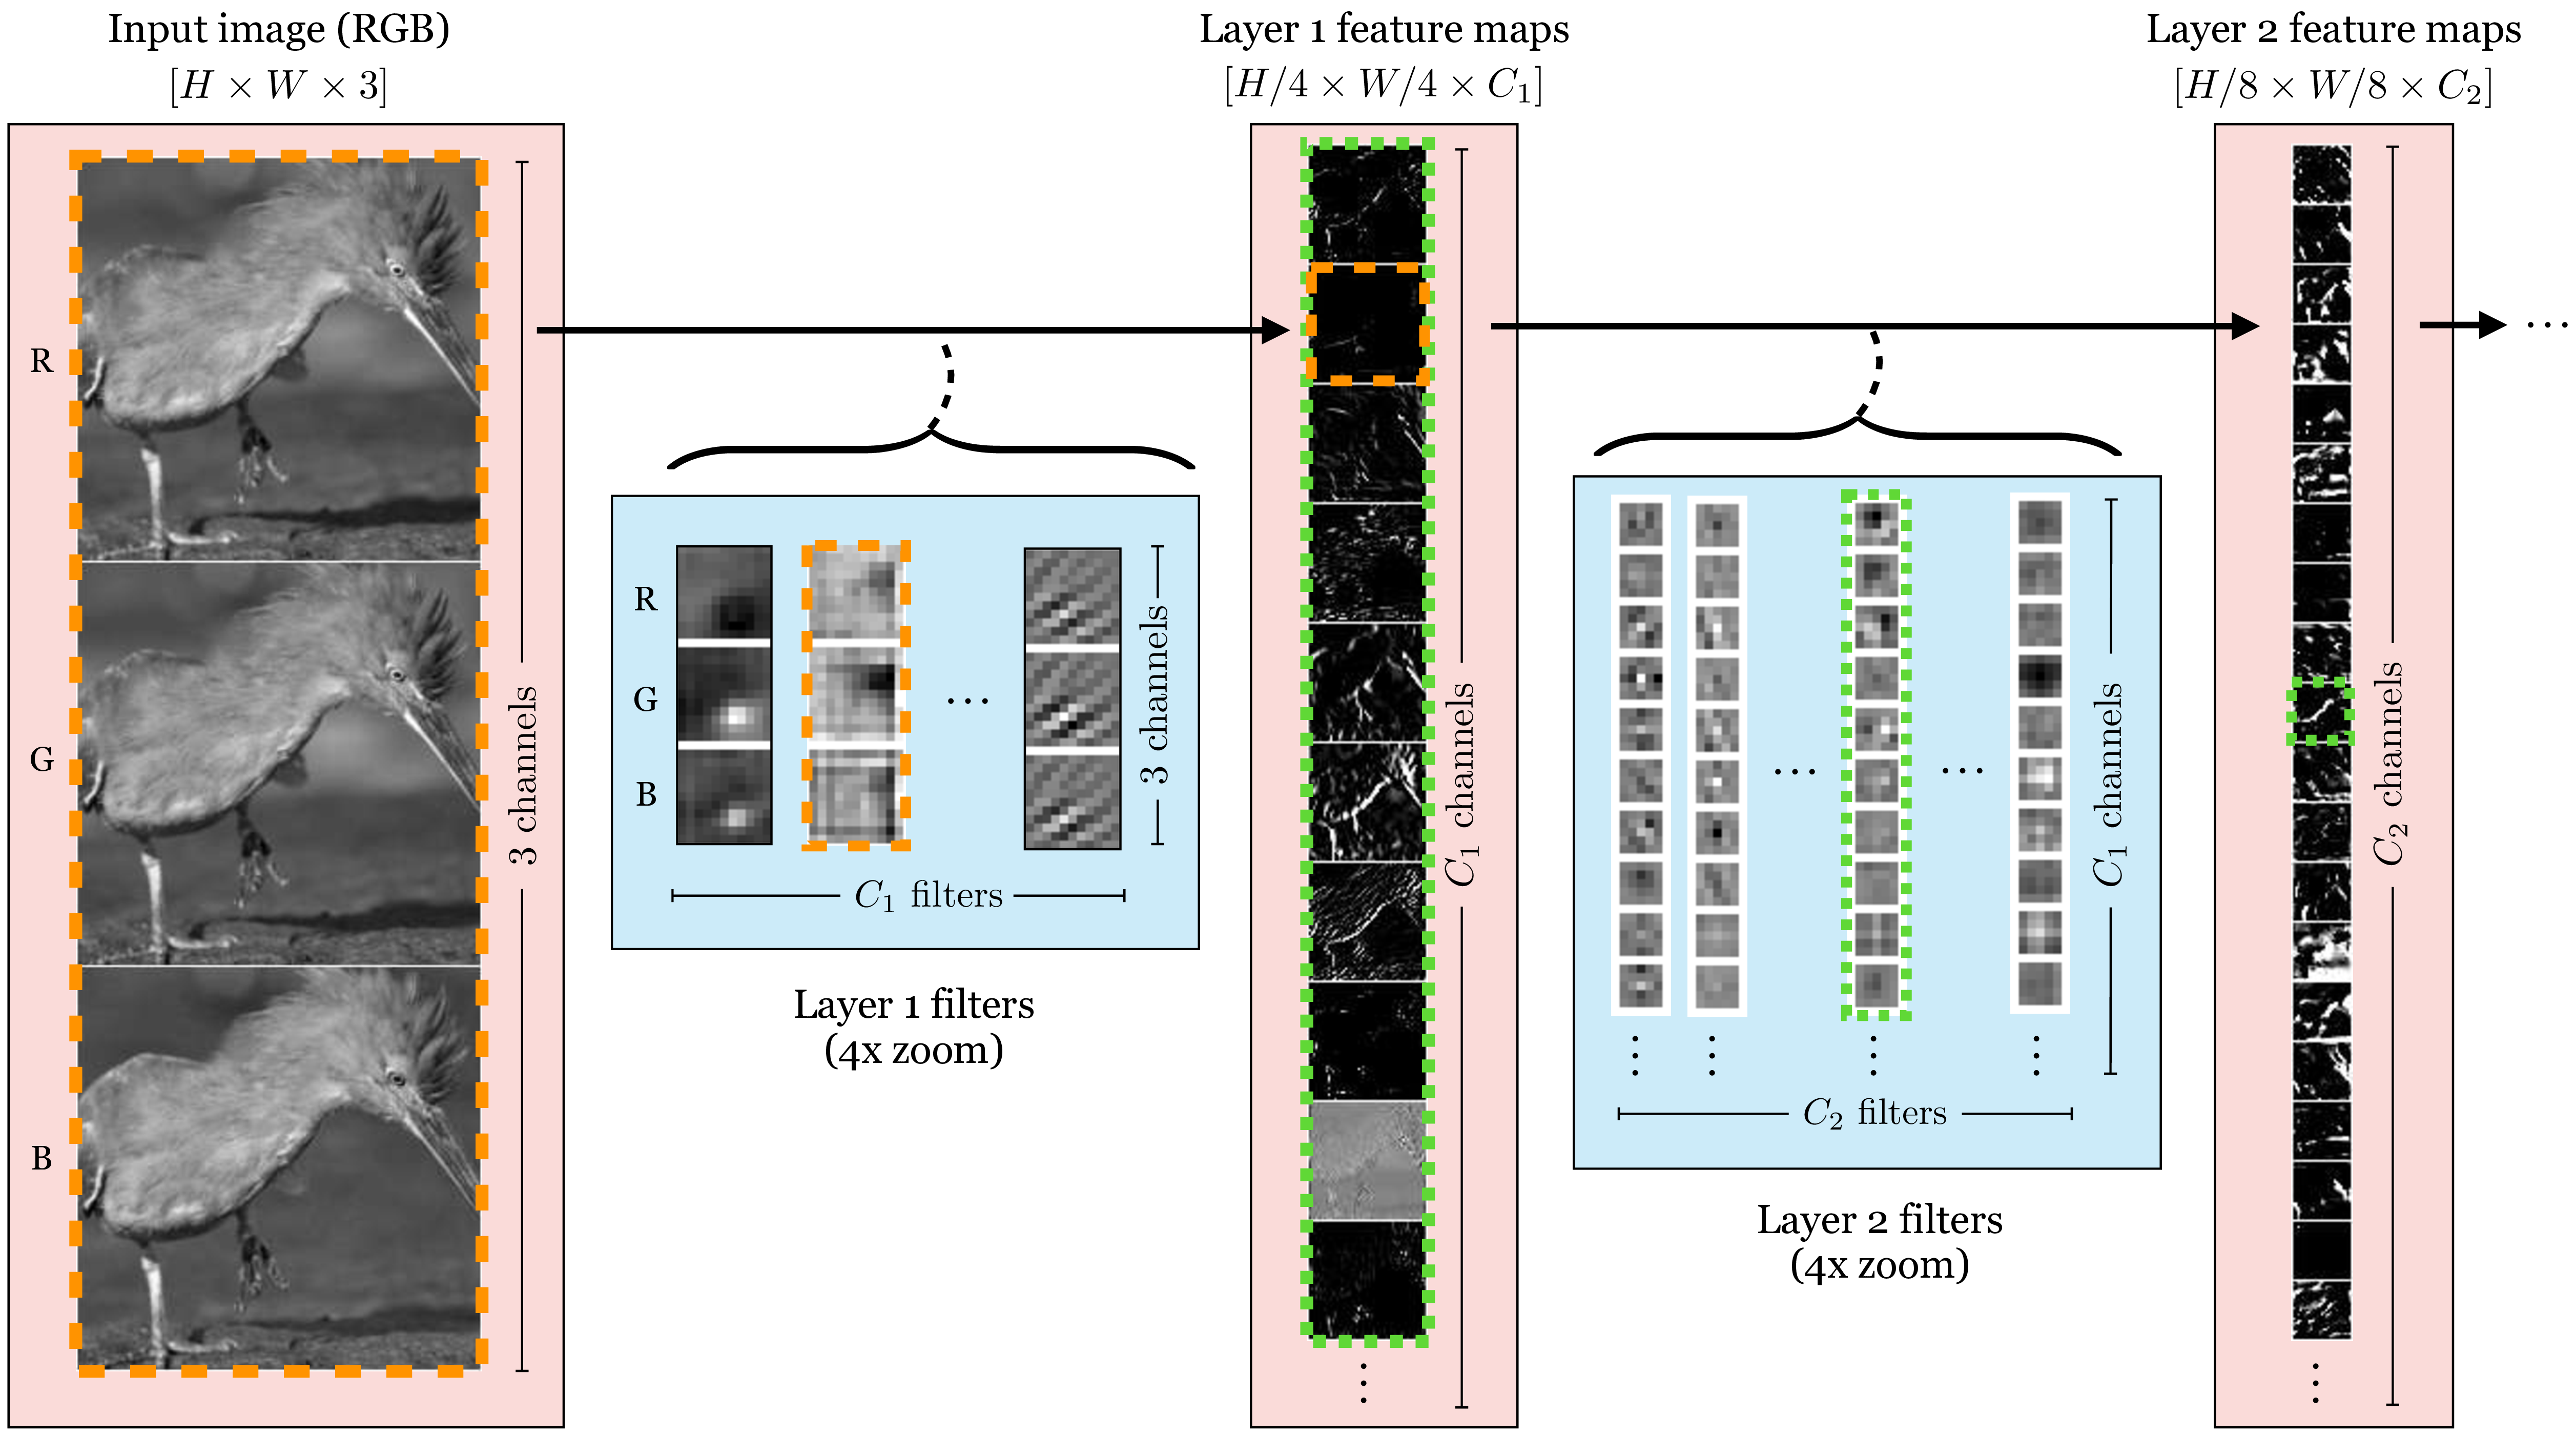
The Futurology video provides a great visualization of how these filters and feature maps work together.
Convolutional Neural Networks Explained (CNN Visualized)
This video offers a highly visual explanation of kernels as feature detectors and how they produce feature maps.
Watch the segment on the convolutional layer. It clearly shows how different kernels are designed to detect different patterns (like edges) and how a single layer can have multiple kernels, each producing its own feature map.
2.3. Pooling Layers
After a convolutional layer extracts features, it's common to use a pooling layer. The primary purpose of pooling is to progressively reduce the spatial size (width and height) of the feature maps.
This downsampling serves three important purposes:
- Reduces Computation: Smaller feature maps mean fewer parameters and computations in subsequent layers.
- Prevents Overfitting: By summarizing feature information, it makes the model more robust and less likely to memorize noise in the training data.
- Provides Translation Invariance: It makes the network tolerant to small shifts and distortions in the location of features. For example, whether a piece of roti is in the top-left or top-center of the plate shouldn't change the model's classification. Pooling helps achieve this by summarizing a region of features into a single value.
The most common type of pooling is Max Pooling. It works by sliding a small window over the feature map and taking only the maximum value from each window. This effectively keeps the most "activated" feature response from that region and discards the rest.
The Secret to Understanding CNNs: Convolution, Feature Maps ...
This article provides a simple and effective numerical example of Max Pooling.
Read section "3. Pooling" and carefully follow the step-by-step example of Max Pooling. Notice how a 4x4 feature map is reduced to a 2x2 map.
The video from codebasics also provides a helpful animated explanation of pooling and its benefits.
Simple explanation of convolutional neural network | Deep Learning Tutorial 23 (Tensorflow & Python)
This section of the video explains the "why" and "how" of pooling layers.
Watch the part explaining pooling. It clearly demonstrates max pooling and explains how it helps with position invariance.
Conclusion
In this lesson, you've learned the conceptual foundations of Convolutional Neural Networks, the engine behind your first baseline model. You are now equipped with the "what" and "why" of the key components that make CNNs so powerful for image analysis.
Here are the key takeaways:
- Convolutional Layers use learnable filters (kernels) to slide across an image and detect specific features like edges, corners, and textures.
- Feature Maps are the outputs of this process, indicating where in the image each specific feature was found. A convolutional layer produces a stack of these maps.
- Pooling Layers (most commonly Max Pooling) downsample the feature maps to reduce computational complexity and make the model more robust to variations in feature location.
- Together, these layers form the feature extraction part of a CNN, creating a rich, hierarchical representation of the input image before passing it to a standard fully-connected network for final classification.
Now that you understand the theory, you're ready for the practical application. In the next lesson, you will load a pretrained CNN (ResNet-50) using torchvision and adapt its final layer for your specific meal quality classification task. This technique, known as transfer learning, will allow you to leverage a model already trained on millions of images and fine-tune it for your project, saving immense time and computational resources.