Hello again! In our last session, you successfully created an annotation tool and generated your first labeled dataset, annotations.json. This file is the ground truth for your image classification task, capturing your initial assessments of meal quality and quantity.
In this lesson, we will build the crucial bridge between your annotated data on disk and the PyTorch models you'll soon be training. You will learn how to create a custom torch.utils.data.Dataset class. This is a standard and powerful practice in PyTorch for handling any dataset that doesn't come pre-packaged. It allows for efficient, on-the-fly data loading and preprocessing, ensuring your model training pipeline is both clean and performant. Your strong background in object-oriented programming will be a great asset here, as the concepts of inheritance and implementing required methods are central to this process.
1. The Anatomy of a Custom PyTorch Dataset
At its core, a PyTorch Dataset is a Python class that provides a standardized way to access your data. To create a custom one, you must inherit from the base class torch.utils.data.Dataset and implement three special methods, often called "dunder" (double underscore) methods.
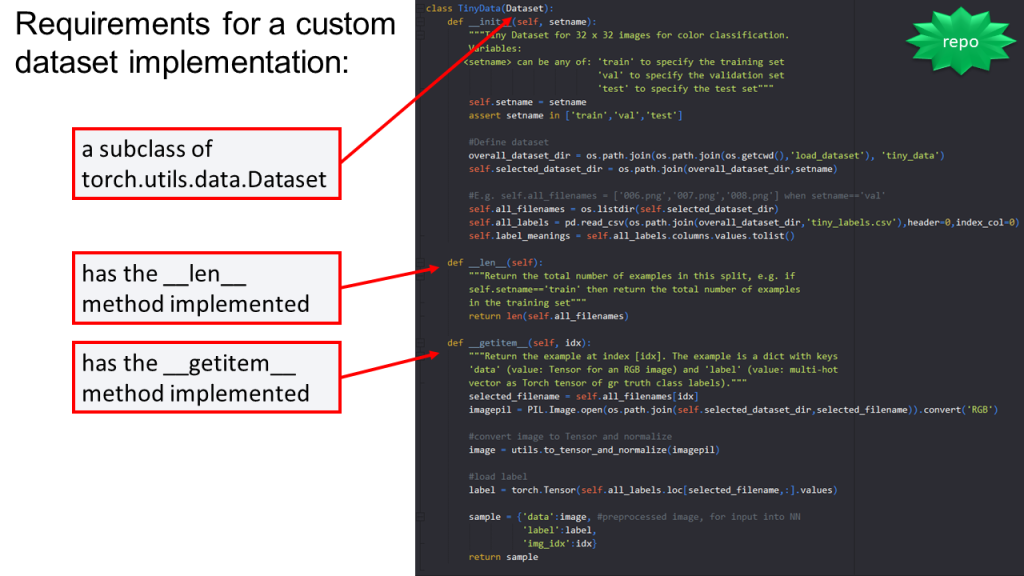
These three required components are:
- Inheritance: Your class must be a subclass of
torch.utils.data.Dataset. __init__(self, ...): This is the constructor. It runs only once when you create an instance of your dataset. Its job is to perform one-time setup tasks, like loading yourannotations.jsonfile and identifying the list of all image files you'll be working with.__len__(self): This method must return the total number of samples in the dataset. PyTorch uses this to know how many items there are in total.__getitem__(self, idx): This is the workhorse method. Given an indexidx(from 0 tolen(dataset)-1), it must locate, load, preprocess, and return the single data sample at that position. PyTorch calls this method whenever it needs to fetch an item.
The official PyTorch documentation provides a clear and concise overview of this structure.
This official tutorial provides the canonical explanation for building a custom Dataset class. It breaks down the role of each required method.
Please read the following sections: Start with the introduction to "Creating a Custom Dataset for your files". Then, review the explanations for the three methods: __init__, __len__, and __getitem__. Focus on understanding the distinct responsibility of each one. The example uses a CSV for labels, but the principle is identical for our JSON file.
2. Building Your MidDayMealDataset
Now, let's apply these principles to create a Dataset for your project. We'll call it MidDayMealDataset. It will read the annotations.json file you created, load the corresponding meal images, and prepare them for training.
Since your background is strong in Python, we'll build this class step-by-step.
Step 1: The __init__ Method
The constructor will initialize everything we need. It will take the path to your annotations file, the directory containing the images, and an optional transform pipeline (which we'll discuss next).
import json
import os
from PIL import Image
import torch
from torch.utils.data import Dataset

class MidDayMealDataset(Dataset):
    def __init__(self, annotations_file, img_dir, transform=None):
        """
        Args:
            annotations_file (string): Path to the json file with annotations.
            img_dir (string): Directory with all the images.
            transform (callable, optional): Optional transform to be applied on a sample.
        """


        # Load the annotations from the JSON file
        with open(annotations_file, 'r') as f:
            self.annotations = json.load(f)


        # We only want to use the images that have been annotated
        self.image_files = list(self.annotations.keys())

        self.img_dir = img_dir
        self.transform = transform


        # Create mappings from string labels to integer indices
        self.quality_map = {"Good": 0, "Adequate": 1, "Poor": 2}
        self.quantity_map = {"Full": 0, "Half": 1, "Quarter": 2}
In this constructor, we load the JSON data, create a list of image filenames from the keys of the annotations dictionary, and set up mappings to convert our text labels ("Good", "Full", etc.) into numbers, which is what a neural network requires.
Step 2: The __len__ Method
This is the simplest method. It just returns the total number of annotated images.
    def __len__(self):
        return len(self.image_files)
Step 3: The __getitem__ Method
This method contains the core logic for loading a single data point. Given an index idx, it performs the following:
- Gets the image filename from our list.
- Constructs the full path to the image.
- Loads the image from disk using the Pillow library (
PIL). - Retrieves the corresponding
qualityandquantitylabels from our annotations. - Converts these string labels to integer labels using the maps we defined in
__init__. - Applies the image transformations (e.g., resizing, converting to a tensor).
- Returns the processed image and its labels.
    def __getitem__(self, idx):


        # Get the image filename for the given index
        img_name = self.image_files[idx]
        img_path = os.path.join(self.img_dir, img_name)


        # Load the image and convert to RGB
        image = Image.open(img_path).convert("RGB")


        # Get the labels for this image
        labels_dict = self.annotations[img_name]
        quality_str = labels_dict['quality']
        quantity_str = labels_dict['quantity']


        # Convert string labels to integer indices
        quality_label = self.quality_map[quality_str]
        quantity_label = self.quantity_map[quantity_str]


        # Create a dictionary for the labels
        labels = {
            'quality': torch.tensor(quality_label, dtype=torch.long),
            'quantity': torch.tensor(quantity_label, dtype=torch.long)
        }


        # Apply transforms if they exist
        if self.transform:
            image = self.transform(image)

        return image, labels
Returning labels as a dictionary is a flexible approach, especially for multi-label or multi-task problems like yours. It makes the training loop code more readable, as you can access labels by name (e.g., labels['quality']).
3. Applying Image Transformations
Raw images are not suitable for a neural network. They need to be resized to a consistent shape, converted into PyTorch tensors, and normalized. The torchvision.transforms module provides all the tools for this. We can chain these operations together using transforms.Compose.
The following tutorial provides excellent examples of creating and composing transforms.
Writing Custom Datasets, DataLoaders and Transforms
This tutorial expands on the basic Dataset by showing how to create and compose multiple transformations.
Focus on these two key ideas: Compose transforms: Read the section on composing transforms to see how transforms.Compose is used to create a pipeline of preprocessing steps. Iterating through the dataset: Skim the final section, "Iterating through the dataset", to see how the dataset instance is created with the composed transform.
Here is a typical transformation pipeline for an image classification model:
from torchvision import transforms


# Define a standard transformation pipeline for training
data_transform = transforms.Compose([
    transforms.Resize((224, 224)),  # Resize images to 224x224 pixels
    transforms.ToTensor(),          # Convert image to a PyTorch tensor


    # Normalize with mean and std dev of ImageNet, a common practice
    transforms.Normalize(mean=[0.485, 0.456, 0.406],
                         std=[0.229, 0.224, 0.225])
])
4. Testing Your Dataset and DataLoader
With the class and transforms defined, you can now instantiate your Dataset.
# --- Assuming your files are in these locations ---
ANNOTATIONS_PATH = "annotations.json"
IMAGE_DIRECTORY = "data/images/"


# Create an instance of your custom dataset
meal_dataset = MidDayMealDataset(
    annotations_file=ANNOTATIONS_PATH,
    img_dir=IMAGE_DIRECTORY,
    transform=data_transform
)


# Test it out!
print(f"Dataset size: {len(meal_dataset)}")


# Get the first sample
image, labels = meal_dataset[0]
print("\nFirst sample:")
print(f"Image tensor shape: {image.shape}")
print(f"Labels: {labels}")
This confirms that your Dataset can correctly load and process a single item. However, for training, we need to feed data to the model in batches, shuffle it at each epoch to prevent overfitting, and potentially use multiple CPU cores to load it in parallel. This is where DataLoader comes in. It's a wrapper around your Dataset that handles all this complexity for you.
from torch.utils.data import DataLoader


# Create a DataLoader
# batch_size=4 means it will group 4 samples together
# shuffle=True is important for training to randomize the data order
train_dataloader = DataLoader(meal_dataset, batch_size=4, shuffle=True)


# Get one batch of data
images, labels = next(iter(train_dataloader))

print("\nFirst batch from DataLoader:")
print(f"Images batch shape: {images.shape}") # [batch_size, channels, height, width]
print(f"Quality labels batch: {labels['quality']}")
print(f"Quantity labels batch: {labels['quantity']}")
If this code runs without errors and prints the shapes and labels, your data loading pipeline is complete!
For another excellent walkthrough of this entire process, the following video provides a practical, code-along demonstration.
How to build custom Datasets for Images in Pytorch
This video from Aladdin Persson offers a very clear and practical guide to building a custom image dataset in PyTorch, covering the same concepts we've discussed.
Watching these sections will reinforce your understanding of the end-to-end process: Class Definition: Watch how the custom Dataset class is defined, including the init method. Core Methods: See the implementation of the len and getitem methods, where the image and label are loaded and returned. Instantiation and DataLoader: Observe how the Dataset is instantiated with a transform and then wrapped in a DataLoader for batching.
Conclusion
In this lesson, you have constructed a vital component of your machine learning project: a custom PyTorch Dataset. This class provides a clean, modular, and efficient interface to your annotated image data, preparing it perfectly for model training.
Here are the key takeaways:
- A custom
Datasetmust inherit fromtorch.utils.data.Datasetand implement__init__,__len__, and__getitem__. - The
__init__method handles one-time setup, while__getitem__is responsible for loading and returning a single indexed sample. - String labels must be encoded into numerical format (e.g., integers) for the model to process.
torchvision.transforms.Composeis used to build a pipeline of preprocessing steps, such as resizing and normalization.DataLoaderwraps aDatasetto provide efficient batching, shuffling, and parallel data loading, which are essential for training.
You have now completed the "Image Data Preparation & Annotation Strategy" module. With a robust data pipeline in place, you are fully prepared to move on to the exciting next step. In the next lesson, we will begin Module 4 by diving into Convolutional Neural Networks (CNNs) and fine-tuning a powerful, pretrained model on your meal quality dataset to build your first baseline classifier.