In our last session, you mastered the fundamentals of image preprocessing with OpenCV and Pillow, learning how to load, resize, and convert images into a standardized format. This was a critical step in taming the varied and messy data you'll scrape from the web. Now, we'll address another reality of real-world machine learning: limited training data.
Your goal is to build a classifier, but you'll only have a few hundred annotated images to start. A model trained on such a small dataset is likely to "memorize" the training examples and fail to generalize to new, unseen images—a problem known as overfitting. This lesson introduces a powerful technique to combat this: data augmentation. We will artificially expand your dataset by creating modified versions of your existing images, teaching your model to be robust to variations in orientation, lighting, and composition.
By the end of this lesson, you will be able to define and apply a complete data augmentation pipeline using PyTorch's torchvision.transforms module, preparing you to build a robust image classifier for your project.
1. Why Artificially Create More Data?
The core idea of data augmentation is simple: a rotated picture of a meal is still a picture of a meal. By applying random transformations like rotations, flips, and color shifts to your training images, you can create a virtually endless stream of unique examples. This teaches your model what a "good" or "poor" quality meal looks like, regardless of the camera angle, the lighting in the room, or whether the photo is slightly off-center.
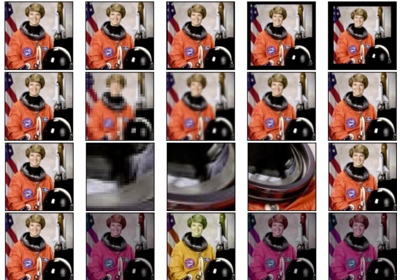
A series of augmentations applied to a single source image. By randomly resizing, cropping, and altering colors, we can generate many unique training samples from one picture, making our model more robust.
This technique is one of the most effective ways to improve model performance, especially when working with a limited dataset like the one you will be annotating. To see a practical demonstration of its impact, let's watch a short segment of the following video.
Data Augmentation in PyTorch: Improve Models with Existing Data
This video by NeuralNine provides an excellent conceptual introduction to data augmentation and then demonstrates its effect on model accuracy.
First, watch the introduction from the beginning to 1:20 to solidify your understanding of why augmentation helps a model generalize better. Then, skip to the end and watch the comparison of results from 14:57 to 15:19. The speaker shows a tangible ~5% accuracy boost from using basic augmentation, highlighting its practical value.
2. Your Toolkit: torchvision.transforms
PyTorch simplifies data augmentation with the torchvision.transforms module. This module provides a collection of functions that can perform various image transformations. The standard way to build an augmentation pipeline is to chain these functions together using transforms.Compose. This creates a single, callable object that applies a sequence of transformations to an image.
This approach is highly modular and readable, which fits well with your experience building complex software pipelines.
Data Augmentation: TensorFlow Methods and torchvision.transforms
This article from ApXML gives a great overview of the PyTorch approach to data augmentation.
First, read the introduction, from the beginning to the end of the second paragraph. This will frame torchvision.transforms as PyTorch's primary tool for this task. Next, read the section "Working with torchvision.transforms". Pay close attention to the concept of chaining transforms together with transforms.Compose.
A typical augmentation pipeline in code looks like this:

This image shows a transforms.Compose pipeline in action. A list of transformations (Resize, Flip, Rotation, etc.) is defined and then applied to an image from the CIFAR dataset. The blurry output image is the result of these combined transformations.
3. Common and Useful Transformations
For your project, we can group useful transformations into two categories: geometric (changing the image's orientation or shape) and photometric (changing its color or lighting).
Geometric Transforms
These simulate variations in how a photo is taken.
RandomHorizontalFlip(): Flips the image horizontally with a 50% probability. This is almost always a safe and effective augmentation.RandomRotation(degrees): Rotates the image by a random angle within a specified range (e.g.,-10to+10degrees). This helps the model recognize food even if the plate is slightly tilted.RandomResizedCrop(size): This is a very powerful one. It crops a random part of the image and then resizes it to the target size. This forces the model to focus on different parts of the meal and not just, for example, what's in the center of the plate.
Photometric Transforms
These simulate variations in camera quality and lighting conditions.
ColorJitter(brightness, contrast, saturation, hue): This is arguably the most important transform for your project. User-submitted photos will have wildly different lighting.ColorJitterrandomly alters the brightness, contrast, and saturation, making your model robust to these variations and better able to judge food quality based on texture and shape, not just perfect color.
To see what these look like in practice, the official PyTorch documentation provides an excellent visual gallery.
Illustration of transforms — Torchvision main documentation
This documentation page provides visual examples of nearly every transform available.
Skim through the page to get a feel for the possibilities. Specifically, look at the visual outputs for: RandomResizedCrop RandomRotation ColorJitter RandomHorizontalFlip
For a code-focused walkthrough of how to implement these, the following video is very helpful.
Pytorch Data Augmentation using Torchvision
This video from Aladdin Persson demonstrates how to apply several common transforms using transforms.Compose.
Watch the following segments to see these transforms implemented in code: Horizontal Flip: 2:36 - 3:07 Color Jitter, Resize, and Crop: 4:15 - 5:03 Rotation and Grayscale: 5:03 - 6:03
4. Building Your Augmentation Pipelines
A crucial best practice is to create two separate transformation pipelines: one for training and one for validation/testing.
-
Training Pipeline: This pipeline includes both the necessary preprocessing steps (resizing, converting to a tensor, normalizing) and the random augmentations. We want the model to see a different version of each image on every pass (epoch) to improve its ability to generalize.
-
Validation/Testing Pipeline: This pipeline only includes the necessary preprocessing steps. It does not include random augmentations. When we evaluate our model, we want to test it on the clean, original data to get a consistent and reproducible measure of its performance. Applying random transformations here would mean your accuracy could change every time you run an evaluation, which is not desirable.
Let's look at how to define these two pipelines.
Data Augmentation: TensorFlow Methods and torchvision.transforms
This final section from the ApXML article provides a perfect, concise example of creating separate training and validation transform pipelines.
Read the section titled "Data Augmentation Techniques". It shows exactly how to define a train_transforms object with augmentations and a val_transforms object without them.
Here is a complete code example that defines both pipelines, tailored for your project. This is the code you will integrate into your custom Dataset class in our next lesson.
from torchvision import transforms

# Define target size and normalization constants (using ImageNet defaults is a good start)
TARGET_SIZE = (224, 224)
NORMALIZE_MEAN = [0.485, 0.456, 0.406]
NORMALIZE_STD = [0.229, 0.224, 0.225]

# 1. Augmentation pipeline for the training set
train_transforms = transforms.Compose([
    # First, resize the image. RandomResizedCrop is a powerful choice.
    transforms.RandomResizedCrop(size=TARGET_SIZE, scale=(0.8, 1.0)),

    # Apply random geometric transformations
    transforms.RandomHorizontalFlip(p=0.5), # p is the probability of the flip
    transforms.RandomRotation(degrees=15),

    # Apply random photometric transformations
    transforms.ColorJitter(brightness=0.2, contrast=0.2, saturation=0.2, hue=0.1),

    # Convert the PIL Image to a PyTorch Tensor. This also scales pixel values to [0, 1].
    transforms.ToTensor(),

    # Normalize the tensor. This helps the model train more effectively.
    transforms.Normalize(mean=NORMALIZE_MEAN, std=NORMALIZE_STD)
])

# 2. Preprocessing-only pipeline for the validation/test set
val_transforms = transforms.Compose([
    # For validation, we just resize deterministically. No randomness.
    transforms.Resize(TARGET_SIZE),
    # A CenterCrop can also be used to ensure the dimensions are exact,
    # but simple Resize is often sufficient.

    # Convert to a tensor
    transforms.ToTensor(),

    # Normalize with the same values used for training
    transforms.Normalize(mean=NORMALIZE_MEAN, std=NORMALIZE_STD)
])

# How you would use it (conceptual):
# from PIL import Image
# img = Image.open("path/to/a/meal_image.jpg")
# transformed_img = train_transforms(img)
# print(transformed_img.shape) # Output: torch.Size([3, 224, 224])
Notice the order of operations: transformations are applied to the PIL Image object first, then ToTensor() converts it into a PyTorch tensor, and finally Normalize() is applied to the tensor. This order is mandatory.
Conclusion
In this lesson, you've moved beyond simple preprocessing and learned one of the most impactful techniques for training deep learning models: data augmentation. You now understand not just why it's important for preventing overfitting, but also how to implement it practically.
Our key takeaways are:
- Data augmentation artificially increases dataset size by creating modified image copies, improving model robustness.
torchvision.transformsis PyTorch's primary module for image transformations.transforms.Composeis used to chain multiple transforms into a single, reusable pipeline.- It is standard practice to create two separate pipelines: a
train_transformspipeline with random augmentations and aval_transformspipeline with only deterministic preprocessing for evaluation.
You have now built all the necessary components for image preparation. In our next lesson, we will put all the pieces together by building a custom PyTorch Dataset. This class will be the engine of your data pipeline, responsible for loading your annotated image paths, applying the transformation pipelines you just created, and feeding the resulting tensors to your model for training.