Welcome back! In our previous lesson, we conducted a thorough exploratory data analysis of your image dataset. We established that due to variations in size, quality, and format, a systematic preprocessing pipeline is essential. You designed a clear strategy: validate images, pad and resize them, convert their color space, and normalize their pixel values.
This lesson marks our transition from analysis to implementation. We will begin building the technical foundation for your image classification pipeline by tackling the first few steps of that strategy. You will learn to perform the essential preprocessing tasks of loading, resizing, and color space conversion. Given your strong background in Python, you'll find the syntax of these new libraries familiar, allowing us to focus on the computer vision concepts behind the operations.
We will use two of the most important libraries in the Python ecosystem for this purpose: Pillow (PIL) and OpenCV. By the end of this lesson, you will be able to write a script that takes a raw image file and transforms it into a clean, standardized format, ready for a neural network.
1. The Right Tools for the Job: Pillow vs. OpenCV
Before we start writing code, it's useful to understand the roles of our two main tools. Pillow is a user-friendly library perfect for general image manipulation like opening, saving, and basic transformations. OpenCV (Open Source Computer Vision Library) is a far more extensive library designed for advanced computer vision tasks, including real-time video analysis, object detection, and feature extraction. For your project, we'll often use them together—Pillow for simple I/O and torchvision integrations, and OpenCV for more complex, performance-critical operations.
To get a high-level sense of their respective strengths, please read the introductory and concluding thoughts from the following article.
What is the difference between OpenCV and Pillow? - Educative.io
This article from Educative.io provides a concise comparison between the two libraries.
First, read the introduction to understand what each library is primarily used for, from the start of the article down to the end of the introduction. Then, jump to the Conclusion section. This summary will crystallize when you might choose one over the other. The key takeaway is that OpenCV is the go-to for heavy-duty computer vision, while Pillow is excellent for streamlined image handling and manipulation.
2. Loading Images: The First Step
Our first task is to load an image from a file into a format Python can work with. Both libraries can do this, but they do it slightly differently, leading to a critical "gotcha" that trips up many beginners.

Loading with Pillow (PIL)
Pillow is very straightforward. The Image module's open() function returns an Image object, which contains metadata and the pixel data.
Image Processing With the Python Pillow Library
This Real Python article is a comprehensive guide to Pillow. We'll start with the basics of opening an image and understanding its properties.
Read the section titled "The Image Module and Image Class in Pillow". Focus on how to use Image.open() and .load(). Then, read the part that introduces the three key properties: .format, .size, and .mode. These are the attributes you inspected during your EDA in the last lesson.
Here's a quick example:
from PIL import Image


# Open an image file
img_pil = Image.open('path/to/your/image.jpg')


# Print its properties
print(f"PIL Format: {img_pil.format}")
print(f"PIL Size (Width, Height): {img_pil.size}")
print(f"PIL Mode: {img_pil.mode}") # Typically 'RGB' for color images
Loading with OpenCV and the BGR vs. RGB issue
OpenCV's cv2.imread() function loads an image directly into a NumPy array, which is highly efficient and convenient since deep learning frameworks like PyTorch operate on numerical tensors. However, there's a crucial difference: OpenCV loads images in BGR (Blue, Green, Red) channel order by default, whereas most other libraries, including Pillow and Matplotlib, use RGB (Red, Green, Blue).
Failing to account for this will cause your colors to appear swapped (e.g., reds will look blue) and will confuse your neural network, which expects a consistent channel order.
The following video clearly demonstrates this difference.
Image Processing with OpenCV and Python
This video from Rob Mulla provides a practical walkthrough of basic image processing with OpenCV.
First, watch from 3:42 to 5:23 to see how an image is represented as a NumPy array with (height, width, channels). This reinforces the concept from our last lesson. Next, watch the segment from 9:42 to 11:37. This is the most important part. It visually shows the color difference between an image loaded with OpenCV (BGR) and one loaded with Matplotlib (RGB), and then demonstrates how to fix it using cv2.cvtColor.
Here is the code to load with OpenCV and correct the color channels:
import cv2
import matplotlib.pyplot as plt


# Open an image file with OpenCV
# The image is loaded as a NumPy array in BGR format
img_bgr = cv2.imread('path/to/your/image.jpg')


# Convert from BGR to RGB
img_rgb = cv2.cvtColor(img_bgr, cv2.COLOR_BGR2RGB)

print(f"OpenCV Image Shape (Height, Width, Channels): {img_rgb.shape}")


# Displaying to confirm colors are correct
# plt.imshow(img_bgr) # This would show incorrect colors
plt.imshow(img_rgb)   # This shows correct colors
plt.axis('off')
plt.show()
This BGR-to-RGB conversion is a non-negotiable step in almost any deep learning pipeline that uses OpenCV for image loading.
3. Color Space Conversion
Besides fixing the BGR-to-RGB issue, another common conversion is changing a color image to grayscale. This reduces the image from 3 channels to 1, simplifying the data significantly. While you'll likely use full-color images for your project to detect food quality, knowing how to convert to grayscale is a fundamental skill.
Both libraries make this easy:
- Pillow:
img.convert('L')(where 'L' stands for Luminance). - OpenCV:
cv2.cvtColor(img_rgb, cv2.COLOR_RGB2GRAY)
Image Processing Tutorial for beginners with Python PIL in 30 mins
This video provides a quick tutorial on PIL.
Watch the short segment on converting to black and white to see how it's done with Pillow.
Image Processing with OpenCV and Python
This video shows the same process in OpenCV.
Now watch this clip from 12:21 to 13:16 to see how cv2.cvtColor is used to create a grayscale image. Notice how the shape of the resulting NumPy array changes from 3D to 2D.
4. Resizing Images
As you discovered during EDA, your scraped images come in many different sizes. Neural networks, however, require inputs of a fixed size (e.g., 224x224 pixels). Therefore, resizing is a mandatory preprocessing step.
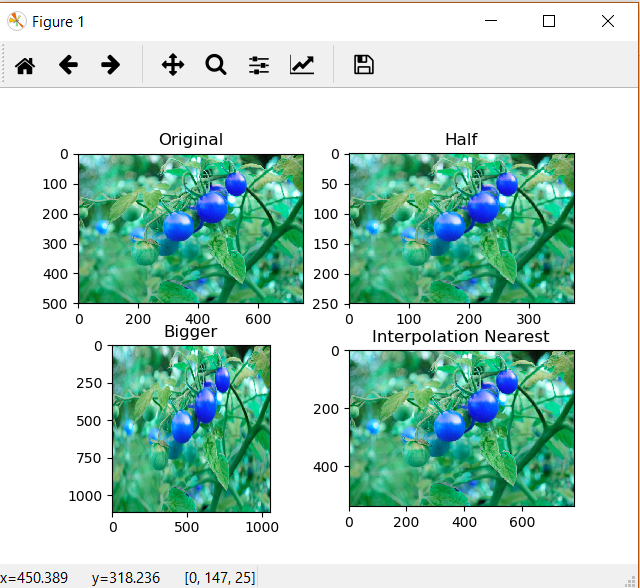
Both libraries can resize images, and both require you to specify an interpolation algorithm. When you resize an image, the library has to invent or discard pixels. The interpolation algorithm is the rule it uses to do this. Common choices include:
NEAREST: Fastest, but lowest quality. Can produce blocky, pixelated results.BILINEAR: Good balance of speed and quality. A common default.BICUBIC: Higher quality than bilinear, producing sharper images, but is slower. Often a great choice for downscaling.
Image Processing Tutorial for beginners with Python PIL in 30 mins
This video explains resizing and interpolation in PIL.
Watch the segment from 5:37 to 7:29. It covers the resize() method and visually compares the output of different interpolation algorithms.
Here's how you do it in code:
# --- Resizing with Pillow ---
from PIL import Image

target_size = (224, 224)
img_pil = Image.open('path/to/your/image.jpg')
resized_pil = img_pil.resize(target_size, resample=Image.Resampling.BICUBIC)


# resized_pil.show()


# --- Resizing with OpenCV ---
import cv2

img_rgb = cv2.cvtColor(cv2.imread('path/to/your/image.jpg'), cv2.COLOR_BGR2RGB)


# Note: OpenCV's resize expects (width, height), which is different from NumPy's (height, width) array indexing
resized_cv2 = cv2.resize(img_rgb, target_size, interpolation=cv2.INTER_CUBIC)


# plt.imshow(resized_cv2)
# plt.show()
A note on aspect ratio: Simply resizing a rectangular image to a square (224, 224) will stretch or squash it, distorting the food items. In the last lesson, we identified a "pad-and-resize" strategy to fix this. We will implement that more robustly in the next lesson when we discuss data augmentation. For now, mastering the basic resize operation is the goal.
5. Bringing It All Together
Let's combine these steps into a single, reusable function. This function will serve as the core of our image preprocessing pipeline. It will take a file path, load the image using the robust OpenCV library, convert it to the correct RGB color space, and resize it to a fixed dimension.
Since deep learning models work with tensors, the final step in any preprocessing pipeline is to convert the image data (which is a NumPy array when using OpenCV) into a PyTorch tensor. Both Pillow and NumPy make this conversion seamless.
Image Processing With the Python Pillow Library
This section of the Real Python article demonstrates the interoperability between Pillow, NumPy, and by extension, other numerical libraries like PyTorch.
Read the section "Image Manipulation With NumPy and Pillow". The key concept here is the conversion between an Image object and a numpy.ndarray using np.asarray() and Image.fromarray(). This is the bridge that allows you to use different libraries in the same workflow.
Here is a function that encapsulates our workflow:
import cv2
import numpy as np

def preprocess_image(file_path: str, target_size: tuple = (224, 224)) -> np.ndarray:
    """
    Loads an image file, converts it to RGB, and resizes it.

    Args:
        file_path (str): The path to the image file.
        target_size (tuple): The target (width, height) for resizing.

    Returns:
        np.ndarray: The preprocessed image as a NumPy array.
    """


    # 1. Load image using OpenCV (loads as BGR)
    image = cv2.imread(file_path)


    # Handle cases where the image cannot be read
    if image is None:
        raise FileNotFoundError(f"Could not read image file at {file_path}")


    # 2. Convert from BGR to RGB color space
    image = cv2.cvtColor(image, cv2.COLOR_BGR2RGB)


    # 3. Resize the image to the target size
    image = cv2.resize(image, target_size, interpolation=cv2.INTER_CUBIC)

    return image


# --- Example Usage ---
preprocessed_image = preprocess_image('path/to/your/image.jpg')


# Now, this NumPy array is ready to be converted to a PyTorch tensor
# import torch
# tensor_image = torch.from_numpy(preprocessed_image)

print(f"Shape of final preprocessed image: {preprocessed_image.shape}")
print(f"Data type: {preprocessed_image.dtype}")
This function is a clean, modular piece of code that you can directly incorporate into the custom Dataset class you'll build later.
Conclusion
In this lesson, you have successfully translated the first part of your preprocessing strategy into functional code. You've gone from a theoretical plan to practical implementation, a crucial step in any machine learning project.
Our key takeaways are:
- Pillow is excellent for simple image I/O and manipulations, while OpenCV is a powerful library for complex computer vision algorithms.
- A critical step when using OpenCV is to convert images from BGR to RGB format to ensure compatibility with deep learning frameworks.
- Resizing images to a uniform dimension is mandatory for most CNNs, and the choice of interpolation algorithm impacts the quality of the result.
- These operations can be chained together into a clean, reusable preprocessing function that forms the backbone of your data pipeline.
You now have the fundamental skills to load and standardize any image from your dataset. In our next lesson, we will build directly on this foundation. We'll explore data augmentation, a technique to artificially increase the size and diversity of your training data by applying random transformations like rotations, flips, and color shifts. This is a powerful method for improving model accuracy and preventing overfitting.