Hello and welcome back!
In our last lesson, you mastered the local development workflow using the Shopify CLI. You're now comfortable running shopify theme dev for live previews and using shopify theme push to deploy your work. This "edit-preview-deploy" cycle is the engine for all theme development.
Today, we're putting that engine to work on one of the most important pages of any e-commerce site: the product page. This lesson is focused on a single, crucial learning outcome: to build a custom product template to display product details, images, and variants.
You'll learn how Shopify uses templates to render product pages, how to access product data using Liquid, and how to create unique layouts for different products. Given your background in full-stack development, you'll find the concept of templates analogous to dynamic route handlers (like [slug].js in Next.js) that render pages based on URL parameters.
1. Why Custom Templates? The Power of Unique Layouts
Before we write any code, let's address a fundamental question that your curious mind is likely already asking: "Why would I need a custom product template? Shouldn't one design work for all products?"
Often, the answer is no. A store might sell both simple, everyday items and complex, flagship products that require much more explanation, different image galleries, or unique features. Using the same layout for both is a missed opportunity. This is where custom templates become essential.
The following video provides an excellent overview of this concept, using a real-world example to illustrate why different products benefit from different page designs.
Shopify Templates Tutorial - Different Layouts for Different Products & Collections
Watch this clip from Ed Codes to understand the business case for creating different page layouts for different products. It frames the 'why' behind today's technical lesson.
Watch the first 4 minutes and 43 seconds (00:00 - 04:43). Pay attention to the Allbirds example, where they use a detailed layout for their main sneaker products but a simpler one for accessories like beanies.
2. The Product Template and the product Object
So, how does Shopify generate a product page? When you visit a URL like your-store.com/products/awesome-sneakers, Shopify doesn't look for a static HTML file named awesome-sneakers.html. Instead, it loads a product template and makes the data for the "Awesome Sneakers" product available to it.
In a modern Shopify theme, this is typically handled by templates/product.json. This JSON file defines the structure of the page by referencing various sections (which are .liquid files in the sections folder).
Within this context, Shopify automatically provides a global product object. This object is your single source of truth for everything related to the product being viewed.
SHOPIFY LIQUID: Theme Programming for Beginners [CRASH COURSE]
This segment from Code with Chris the Freelancer clearly explains this concept of 'template scope'—how a template automatically gets access to a specific object based on the URL you're visiting.
Watch from 41:31 to 45:08. The key takeaway is understanding that the product variable in your code is automatically populated with the data of the product the user is currently viewing.
Let's start by displaying the most basic product details. Open the main section file for your product template (in the Dawn theme, this is sections/main-product.liquid) and you will see Liquid code like this:
<h1>{{ product.title }}</h1>
<div>{{ product.description }}</div>
<span>{{ product.price | money }}</span>
{{ product.title }}: Outputs the product's name.{{ product.description }}: Outputs the product's description, preserving any HTML formatting from the Shopify admin.{{ product.price | money }}: Outputs the price. The| moneypart is a filter that formats the raw number (which is in cents) into a currency string, like$49.99.
3. Displaying Product Images
A product page isn't complete without images. The product object contains all the images associated with it in an array called product.images.
The Featured Image
To display the main product image, you can use the product.featured_image object:
<img src="{{ product.featured_image | image_url: width: 800 }}"
     alt="{{ product.featured_image.alt | escape }}"
     width="800">
image_url: width: 800: This is another powerful filter. It generates a URL for the image, optimized by Shopify's CDN to be 800 pixels wide. This is crucial for performance.escape: This filter sanitizes the alt text to prevent HTML injection, a good security practice.
Creating an Image Gallery
To display all product images, you can loop through the product.images array:
<div class="product-gallery">
  {% for image in product.images %}
    <img src="{{ image | image_url: width: 400 }}" alt="{{ image.alt | escape }}" width="400">
  {% endfor %}
</div>
4. Handling Product Variants
This is where things get interesting. Most products have options like size, color, or material. In Shopify, each unique combination of these options is a variant. For example, a "Small, Red" t-shirt is one variant, and a "Medium, Blue" t-shirt is another. Each has its own ID, price, SKU, and inventory level.

To sell a product with variants, you need an HTML form that submits the chosen variant.id to the cart.
The following article provides a clear, minimal example of the Liquid code required to build a variant selector.
This Shopify Partners blog post, 'The product.liquid template', contains a concise and fundamental example of how to loop through variants to build an 'Add to Cart' form. We'll use its logic as our foundation.
Read the sections that show the example code and explain the form structure and the variant loop. Focus on the for variant in product.variants loop and the if variant.available check.
Here is a practical implementation of that logic, which you can add to your sections/main-product.liquid file:
<form method="post" action="/cart/add">

  <label for="variant-select">Choose an option:</label>
  <select name="id" id="variant-select">
    {% for variant in product.variants %}
      {% if variant.available %}
        <option value="{{ variant.id }}">
          {{ variant.title }} - {{ variant.price | money }}
        </option>
      {% else %}
        <option disabled="disabled">
          {{ variant.title }} - Sold Out
        </option>
      {% endif %}
    {% endfor %}
  </select>

  <button type="submit">Add to Cart</button>

</form>
Breaking it down:
- The
<form>action must point to/cart/add. - The
<select>element'snameattribute must beid. This is how Shopify knows which variant to add to the cart. - We loop through
product.variants. - We use an
ifstatement (if variant.available) to check the inventory status. If it's unavailable, we disable the option. - The
valueof each<option>is the uniquevariant.id.
Test your understanding!
A client asks you to display "Low Stock" instead of the price for variants with fewer than 10 items in stock. How would you modify the loop above to achieve this? (Hint: The variant object has a inventory_quantity property.)
Show answer
You would add another condition within the if variant.available block.
<select name="id" id="variant-select">
  {% for variant in product.variants %}
    {% if variant.available %}
      <option value="{{ variant.id }}">
        {{ variant.title }} -
        {% if variant.inventory_quantity < 10 %}
          Low Stock!
        {% else %}
          {{ variant.price | money }}
        {% endif %}
      </option>
    {% else %}
      <option disabled="disabled">
        {{ variant.title }} - Sold Out
      </option>
    {% endif %}
  {% endfor %}
</select>
This demonstrates how you can combine Liquid logic with object properties to create custom purchasing experiences.
5. Creating and Assigning a Custom Template
Now for the final piece of the puzzle: creating a new, separate product template. This allows you to apply a unique design to specific products without altering the default.
In Online Store 2.0, this is done by creating a new JSON template file.
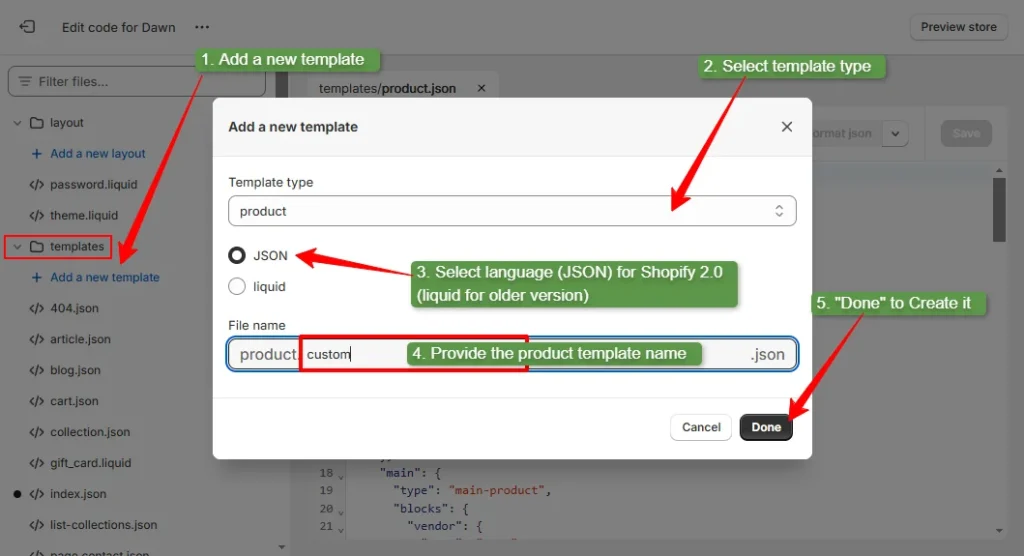
The process is straightforward. This article provides a clear, step-by-step guide.
Shopify JSON: Everything You Need to Know
This article, 'Shopify JSON: Everything You Need to Know', provides an excellent walkthrough on creating and assigning JSON templates. It's a perfect practical guide for this task.
Read 'Step 1: Create a new JSON template file' and 'Step 3: Assign your JSON template to a resource'. This covers the end-to-end process of creating the file and then applying it to a product in the admin.
Let's walk through it together:
- Create the Template: In your local VS Code project, go to the
templates/directory. Create a new file namedproduct.featured.json. Copy the content from your existingproduct.jsonfile into this new file as a starting point. - Customize the Template:
- Push your changes to a development theme using
shopify theme push --unpublished(give it a name like "Product Template Test"). - Go to the Theme Customizer for this new theme.
- Use the dropdown at the top of the page to navigate to
Products > featured. - You are now editing your new template. Add a new section, change the layout, etc. For example, add a "Rich text" section above the product info and write "Our Flagship Product!".
- Save your changes in the customizer.
- Push your changes to a development theme using
- Assign the Template:
- Go to your Shopify Admin and navigate to
Products. - Select a product that you want to use this new layout for.
- On the product details page, find the "Theme template" card on the right-hand side.
- Select your new "featured" template from the dropdown and save.
- Go to your Shopify Admin and navigate to
Now, when you view that specific product on your storefront, it will render using the product.featured.json template with its unique layout. All other products will continue to use the default.
Conclusion
Congratulations! You have successfully built a custom product page from the ground up. This is a foundational skill for any Shopify developer and a significant step toward building your portfolio.
Let's recap the key takeaways:
- Product pages are rendered using templates (
product.json) which are populated by the globalproductobject. - You can access product data like
product.title,product.images, andproduct.priceusing Liquid syntax. - Handling variants is crucial. You must loop through
product.variantsand submit avariant.idwithin a form posting to/cart/add. - The Online Store 2.0 architecture allows you to create custom JSON templates (e.g.,
product.featured.json) and assign them to specific products, enabling unique layouts for different items.
In our next lesson, we will extend these concepts to build a collection template. You'll learn how to access the collection object, loop through its products to create a product grid, and implement basic sorting functionality. The skills you learned today with the product object will be directly transferable.