¡Hola! Welcome back to your journey into DJing.
In our last lesson, you accomplished a crucial first step: you successfully connected your Hercules DJControl Inpulse 200, your laptop, speakers, and headphones, and configured the audio in DJUCED. Your physical setup is now fully operational and ready for action.
Today, we're going to open the door to your digital workspace and get you comfortable inside. This lesson is a guided tour of the DJUCED software interface. Just like a pilot needs to know their cockpit, a DJ needs to know their software. We will explore the four main areas you'll be using constantly: the Library (where you find your music), the Decks (where you play it), the Waveforms (how you "see" the music), and the Mixer (where you blend it all together).
By the end of this lesson, you'll be able to confidently navigate DJUCED, understanding what each section is for and where to find the essential controls.
Your Digital DJ Booth: The Four Main Areas
When you open DJUCED, it can look a bit complex, but it’s logically divided into a few key zones. Think of it like a kitchen: you have your pantry (the Library), your stovetops (the Decks), and your main counter for combining ingredients (the Mixer).
To get a quick visual overview, let's start with a short video from the creators of DJUCED.
DJUCED | Know your gear | 03 Discover DJUCED Interface
This official video from DJUCED provides a quick tour of the software's main components. It will help you build a mental map of the interface.
Watch the video from the beginning to 00:20, and then skip ahead to watch from 01:08 to 02:24. Focus on how they introduce these four main areas: Top Bar: General settings and information. Decks: The players for your tracks. Browser: Your music library at the bottom. Don't worry about the 'FX' section mentioned; we'll cover that much later.
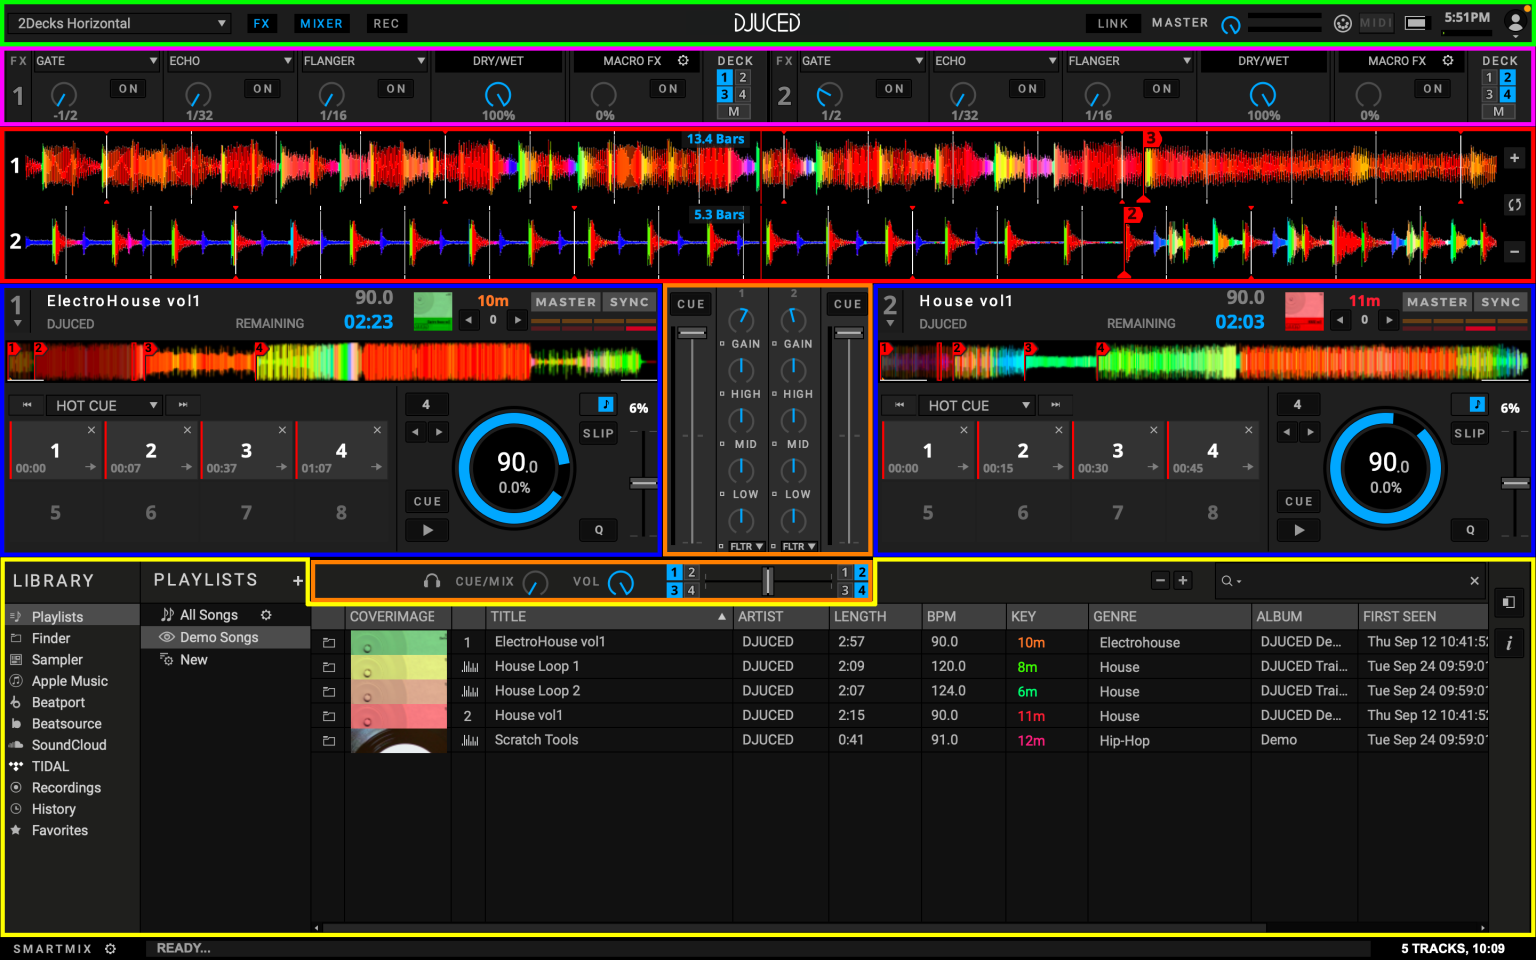
Now, let's break down these areas one by one. Here is a picture of the main interface. We'll refer back to this as our map.
1. The Browser: Your Music Library
The large area at the bottom of the screen is the Browser. This is your digital record crate—it's where you find, organize, and select all your music.
If you look to the far left of the browser, you'll see your "Media Sources". For now, the most important folders are:
- Explorer/Finder: This lets you browse the files and folders directly on your computer's hard drive.
- Song Library: This shows all the tracks that DJUCED has analyzed. It includes the Demo Songs folder, which is perfect for practicing.
- Playlists: Where you will create and manage your own lists of tracks for your mixes.
- History: This automatically keeps a record of every track you play, which is incredibly useful.
The main part of the browser displays your tracks in a list with several columns. The most important ones for a beginner are:
- #: Track number
- Title: The name of the song
- Artist: The artist's name
- BPM: Beats Per Minute, or the tempo of the track. We'll dive deep into this in the next module.
- Key: The musical key of the track.
Your first task: When you have DJUCED open, find the Song Library > Demo Songs folder. This is where you can find pre-loaded tracks to start practicing with immediately.
2. The Decks: Your Virtual Turntables
The sections on the left and right of the screen are your Decks (Deck 1 and Deck 2). Each deck functions as an independent music player, like a virtual turntable or CDJ. This is where you load a track to get it ready for playing.
Each deck displays key information about the loaded track:
- Track Title and Artist
- Cover Art
- Remaining or Elapsed Time
- A large Virtual Jog Wheel, which mirrors the jog wheel on your Inpulse 200 controller.
You'll also see buttons for PLAY/PAUSE, CUE, and SYNC. We are going to cover these controls in detail in our very next lesson, but for now, just know that this is where the core playback happens.
3. The Waveforms: Seeing Your Music
One of the biggest advantages of digital DJing is the ability to see the music. The Waveforms are the visual representation of your tracks' audio.
There are two waveforms for each deck:
- Global Waveform (the small one): This shows the entire song from start to finish. You can see the "shape" of the track—loud parts have a thick waveform, while quiet parts (like intros or breakdowns) are thin. This is great for anticipating major changes in a song.
- Detailed Waveform (the large, scrolling one): This is a zoomed-in, real-time view of the music as it plays. This is your most important visual tool for mixing.
To understand what you're seeing in the detailed waveform, watch this short clip.
A Beginner's Guide to DJing (How to DJ for Complete Beginners)
This clip from the 'A Beginner's Guide to DJing' video clearly explains how to read the detailed waveform in DJUCED.
Watch from 03:56 to 04:20. Pay close attention to the vertical lines. The presenter points out the lines for each beat and the special markers for the start of each bar (a group of 4 beats).
As the video showed, the vertical lines on the waveform are the beat grid.
- White lines mark each beat (1, 2, 3, 4).
- Red-marked lines (or a different color depending on your settings) mark the "one"—the first beat of a new bar.
The colors within the waveform also give you clues about the sound: red and orange typically represent low-frequency sounds like bass and kick drums, while yellow and green represent mid- and high-frequency sounds like vocals and hi-hats.
4. The Mixer: Blending It All Together
Located in the very center of the interface, between the two decks, is the Mixer. This is your command center for controlling the sound and blending the tracks from Deck 1 and Deck 2. The controls here directly correspond to the knobs and faders in the center of your Inpulse 200.
Let's identify the essential controls:
- Channel Volume Faders: These two vertical sliders control the volume of Deck 1 and Deck 2 independently.
- Crossfader: The horizontal slider at the very bottom. Sliding it to the left plays only Deck 1; sliding it to the right plays only Deck 2. In the middle, it plays both.
- EQ (Equalizer) Knobs: Usually three knobs per channel:
- High: Controls the treble (cymbals, hi-hats).
- Mid: Controls the mid-range (vocals, melodies).
- Low: Controls the bass (kick drums, basslines).
- Gain (or Trim) Knob: This knob at the top of each channel adjusts the track's base volume level before you mix. It’s used to make sure two tracks start at roughly the same loudness.
- Cue/Headphones Button: This button lets you listen to a track in your headphones without the audience hearing it. This is the key to preparing your next track.
We will dedicate entire future lessons to using these controls effectively, but for now, the goal is to simply know what they are and where to find them.
Test your understanding!
Imagine you've loaded a new track on Deck 2 and you want to listen to its intro in your headphones to prepare it for the mix, while the crowd is still hearing the track playing from Deck 1.
Which two sections of the mixer would you primarily use to do this?
Show answer
You would use the Mixer section. Specifically, you would:
- Press the Cue button for Deck 2. This sends its audio to your headphones.
- Ensure the Channel Volume Fader for Deck 2 is down, so the crowd doesn't hear it yet.
Conclusion
Great work! You've just completed a full tour of your new digital DJ workspace. It might feel like a lot of information, but you'll quickly become familiar with this layout as you start to practice.
Here are the key takeaways from today's lesson:
- Four Core Zones: The DJUCED interface is built around the Browser (for finding music), the Decks (for playing music), the Waveforms (for seeing music), and the Mixer (for blending music).
- Browser is Your Crate: Use the Browser at the bottom to navigate your folders, find the included demo songs, and view track information like BPM and Title.
- Decks are Your Players: The left and right decks are where you load tracks for playback.
- Waveforms are Your Guide: The waveforms provide a visual map of the music's structure and rhythm, with the beat grid showing you exactly where each beat falls.
- Mixer is Your Hub: The central mixer is where you control volume, EQ, and the blend between your two decks.
Knowing where everything is located is the first essential step. Now that you can navigate the interface, you're ready to start making some noise.
In our next lesson, we'll put this knowledge into practice. You'll learn how to load your first tracks from the library onto the decks and use the fundamental playback controls: play, pause, and cue. This is where the fun really begins