¡Hola! Welcome back.
In our last lesson, we took a complete tour of your digital DJ booth, the DJUCED software. You learned to identify the four key areas: the Browser (your music library), the Decks (your virtual players), the Waveforms (your visual guide to the music), and the Mixer (your command center for blending sound).
Today, we move from knowing to doing. You're going to take control and make some noise for the first time. This lesson focuses on the absolute fundamentals of track playback. By the end of our session, you will be able to load tracks from your library onto each deck and confidently use the essential playback controls: Play, Pause, and Cue. This is the foundation upon which every other DJ skill is built.
Let's get started.
Part 1: Loading Your Tracks
Before you can play a track, you need to get it from your library onto a deck. There are two main ways to do this: using the software interface and using your controller.
First, a quick reminder of your workspace. The Browser is at the bottom, and your Decks are on the left and right.
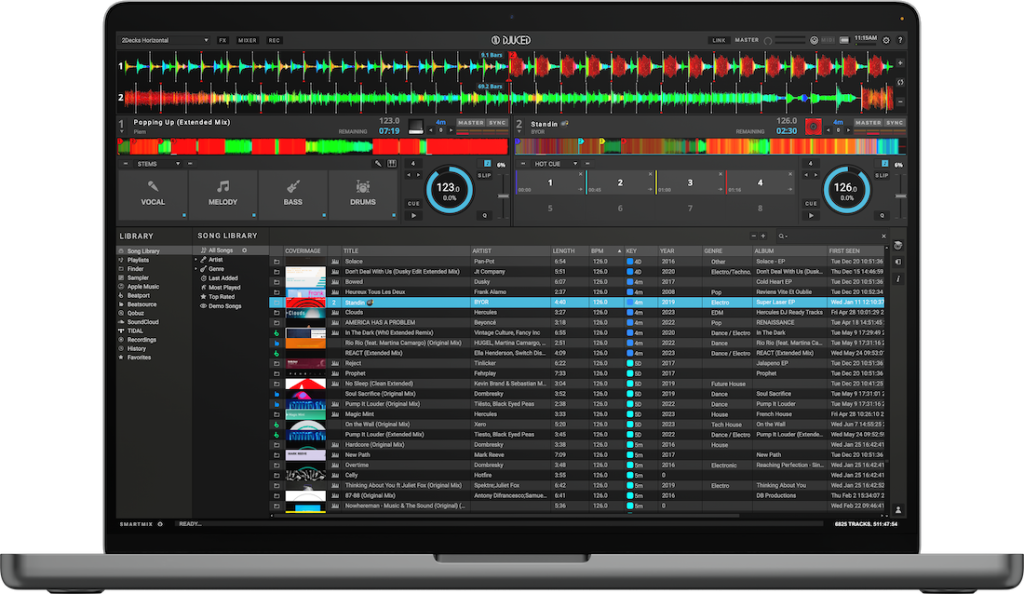
Method 1: Drag-and-Drop (Software)
The most intuitive way to start is by using your mouse.
- In the Browser, navigate to the Demo Songs folder.
- Click and hold on a track title (e.g., "House Volume One").
- Drag it up to the header of Deck 1 and release.
That's it! The track's waveform will appear, and it's ready to go. The following video gives a quick demonstration of this.
Loading tracks (day 1, 2/3) - DJ Academy – DJControl Inpulse 200
Watch this short clip from the Hercules DJ Academy to see how to drag and drop tracks onto the decks in DJUCED.
Watch from 00:25 to 00:45. The video shows exactly how to drag a track from the library to a deck. It also mentions keyboard shortcuts (Shift + Left/Right arrow), which are good to know but not essential right now.
Method 2: The DJ Way (Controller)
Now for the more practical, hands-on method using your DJControl Inpulse 200. This is how you'll work when you're in the flow of a mix. You'll use the large rotary knob and the 'Load' buttons.
Let's locate these on your controller.

Here's the process:
- Turn the Browse Encoder (6): This scrolls through the tracks in your library list.
- Press the Browse Encoder (6): This allows you to enter or exit folders (like a click).
- Press the Load Button (6): Once you've highlighted the track you want, press the 'Load' button for the deck you want to put it on (left button for Deck 1, right button for Deck 2).
This next video demonstrates this process perfectly.
A Beginner's Guide to DJing (How to DJ for Complete Beginners)
This clip from 'A Beginner's Guide to DJing' clearly shows how to browse and load tracks using the controller's encoder and load buttons.
Watch from 02:35 to 03:00. The presenter shows you exactly how to navigate your library and load tracks onto Deck 1 and Deck 2 using the physical controls on the Inpulse 200.
Practice Time:
With DJUCED open, use your controller's Browse encoder and Load buttons to:
- Load "House Volume One" onto Deck 1.
- Load "Electro House Volume One" onto Deck 2.
Part 2: Basic Playback - Play and Pause
You've got your tracks loaded. Now, let's make them play. This is the simplest part. Each deck has its own Play/Pause button.
On your controller diagram, these are part of the transport buttons (1). They are usually the largest, most prominent buttons on each deck.
- Press Play/Pause once to start the track.
- Press it again to pause the track exactly where it is.
When you press play, you should hear the music through your speakers (as long as the volume fader for that channel and the master volume are up). Don't worry about the volume levels for now; just make sure you can hear it.
Part 3: The Cue Button - Setting Your Starting Point
This is one of the most important buttons in DJing. The Cue button is not just another "pause" button. Its main job is to set and return to a precise starting point in a track.
Think of it like a bookmark. When mixing, you don't just start a track from the very beginning. You find the exact beat you want to start from (usually the first beat of the song) and set your Cue point there.
Let's look at the official functions from the user manual. The Cue button is also part of the transport controls (1) on your controller, right next to Play/Pause.
Hercules DJControl Inpulse 200 - User manual
The Hercules DJControl Inpulse 200 user manual gives the most precise definition of how the CUE button works. Understanding these functions is key.
Read the section titled 'CUE BUTTON'. It's located after the 'PLAY/PAUSE BUTTON' description. Focus on these three main functions: Setting a Cue point when a track is paused. Returning to the last Cue point when a track is playing. Temporarily playing from the Cue point when you press and hold the button.
Let's simplify that into what you need to know right now:
- Default Cue Point: When you first load a track, DJUCED automatically sets a Cue point at the very beginning (0:00). This is perfect for now.
- Return to Cue: If a track is playing and you press
CUE, the music will stop and jump back to that starting point. - Stutter/Preview: If the track is paused at the Cue point, you can press and hold the
CUEbutton to play the track. When you release it, the track stops and jumps right back to the Cue point. This is extremely useful for "tapping" the button to the beat of the other song to make sure you're ready to launch your track in time.
Test your understanding!
You are playing a track on Deck 1. You have a track loaded on Deck 2, and you want to start it perfectly on the first beat. What is the difference between pressing PLAY on Deck 2 versus holding and releasing CUE?
Show answer
Pressing PLAY starts the track and it continues to play. Holding and releasing CUE plays the track only for as long as you hold the button down, then it instantly returns to the starting Cue point. The CUE button lets you preview and time your start without committing to playing the track.
Your First Practice Routine
Let's put all three skills together. This routine will help build muscle memory for these core actions.
On Deck 1:
- Load a track using the browse encoder and Load button.
- Press Play/Pause to start the music. Let it play for about 10 seconds.
- Press Play/Pause again to stop it.
- Now, press the CUE button. Notice how the track jumps back to the very beginning (the default Cue point).
- Press and hold the CUE button. The track plays. Release it. The track stops and returns to the start. Try tapping it a few times.
Now, repeat the exact same 5 steps for Deck 2 with a different track. Get comfortable with how these three buttons feel and react.
Conclusion
Fantastic work! You have officially moved from a spectator to a participant. You are no longer just looking at the software; you are controlling it and making it produce sound.
Here are your key takeaways:
- Loading Tracks: You can load tracks by dragging them in the software or, more importantly, by using the Browse encoder and Load buttons on your controller.
- Play/Pause Control: The Play/Pause button gives you simple, direct control over starting and stopping your music.
- The Power of Cue: The Cue button is your essential tool for setting and returning to a precise start point, which is critical for timing your mixes.
You may have noticed that when you play a track, it comes out of your main speakers for everyone to hear. This leads to a crucial question: how do you prepare your next track without the audience hearing it?
In our next lesson, we will solve that exact problem. We'll explore how to use your headphones to preview a track independently, a skill that is at the very heart of being a DJ.