Hello! Welcome back to your course on building a web application.
In our last lesson, you learned how to handle different types of browser requests, specifically GET and POST. You built a login form that sent data to your Flask server. When you received a GET request, you served an HTML page using render_template('login.html'). However, when you handled the POST request, you returned a simple line of HTML directly from your Python code: return f'<h1>Welcome, {username}!</h1>'.
While this works, it's not a practical way to build real applications. Imagine trying to write an entire webpage inside a Python string! Today, we'll fix that. You will learn how to properly render full HTML files as a response, even when you need to include dynamic data from your Python script. This is the foundation for displaying any kind of information to your user, from a simple welcome message to the complex text analysis results from your AI tool.
From Python Strings to HTML Templates
Writing HTML inside your Python code gets messy very quickly. It mixes the logic of your application (the Python part) with the presentation of your application (the HTML part). The standard practice in web development is to keep these separate.
Flask helps us do this by using a powerful templating engine called Jinja. A template is just an HTML file that contains special placeholders for dynamic data. Your Flask application can then "render" this template by filling in the placeholders with actual values before sending the final HTML page to the user's browser.
As you saw in the last lesson, Flask has a strict rule for this to work: all your HTML template files must be stored in a folder named templates, located in the same directory as your main app.py file.
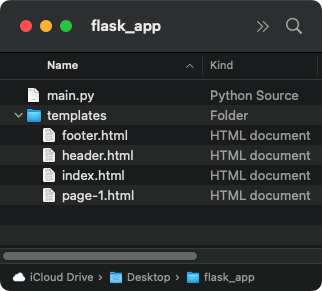
Passing Data from Python to a Template
Let's upgrade the login application from the last lesson. Instead of returning an f-string after a successful login, we will render a new welcome.html page and pass the user's name to it.
The core of this process is the render_template() function. You've used it before, but now we'll use it with extra arguments.
To get a clear understanding of how this works, let's start with a foundational article.
How To Use Templates in a Flask Application
The following article from DigitalOcean's community tutorials clearly explains how to use render_template() to serve an HTML file and pass a variable to it.
Please read 'Step 1 — Rendering a Template and Using Variables'. Focus on how a variable (utc_dt) is passed in the render_template() function call and how it is displayed in the HTML file using the {{ ... }} syntax.
Now let's see this in action. The following video demonstrates exactly how to pass a variable from your Flask backend to the HTML template.
Flask Tutorial #2 - HTML Templates
This video from Tech With Tim provides a practical demonstration of rendering templates and passing data.
Please watch from 03:47 to 07:19. The presenter will: Create a basic index.html file. Use render_template() to display it. Pass a variable from the Python script to the HTML file and display it using the {{ content }} syntax.
Let's Apply It
Here’s how we can update our app.py from the previous lesson.
1. Create a welcome.html file:
First, create a new file named welcome.html inside your templates folder.
my-ai-app/templates/welcome.html:
<!DOCTYPE html>
<html>
<head>
    <title>Welcome!</title>
</head>
<body>
    <!-- The placeholder 'user' will be replaced by the value from Python -->
    <h1>Welcome, {{ user }}!</h1>
    <p>Your form was submitted successfully.</p>
</body>
</html>
Notice the {{ user }}. This is a Jinja placeholder. It tells Flask, "Put the value of the variable named user right here."
2. Update app.py:
Now, modify the login function in your app.py file.
my-ai-app/app.py:
from flask import Flask, render_template, request

app = Flask(__name__)

# The home route is not used in this example, but it's good to have.
@app.route('/')
def home():
    # Let's render a simple homepage template now
    return render_template('home.html')

@app.route('/login', methods=['GET', 'POST'])
def login():
    if request.method == 'POST':
        # Get the username from the form data
        username = request.form['username']
        # Instead of an f-string, render a template and pass the username to it.
        # The variable name in the template ('user') is set here.
        return render_template('welcome.html', user=username)

    # For a GET request, show the login form as before.
    return render_template('login.html')

# Don't forget to create a simple home.html
# and update your login.html from the last lesson.

if __name__ == '__main__':
    app.run(debug=True)
You'll also need a home.html and a login.html in your templates folder.
my-ai-app/templates/home.html:
<!DOCTYPE html>
<html>
<head>
    <title>Home</title>
</head>
<body>
    <h1>My AI Writing App</h1>
    <p><a href="/login">Click here to log in.</a></p>
</body>
</html>
The login.html remains the same as in the previous lesson.
Now, run python app.py, go to http://127.0.0.1:5000/login, enter a name, and submit. You should see your new welcome.html page with your name dynamically inserted!
Adding Logic to Templates
Jinja can do much more than just insert variables. It allows you to use programming logic like loops and conditional statements directly inside your HTML. This is incredibly powerful for displaying lists of data or showing different content based on certain conditions.
There are two main types of Jinja syntax:
{{ ... }}: For expressions, used to print a variable's value to the template.{% ... %}: For statements, used for control flow likeforloops andifstatements.
The video you just watched continues to explain this perfectly.
Flask Tutorial #2 - HTML Templates
Let's continue with the Tech With Tim video to see how to implement for loops and if statements within your templates.
Watch from 07:19 to 13:04. This part covers: How to pass a Python list to a template. Using a {% for ... %} loop in HTML to display each item in the list. Using {% if ... %} statements to conditionally show content.
Example: Displaying a List
Let's create a new route that displays a list of features for our future app.
Add this to app.py:
@app.route('/features')
def features():
    # A list of features we want to display
    feature_list = [
        "Text Summarization",
        "Grammar Correction",
        "Style Improvement",
        "Word Count"
    ]
    return render_template('features.html', features=feature_list)
And create features.html in your templates folder:
<!DOCTYPE html>
<html>
<head>
    <title>App Features</title>
</head>
<body>
    <h1>Our App's Features</h1>
    <ul>
        <!-- This is a Jinja for loop -->
        {% for item in features %}
            <li>{{ item }}</li>
        {% endfor %}
    </ul>
</body>
</html>
Now, if you run the app and navigate to http://127.0.0.1:5000/features, you will see an unordered list (<ul>) where each feature from the Python list has been turned into a list item (<li>).
Test your understanding!
Let's combine these ideas. Imagine you have a list of users, and you only want to display the ones who are "active".
-
In
app.py, create a new route/users. Inside this function, define a list of Python dictionaries like this:users = [ {'name': 'Alice', 'active': True}, {'name': 'Bob', 'active': False}, {'name': 'Charlie', 'active': True} ]Pass this
userslist to a new template calledusers.html. -
In a new
templates/users.htmlfile, use aforloop to iterate through the list. Inside the loop, use anifstatement to check ifuser['active']is true. If it is, display the user's name.
The final output on the /users page should only show "Alice" and "Charlie".
Show answer
1. app.py update:
@app.route('/users')
def user_list():
users = [
    {'name': 'Alice', 'active': True},
    {'name': 'Bob', 'active': False},
    {'name': 'Charlie', 'active': True}
]
return render_template('users.html', user_data=users)
2. New templates/users.html file:
<!DOCTYPE html>
<html>
<head>
    <title>Active Users</title>
</head>
<body>
    <h1>Active Users</h1>
    <ul>
        {% for user in user_data %}
            {% if user.active == True %}
                <li>{{ user.name }}</li>
            {% endif %}
        {% endfor %}
    </ul>
</body>
</html>
Note: In Jinja, you can access dictionary keys using dot notation (user.name) or bracket notation (user['name']). Both work!
Conclusion
Congratulations! You've taken a massive step forward in building web applications. By separating your presentation (HTML) from your logic (Python) and learning how to dynamically pass data between them, you now have the tools to build clean, scalable, and powerful web pages.
Key Takeaways:
- Separation of Concerns: Keep your Python logic separate from your HTML structure for cleaner, more maintainable code.
templatesFolder: Flask requires all HTML templates to be in a folder namedtemplates.- Passing Data: Use keyword arguments in
render_template()to pass Python variables to your HTML file (e.g.,render_template('page.html', my_var=value)). - Jinja Syntax:
- Use double curly braces
{{ variable }}to display the value of a variable. - Use curly braces with percent signs
{% ... %}to use logic likeforloops ({% for item in list %}...{% endfor %}) andifstatements ({% if condition %}...{% endif %}).
- Use double curly braces
In our next lesson, we will shift focus slightly. Instead of rendering full HTML pages, you will learn how to create an API endpoint. This is a special type of route that returns raw data in a format called JSON, which is essential for making your web page interactive without needing to reload it every time. This will be the bridge that connects your user interface to the backend AI processing.