Hello! Welcome back. In the last lesson, you successfully built and ran your first web server using Flask. You learned how to define a simple route (/) that responds to a browser's request with a "Hello, World!" message. That request your browser made was a GET request.
Today, we'll dive deeper into how browsers and servers communicate. You'll learn how to handle the two most common types of requests: GET and POST. Understanding this is essential for building an interactive web application, as it's the mechanism you'll use to receive the text a user wants to analyze in your AI writing tool.
By the end of this lesson, you will be able to define a single Flask route that can both display a form to the user (a GET request) and process the data submitted from that form (a POST request).
What are GET and POST Requests?
When your browser communicates with a web server, it uses a set of "methods" defined by the HTTP protocol. Think of these as different intentions for the communication. The two most fundamental methods are GET and POST.
- GET: Used to retrieve data from a server. When you type a URL into your browser, click a link, or just refresh a page, you are making a GET request. The data sent to the server is visible in the URL itself (e.g.,
google.com/search?q=flask). - POST: Used to send data to a server to be processed or stored. This is what happens when you fill out a login form, submit a comment, or, in our case, provide text for analysis. The data is sent in the body of the request, hidden from the URL, which is more secure and can handle much larger amounts of data.
To get a clearer picture of these concepts, let's watch a short explanation.
Flask Tutorial #4 - HTTP Methods (GET/POST) & Retrieving Form Data
This video from Tech With Tim provides a great introduction to the difference between GET and POST requests.
Watch the first 2 minutes and 9 seconds of the video (00:00 - 02:09). Focus on the core distinction: GET is for retrieving information and is not secure (data in URL), while POST is for sending secure/form data.
Building a Route to Handle Form Submissions
The most common use case for a POST request is submitting an HTML form. Let's build a simple login page to see how this works in Flask. This will involve two key steps:
- Creating an HTML page with a form.
- Creating a Flask route that can handle both displaying the form (GET) and processing the submitted data (POST).
Step 1: Creating the HTML Form and the templates Folder
Flask has a convention for organizing files. It expects all your HTML files to be in a folder named templates. You must create this folder in the same directory as your app.py file.
Your Project Structure:
my-ai-app/
├── venv/
└── app.py
└── templates/      <-- Create this folder
    └── login.html  <-- Create this file inside it
This folder structure is essential. The render_template() function we'll use later automatically looks inside this templates folder.
Now, create a new file inside the templates folder named login.html and add the following code:
<!DOCTYPE html>
<html>
<head>
    <title>Login Page</title>
</head>
<body>
    <h1>Please Log In</h1>
    <!-- This form will send a POST request to the /login URL -->
    <form method="POST" action="/login">
        <label>Username:</label>
        <!-- The 'name' attribute is crucial. Flask uses it to identify the data. -->
        <input type="text" name="username">
        <br>
        <button type="submit">Submit</button>
    </form>
</body>
</html>
Key points about this HTML:
<form method="POST" ...>: This tells the browser to send the form data using a POST request.... action="/login">: This specifies that the data should be sent to the/loginURL on our server.<input ... name="username">: Thenameattribute ("username") is the key we will use in our Python code to retrieve the value the user typed.
Step 2: Creating the Flask Route
Now, let's modify app.py to handle requests for this form. We need to create a single route, /login, that behaves differently depending on the request method.
- When a user first visits
/login(a GET request), we should show them the form. - When the user fills out the form and clicks "Submit" (a POST request), we should process their data.
First, update your app.py to import the necessary tools: render_template (to send our HTML file) and request (to access incoming request data).
from flask import Flask, render_template, request

app = Flask(__name__)
Now, let's define the /login route.
Flask Tutorial #4 - HTTP Methods (GET/POST) & Retrieving Form Data
The video you started earlier will now show you exactly how to write the Flask code for this. It covers adding methods to the route, checking the request type, and accessing the form data.
Watch the following segments: 2:39 - 3:26: How to add methods=['GET', 'POST'] to the @app.route decorator. 7:30 - 8:27: How to use if request.method == 'POST' to check the request type. 8:27 - 10:40: How to use request.form to get the data submitted by the user. As you watch, try to match what the presenter does with the complete code example below.
Here is the complete app.py code. Replace the content of your app.py with this:
from flask import Flask, render_template, request

# Create an instance of the Flask application
app = Flask(__name__)

# This route will not be used in this example, but you can keep it.
@app.route('/')
def home():
    return "This is the home page."

# Define the route for the login page
@app.route('/login', methods=['GET', 'POST'])
def login():
    # Check if the request is a POST request (form submission)
    if request.method == 'POST':
        # Get the username from the form data
        # 'username' must match the 'name' attribute in the HTML <input> tag
        username = request.form['username']
        return f'<h1>Welcome, {username}!</h1><p>Your form was submitted successfully.</p>'

    # If it's a GET request, just display the login form
    return render_template('login.html')

# This block allows you to run the app by executing this file directly
if __name__ == '__main__':
    app.run(debug=True)
Let's Run It!
- Make sure your virtual environment is active in your terminal (
(venv)should be visible). - Run your application:
python app.py. - Open your browser and go to
http://127.0.0.1:5000/login.- You are making a GET request. Your
loginfunction detects this and executesrender_template('login.html'), showing you the form.
- You are making a GET request. Your
- Type a name into the username field and click "Submit".
- The browser now makes a POST request to
/login. - This time,
request.method == 'POST'is true. The code inside theifblock runs, extracts your name fromrequest.form, and returns a personalized welcome message.
- The browser now makes a POST request to
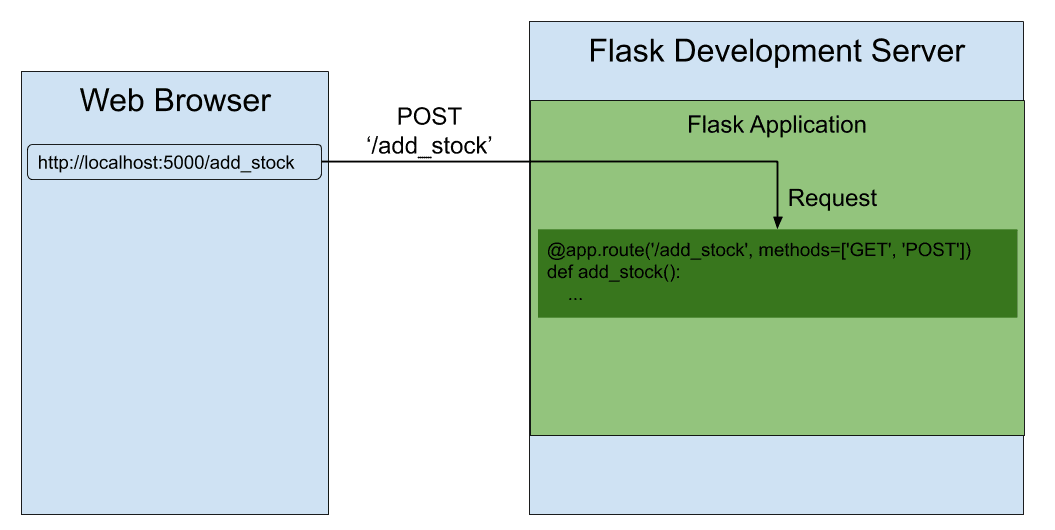
This diagram illustrates the flow of the POST request you just triggered.
Test your understanding!
Modify the login.html file to add a password input field. Give it the name attribute "password". Then, update your app.py file so that when the form is submitted, it retrieves both the username and the password and prints them to the terminal (using print()). The page should still display the "Welcome, [username]!" message.
Show answer
1. Updated templates/login.html:
<!DOCTYPE html>
<html>
<head>
    <title>Login Page</title>
</head>
<body>
    <h1>Please Log In</h1>
    <form method="POST" action="/login">
        <label>Username:</label>
        <input type="text" name="username">
        <br>
        <label>Password:</label>
        <!-- Add a password input field -->
        <input type="password" name="password">
        <br>
        <button type="submit">Submit</button>
    </form>
</body>
</html>
2. Updated app.py (the login function):
@app.route('/login', methods=['GET', 'POST'])
def login():
    if request.method == 'POST':
        username = request.form['username']
        # Retrieve the password from the form
        password = request.form['password']

        # Print the values to the terminal where you ran `python app.py`
        print(f"Received Username: {username}, Password: {password}")

        return f'<h1>Welcome, {username}!</h1><p>Your form was submitted successfully.</p>'

    return render_template('login.html')
After making these changes, run the form again. You will see the credentials printed in your terminal window, demonstrating that you successfully received the data on the server.
Conclusion
You have just mastered a fundamental concept in web development. The ability to receive and process data from a user via a form is the backbone of almost every interactive web application.
Key Takeaways:
- HTTP Methods: GET is for retrieving pages, while POST is for sending data to be processed.
- Flask Routes for Methods: You can specify which methods a route accepts using
methods=['GET', 'POST']in the decorator. - The
requestObject: Imported fromflask, therequestobject gives you access to all information about the incoming request. - Checking the Method: You use
if request.method == 'POST':to run specific code for form submissions. - Accessing Form Data: You retrieve data from a submitted form using
request.form['field_name'], wherefield_namematches thenameattribute in your HTML<input>.
In the next lesson, we will look more closely at render_template. You'll learn how to pass Python variables into your HTML files, allowing you to dynamically generate content on the server before sending it to the user. This will be a key step in displaying the AI-generated results in your application.