Hello! Welcome to the next lesson in your journey to building a web application.
In our last session, we focused on a critical security step: adding your secret Gemini API key to your live application on Render using environment variables. That action triggered a re-deployment. Today, we'll explore the complete process of deploying your application from a Git repository for the first time, which is the foundation for all subsequent updates.
This lesson directly addresses how to get your application code from your computer onto a cloud service like Render. By the end, you will be able to deploy your entire project from a GitHub repository, a fundamental skill for any web developer.
The Deployment Workflow: From Your Code to the Cloud
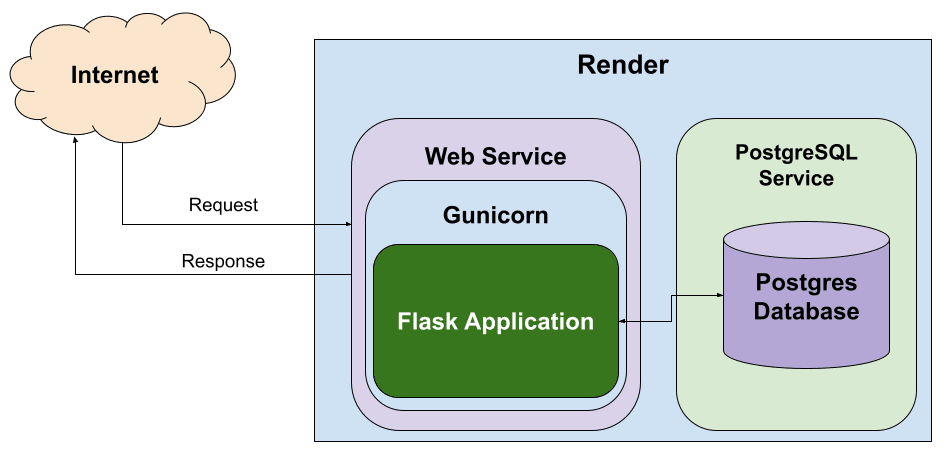
Before we dive into the steps, let's look at the big picture. When you deploy an application, you're placing your code on a powerful, internet-connected computer (a server) that can run it and serve it to users. A "Platform as a Service" (PaaS) like Render automates this entire process for you.
The workflow looks like this:
- You write code on your local machine.
- You push that code to a central Git repository (like GitHub).
- You instruct a cloud platform (Render) to watch that repository.
- Render pulls your code, builds it, and runs it on its servers.
- Whenever you push new code to GitHub, Render automatically repeats the process.
Step 1: Preparing Your Project in a GitHub Repository
The first and most important requirement for this process is that your application's code lives in a GitHub repository. This repository acts as the single source of truth for your deployment.
Render needs two key things from your repository:
- Your application code (
app.py,templates/, etc.). - A
requirements.txtfile listing all the Python packages your app needs to run.
There's also one crucial thing to exclude: your virtual environment folder (e.g., venv). This folder is large and specific to your local machine. We use a .gitignore file to tell Git to ignore it. Render will create its own environment based on requirements.txt.
The following video provides an excellent walkthrough of preparing a Flask project and pushing it to a new GitHub repository.
How to Deploy a Flask App to Render | Flask Render Deployment
Watch this segment from the video 'How to Deploy a Flask App to Render' by Arpan Neupane. It demonstrates how to initialize a Git repository, create a .gitignore file to exclude the virtual environment, and push your code to a new repository on GitHub.
Watch from 03:25 to 05:37. Focus on the commands used: git init, git add ., git commit, and git push. Also, note how the .gitignore file is created and what is put inside it.
By completing these steps, you have a clean, deployable version of your code ready and waiting on GitHub.
Step 2: Creating and Connecting Your Render Web Service
Now that your code is on GitHub, you can create a service on Render and link it to your repository. This tells Render where to find your code.
In the previous lesson, you already had a service running. Here, we'll focus on the steps to create a new one from scratch.
This process involves:
- Logging into your Render dashboard.
- Choosing to create a new "Web Service".
- Providing the URL of your public GitHub repository.
Let's continue with the same video, as it flows directly into this step.
How to Deploy a Flask App to Render | Flask Render Deployment
This next clip shows how to create a new Web Service on Render and connect it to the public GitHub repository you just created.
Watch from 05:37 to 07:00. Observe how a new 'Web Service' is created and how the public GitHub repository URL is used to connect it.
Step 3: Configuring the Build and Start Commands
After connecting your repository, you need to give Render two critical instructions:
-
Build Command: What command should Render run to install your project's dependencies?
- For a Python project, this is always:
pip install -r requirements.txt. This command tellspipto install all the libraries listed in yourrequirements.txtfile.
- For a Python project, this is always:
-
Start Command: What command should Render run to start your application server?
- For a Flask application in production, we use a production-ready server like Gunicorn. The command is:
gunicorn app:app. - Let's break this down:
gunicorn: The name of the server program.app: The name of your Python file without the.py(e.g.,app.py).:app: The name of the Flask application variable inside that file (e.g.,app = Flask(__name__)).
- For a Flask application in production, we use a production-ready server like Gunicorn. The command is:
These commands are the bridge between your code and Render's infrastructure.
Render's official documentation provides a clear table of these important configuration fields. Reading this will solidify your understanding of what each field does.
In this guide, find the section titled '4. Configure deployment' and review the table under 'Important web service fields'. Pay special attention to the descriptions for 'Build Command' and 'Start Command'.
The next part of the video walks you through filling out these exact fields in the Render dashboard.
How to Deploy a Flask App to Render | Flask Render Deployment
Let's see these configuration steps in action. This clip demonstrates how to set the build and start commands correctly for a Flask application.
Watch from 07:00 to 09:31. The presenter explains each configuration option, including the crucial build and start commands. Note the explanation of why the start command is gunicorn app:app.
Test your understanding!
You are deploying your project, and the main file is named main.py. Inside this file, your Flask application object is created with the line my_app = Flask(__name__). What should you set as your Start Command on Render?
Show answer
The Start Command should be gunicorn main:my_app. This tells Gunicorn to look in the main.py file for a Flask instance named my_app.
Step 4: Kicking Off the Deployment
Once you've configured the service, you're ready to deploy. You simply scroll to the bottom of the page and click Create Web Service.
Render will now do the following:
- Pull the latest code from your
mainbranch on GitHub. - Run the Build Command (
pip install -r requirements.txt). - Run the Start Command (
gunicorn app:app). - If successful, your application is now live at the
.onrender.comURL provided!
This same process happens automatically every time you git push a new change to your GitHub repository, which is how you'll update your application with new features.
How to Deploy a Flask App to Render | Flask Render Deployment
Finally, let's watch the deployment happen and see the result.
Watch from 09:31 to 10:35. You'll see the deployment process begin and end with a 'Live' status. The presenter then clicks the public URL to verify that the app is running.
Conclusion
Congratulations! You now understand the complete workflow for deploying a web application from a Git repository. This is a powerful and standard industry practice that separates your code development from the mechanics of hosting and running it.
Key Takeaways:
- A Git repository (on GitHub) is the source of truth for your deployed application.
- A
.gitignorefile is essential for keeping unnecessary local files (likevenv) out of your repository. - Deployment platforms like Render connect directly to your GitHub repository.
- The Build Command (
pip install -r requirements.txt) installs your dependencies. - The Start Command (
gunicorn app:app) runs your application using a production server. - Pushing new commits to your main branch on GitHub will automatically trigger a new deployment.
Preview of the Next Lesson
Your application is deployed, but what if something goes wrong? Sometimes deployments fail, or the live app has hidden bugs. In our next lesson, we will learn how to monitor deployment logs for errors and confirm a successful launch, ensuring your application is not just live, but also healthy.