Hello! Let's get your AI-powered application fully working online.
In our last lesson, you accomplished a major milestone: you deployed your Flask application to Render, making it live on the internet. However, we ended on a cliffhanger. Your application is running, but the core AI feature doesn't work because the deployed app has no access to your secret Gemini API key.
Today, we will solve that problem. This lesson focuses on securely configuring your live application with the necessary secrets, like your API key. By the end, you'll understand how to manage sensitive data in a production environment, and your AI Writing Assistant will be fully functional for anyone to use.
1. The Problem: Different Environments, Different Secrets
Remember how you set up your GEMINI_API_KEY on your local computer? You likely set it in your terminal or used a .env file that you (correctly) kept out of your GitHub repository. Your local computer is one environment.
The Render server where your app is now living is a completely separate computer. It's a fresh, clean production environment. It has a copy of your code from GitHub, but it has no knowledge of the files or settings on your personal machine.
This separation is a critical security feature. Your code, which is safe to share on GitHub, is kept apart from your secrets (like API keys), which must remain private. Our task is to provide the API key to the Render environment securely, without ever writing it into our code.
2. How to Configure Environment Variables on Render
The process involves telling Render the name of the secret (the "key") and its value. Your Python code already knows what to look for—GEMINI_API_KEY. We just need to provide it.
First, let's look at the official documentation from Render to get a clear picture of the process.
Environment Variables and Secrets
Render's official documentation explains exactly how to manage environment variables for your service. This is the most reliable source of information for how the platform works.
Please read the first part of the document under the heading 'Setting environment variables', specifically the subsection 'In the Render Dashboard'. This will show you where to find the settings and what the interface looks like. You can stop when you reach the section on 'Blueprints'.
As the documentation shows, the steps are straightforward:
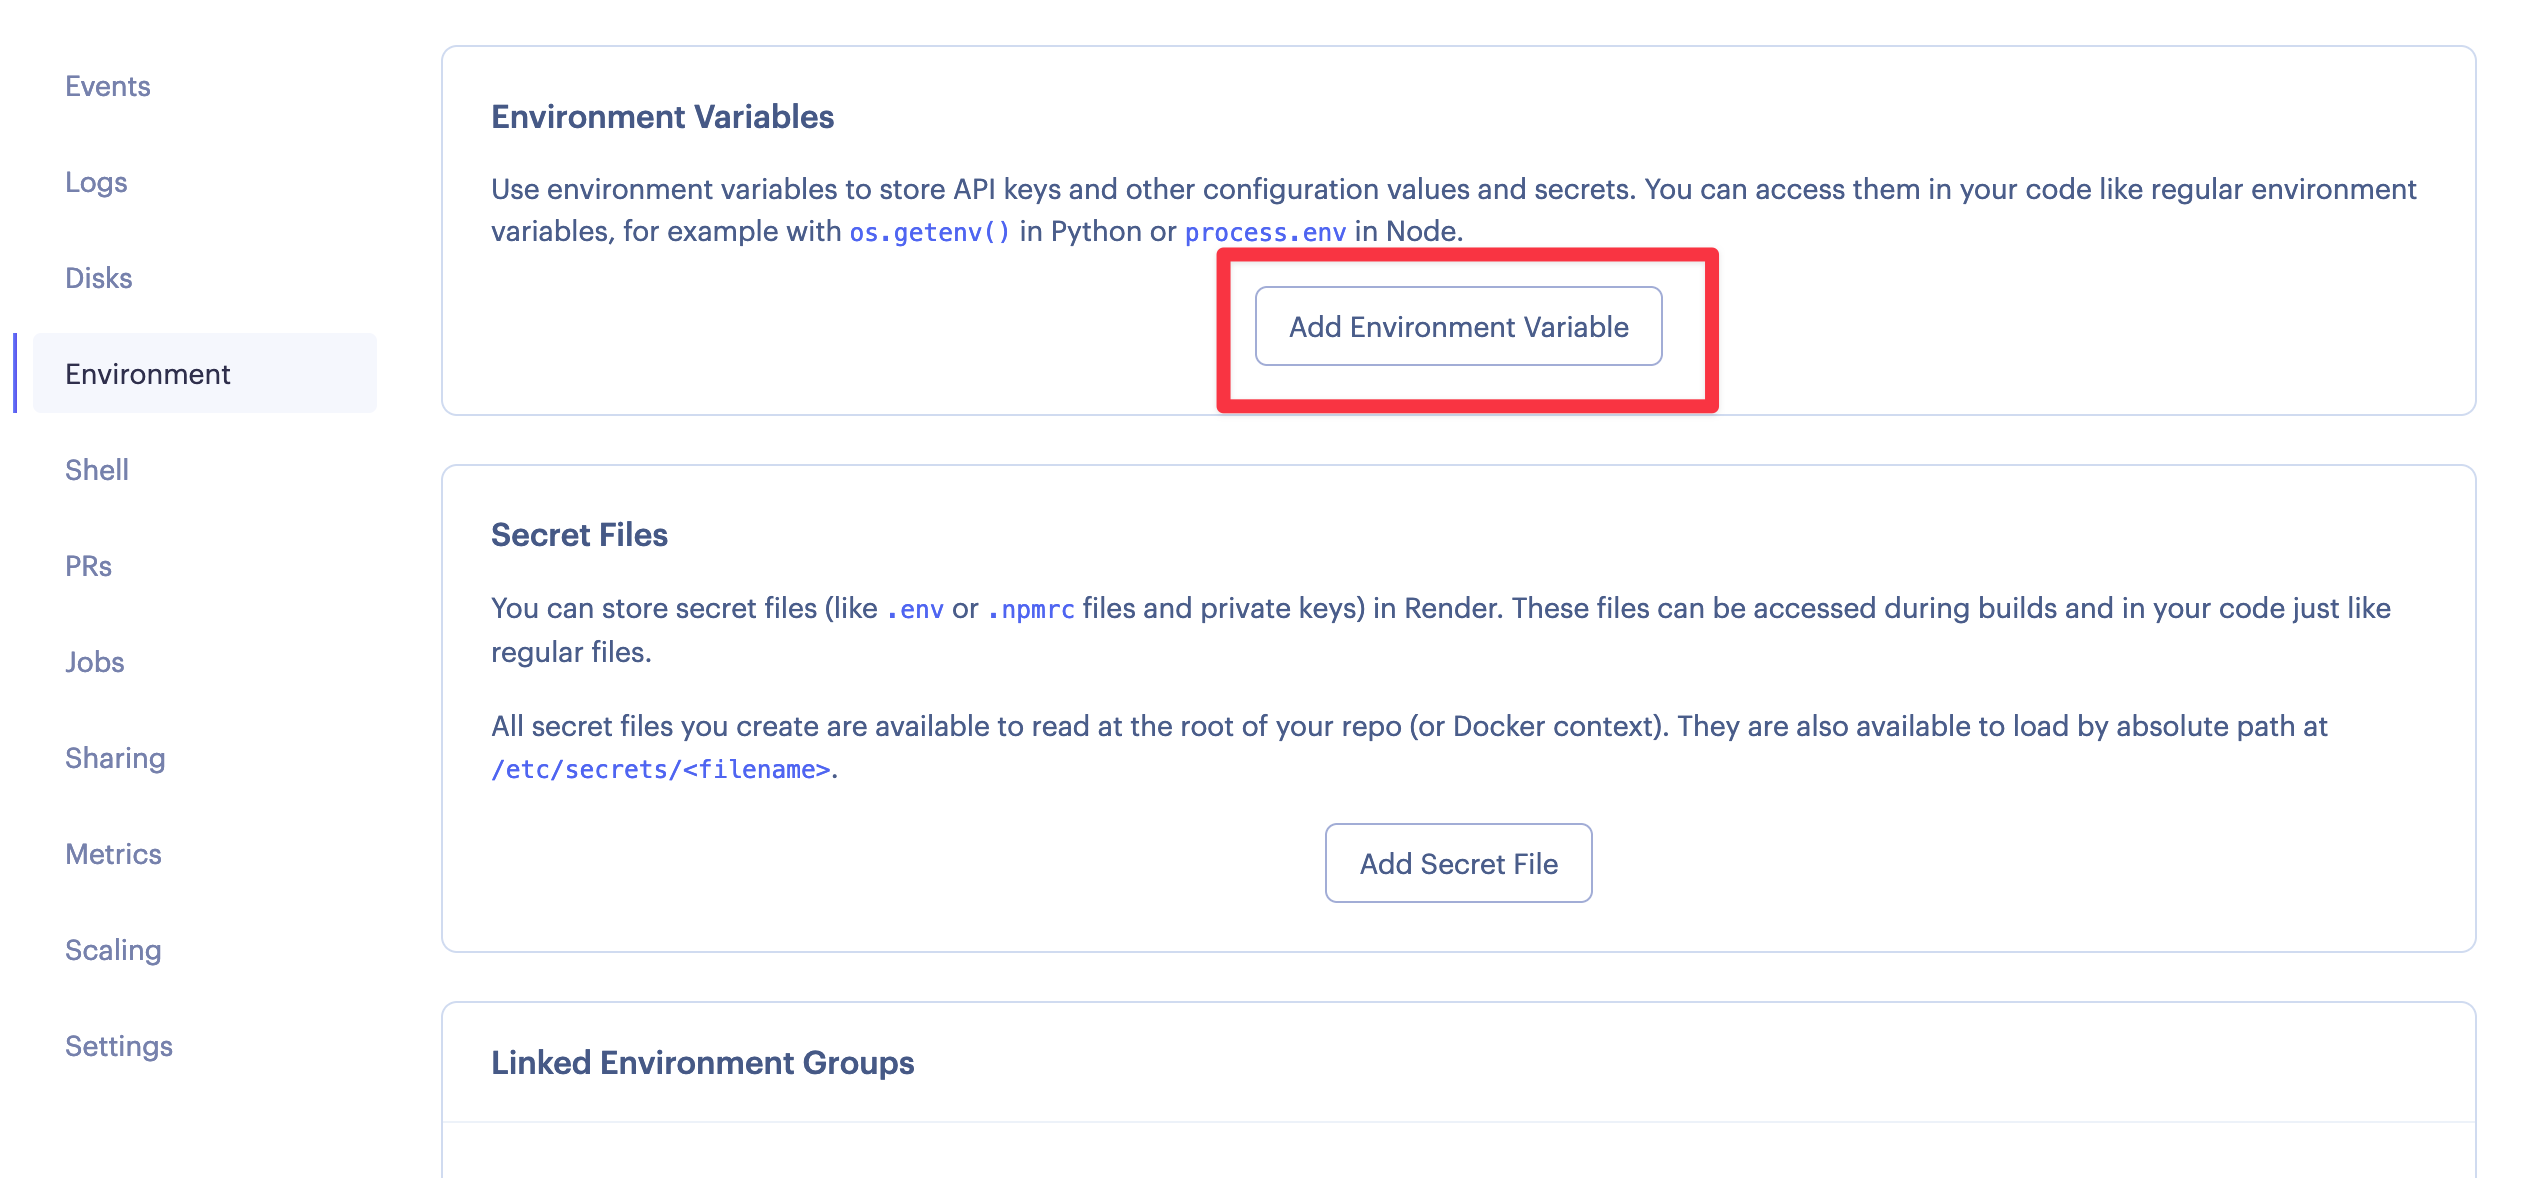
- Go to your Render Dashboard.
- Click on the name of your web service (e.g.,
yourname-ai-writer). - In the menu on the left, click Environment.
- Under the Environment Variables section, click the + Add Environment Variable button.
This will present you with two boxes: one for the Key and one for the Value.
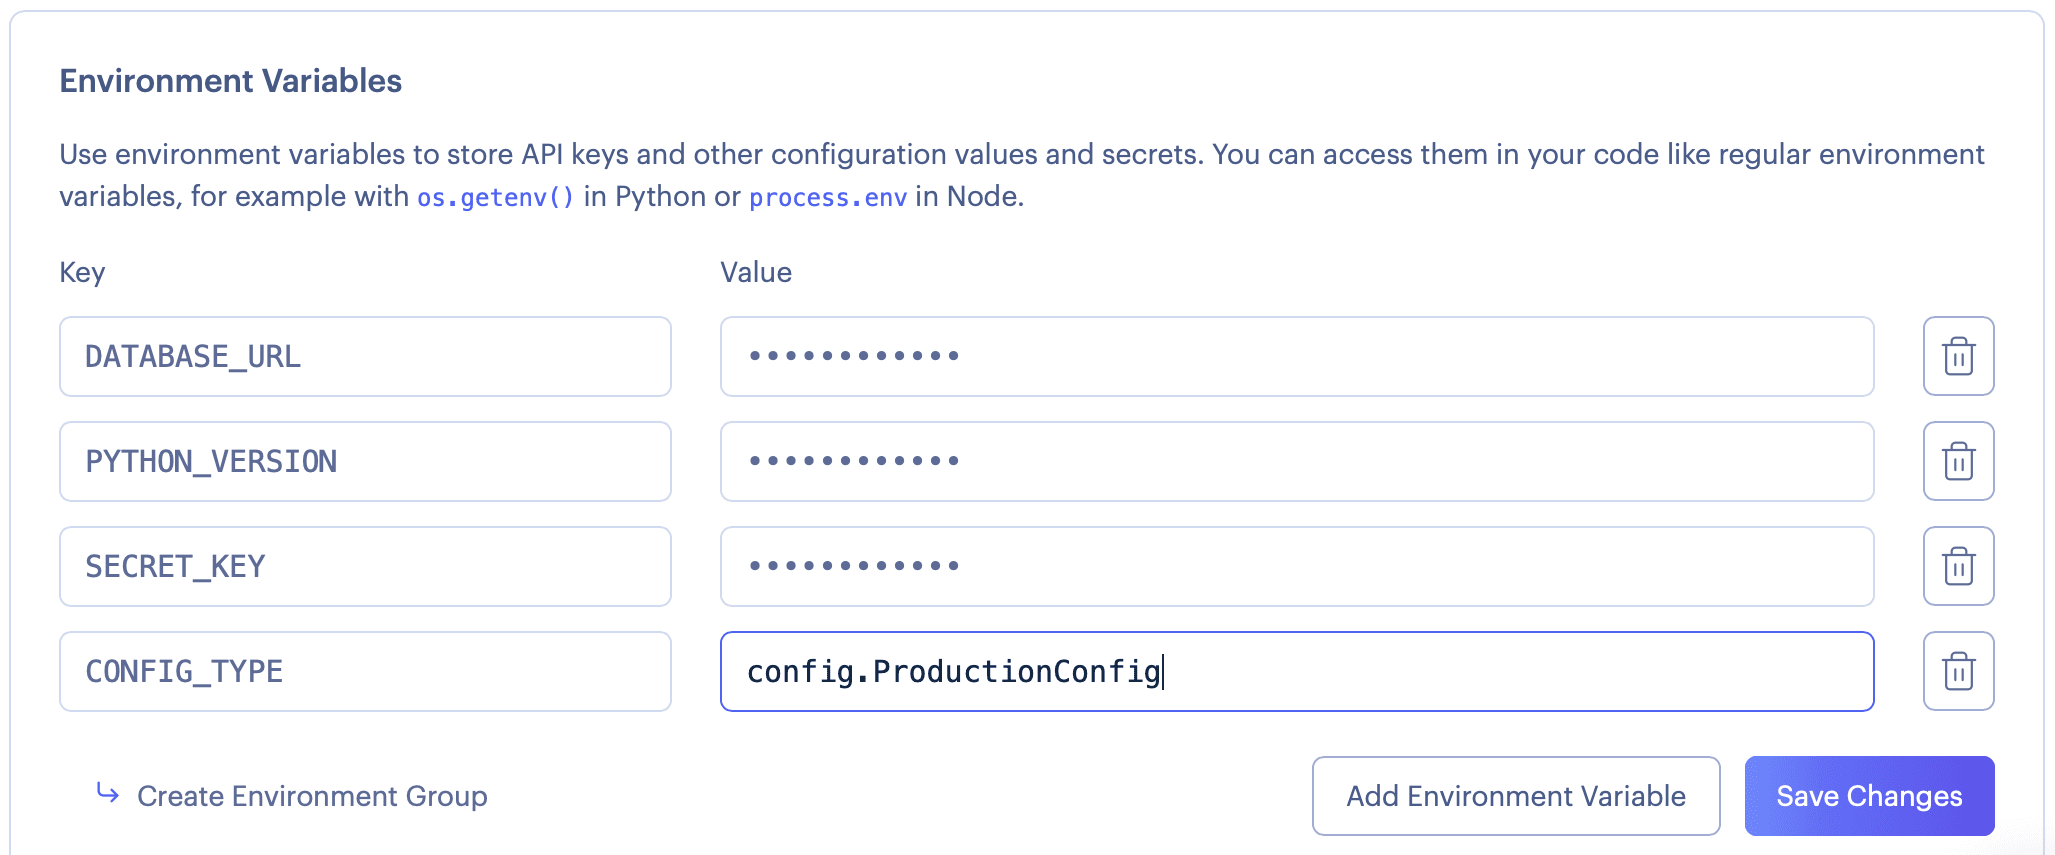
Here is what you need to enter:
- Key:
GEMINI_API_KEY- This must match exactly what you have in your Python code:
os.getenv("GEMINI_API_KEY"). Capitalization matters.
- This must match exactly what you have in your Python code:
- Value: Paste your actual Gemini API key here.
- This is the long string of characters you got from Google AI Studio.
After entering the key and value, click Save Changes.
Now, let's watch a short video that shows this exact process in action. The presenter is setting up a database URL, but the steps are identical for our GEMINI_API_KEY.
How to Deploy a Flask App and Postgres Database to Render
This video clip demonstrates adding an environment variable to a deployed app on Render. Notice how saving the new variable automatically triggers a new deployment to apply the changes.
Watch the segment from 14:05 to 15:09. Pay close attention to how the presenter navigates to the 'Environment' tab, adds a new variable with a key and a value, and saves the changes.
When you save the new environment variable, Render will automatically start a new deployment. This is because the environment has changed, and the application needs to be restarted to access the new variable. You can monitor this new deployment in the Events or Logs tab, just like you did in the last lesson.
Test your understanding!
You follow the steps but accidentally enter GEMINI_KEY as the key in the Render dashboard instead of GEMINI_API_KEY. When you test your live application after it redeploys, what do you expect to happen and why?
Show answer
The AI feature will still fail. Your Python code is specifically looking for an environment variable named GEMINI_API_KEY because of the line os.getenv("GEMINI_API_KEY"). Since it can't find a variable with that exact name, os.getenv() will return None, and the API call will fail, just as it did before. The names must match perfectly.
3. Tying It All Together
Let's quickly review how this connects back to your code. Your Flask app contains this line:
import os

# ... later in your code where you call the API ...
api_key = os.getenv("GEMINI_API_KEY")
This code is beautifully simple and portable. It doesn't care where it's running. The os.getenv() function simply asks the underlying operating system, "Do you have a variable named GEMINI_API_KEY? If so, give me its value."
- On your local machine, the operating system found the variable you set in your terminal.
- On the Render server, the operating system will now find the variable you just set in the web dashboard.
This principle of separating configuration (like API keys) from your code is a fundamental practice in modern software development. It makes your application more secure, flexible, and easier to manage.
4. Verification
Once the new deployment is finished (you'll see a "Live" status), it's time to test.
- Navigate to your application's public URL (e.g.,
https://your-app-name.onrender.com). - Enter some text into the text area and click the submit button.
If everything is configured correctly, the application should now successfully call the Gemini API, and you will see the AI-generated response on your web page.
Conclusion
Fantastic work! You have now mastered one of the most critical aspects of deploying a real-world application: managing secrets and configuration. Your AI Writing Assistant is not only live on the internet but is also fully functional and secure.
Key Takeaways:
- Never commit secrets (like API keys) to your Git repository.
- Deployment platforms like Render provide a secure way to manage secrets for your live application through environment variables.
- You must configure these variables in the platform's environment settings, ensuring the keys match what your code expects (e.g.,
GEMINI_API_KEY). - Saving a new environment variable triggers a re-deployment to apply the changes.
- Your code (
os.getenv()) works universally, reading the variables from whichever environment it is running in.
Preview of the Next Lesson
Your application is live and working! The final step in the deployment process is to perform a thorough check. In the next lesson, you will learn how to monitor your deployment logs for any hidden errors and perform a final test of your live, deployed application to ensure it's robust and ready for users.