Hello! Welcome to the next step in your journey to becoming a web developer.
In our last lesson, we took a crucial step by configuring our Flask application for a production environment. We disabled the insecure debug mode and planned to use a professional-grade server instead of Flask's built-in one. Our app's code is now ready for the world to see.
Today, we will bring your AI Writing Assistant to life on the internet. This process is called deployment. Our goal is to create a new web service on a cloud platform, which will act as the home for your application. We'll focus on a platform called Render, which is modern, easy to use, and has a free plan perfect for our project.
1. What is a Cloud Platform?
Until now, your app has only run on your local computer. To make it accessible to anyone on the web, we need to run it on a server that's always on and connected to the internet.
A Platform as a Service (PaaS) like Render or PythonAnywhere provides exactly that. Think of it as renting a fully-equipped professional kitchen. They manage the building (hardware), the electricity (networking), and the ovens (operating system), so you can focus on what you do best: cooking (writing code).
This diagram shows how it all fits together on a platform like Render.
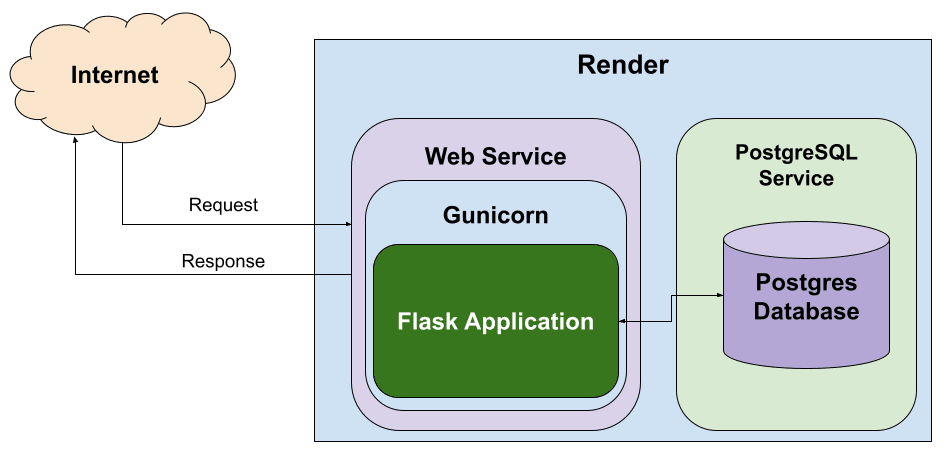
2. Final Preparations for Deployment
Before we can upload our project, we need to make a few final adjustments. This ensures the cloud platform has everything it needs to run our code correctly.
A. Switching to Gunicorn
In the last lesson, we prepared to use a production server called Waitress. For this deployment, we'll switch to another, very popular server called Gunicorn. The reason is that many cloud platforms, including Render, are designed to work seamlessly with it. The core principle is the same: we are using a professional server instead of Flask's simple development one.
Since Render will start Gunicorn for us using a command, we don't need the if/else block we added to app.py anymore. Render will completely bypass that part of the code.
-
Install Gunicorn: Open your terminal (with your virtual environment active) and run:
pip install gunicorn -
Simplify
app.py: You can now remove theif/elseblock at the end of yourapp.pyand theWaitressimport. Yourif __name__ == '__main__':block should go back to the simple version we used for development. This is because when we run the app locally, we want the debug server, and when we deploy, Render will ignore this block anyway.Your
app.pyfile should end like this again:# ... all your Flask routes are above this ... if __name__ == '__main__': app.run(host='0.0.0.0', port=5000, debug=True)Don't forget to remove the
from waitress import serveandimport oslines if they are no longer used.
B. Creating the requirements.txt File
The cloud platform needs to know which Python packages your project depends on (like Flask, gunicorn, and google-generativeai). We list these in a file called requirements.txt.
In your terminal, run this command:
pip freeze > requirements.txt
This command "freezes" the current state of your virtual environment's packages and saves that list into the file. You should now see a requirements.txt file in your project folder.
C. Pushing Your Code to GitHub
Modern deployment platforms like Render work best by connecting directly to a GitHub repository. When you push new code to GitHub, Render can automatically update your live application.
The following video provides an excellent guide for the steps we've just discussed: installing Gunicorn, creating requirements.txt, and getting your code onto GitHub.
How to Deploy a Flask App to Render | Flask Render Deployment
The video 'How to Deploy a Flask App to Render' by Arpan Neupane will walk you through these preparation steps.
Please watch the following segments carefully: Setup and Gunicorn (0:55 - 3:25): This covers installing Gunicorn and creating the requirements.txt file. You can skip the parts about creating a virtual environment, as you already have one. Pushing to GitHub (3:25 - 5:50): This shows how to create a GitHub repository, create a .gitignore file to exclude your virtual environment, and push your code.
After following the video, all your project code, including the new requirements.txt file, should be in a GitHub repository.
3. Creating Your Web Service on Render
Now for the main event! Let's get your application online. We'll create a "Web Service" on Render, which is the platform's name for a live, running backend application.
This process involves:
- Signing up for Render.
- Pointing Render to your GitHub repository.
- Telling Render how to build and run your Flask app.
This next video segment continues exactly where the last one left off, guiding you through the Render interface.
How to Deploy a Flask App to Render | Flask Render Deployment
Let's continue with the 'How to Deploy a Flask App to Render' video. This part shows the actual deployment process on the Render website.
Watch from 5:50 to 9:45. Follow along to create your account and web service. Pay close attention to the configuration steps:
Here is a summary of the settings you need to configure on Render, as shown in the video and the image below.

- Connect Repository: Connect your GitHub account and select the repository for your AI Writing Assistant.
- Name: Give your service a unique name (e.g.,
yourname-ai-writer). This will be part of its public URL. - Root Directory: Leave this blank.
- Region: Choose a region closest to you.
- Branch:
main(ormaster, depending on your repository's default). - Build Command:
pip install -r requirements.txt. This tells Render to install all your packages. - Start Command:
gunicorn app:app. This is the most important command! It tells Render how to run your app.gunicorn: The server program.app: The name of your Python file without the.py(our file isapp.py).:app: The name of the Flask application variable inside your file (app = Flask(__name__)).
- Instance Type: Select the Free plan.
Once you have filled in these details, click the "Create Web Service" button at the bottom of the page.
Test your understanding!
A friend sees your Render start command, gunicorn app:app, and asks what would happen if they had named their main Python file main.py and their Flask variable my_flask_app = Flask(__name__). What would their start command need to be?
Show answer
Their start command would need to be gunicorn main:my_flask_app. The format is gunicorn <python_file_name>:<flask_variable_name>.
4. Monitoring the Deployment
You've done it! Render is now deploying your application. This process isn't instantaneous. Render is essentially doing the following in the cloud:
- Creating a new virtual machine for you.
- Cloning your code from GitHub.
- Running the Build Command (
pip install...). - Running the Start Command (
gunicorn...).
You can watch this happen in real-time. On your service's page in Render, go to the "Logs" tab. You'll see the output from the commands, just as if you were running them in your own terminal. Reading logs is a fundamental skill for every developer, as it's the primary way to diagnose problems.
After a few minutes, you should see a message indicating success, and at the top of the page, it will say "Your service is live".
How to Deploy a Flask App to Render | Flask Render Deployment
The final part of the video shows what a successful deployment looks like.
Watch the last part of the video (9:45 - 10:35) to see how to check the logs and access your live application using the URL provided by Render.
Click the URL at the top of your Render service page. You should see your AI Writing Assistant's web page, live on the internet!
5. An Alternative: PythonAnywhere
The learning outcome mentioned PythonAnywhere as another option. It's also a great platform with a generous free tier. While we won't go through a full tutorial, it's useful to know how it differs.
- Render: Uses a Git-native workflow. You push to GitHub, and Render pulls the changes automatically. Configuration is done through a web form.
- PythonAnywhere: Uses a more manual, console-based workflow. You open a command line on their website,
git cloneyour repository yourself, create a virtual environment, and edit a special configuration file (WSGI file) to point to your app.
If you are curious, you can explore these resources later. For now, sticking with Render is perfectly fine.
Setting up Flask applications on PythonAnywhere
The official PythonAnywhere documentation provides a text-based guide for deploying Flask apps.
If you're interested, you can skim the sections 'Setting up the Web app using Manual configuration' and 'Configuring the WSGI file' to see how the process differs from Render.
Conclusion
Congratulations! You have successfully deployed a web application to the cloud. You've taken your code from a local machine and made it accessible to the world. This is a massive milestone in your journey as a developer.
Key Takeaways:
- A Platform as a Service (PaaS) like Render hosts our application on the internet.
- Deployment requires a prepared project: a production server (
Gunicorn), a list of dependencies (requirements.txt), and a version-controlled codebase (on GitHub). - We created a Web Service on Render and configured it with a build command (to install packages) and a start command (to run the server).
- Monitoring logs is essential for checking deployment progress and debugging errors.
Your application is now live! However, if you try to use the AI functionality, it will probably fail. Why? Because the deployed application doesn't know your Gemini API key. We securely stored it in an environment variable on our local machine, but the cloud server has no access to it.
In our next lesson, we will solve this final piece of the puzzle. You will learn how to securely provide your API key and other secret credentials to your live application using environment variables on the deployment platform.