Hello! Welcome to the first lesson in our module on CSS. It's time to start giving your web application a unique look and feel.
In our last lesson, you successfully created and linked a style.css file to your index.html. You even wrote your first CSS rule to change the background color of the <body>. That body part of your rule was your very first CSS selector. Today, we're going to dive deep into this fundamental concept.
This lesson is all about how to apply CSS styles to HTML elements using class, id, and element selectors. Think of selectors as the way you "select" or "target" the specific parts of your HTML that you want to style. Mastering them is the first and most crucial step in CSS.
What are CSS Selectors?
At its core, styling with CSS is a two-step process:
- Select an element (or elements) from your HTML document.
- Apply a set of style rules to it.

The part of a CSS rule that does the "selecting" is the selector. Let's get a quick and friendly introduction to the different kinds of selectors we'll be covering today.
CSS Tutorial — Selectors, Element, Class and ID (3/13)
The video 'CSS Tutorial — Selectors, Element, Class and ID' from ColorCode provides a great high-level overview of what selectors are and why we need different types.
Watch the first 45 seconds of the video (from 00:04 to 00:45) to understand the core concept of selectors.
As the video explained, selectors are how we choose which elements to style. Let's look at the three most common types.
1. Element Selectors (or Type Selectors)
This is the most basic selector. You've already used it! When you wrote body { ... }, you were using an element selector. It targets all HTML elements of a specific type (or tag name) on the page.
Let's try styling some of the elements in your index.html.
Your Task:
Open your style.css file. We'll add some styles to all <h1> and <button> elements. Add the following code:
h1 {
  color: #003366; /* A dark blue color */
}

button {
  background-color: #007bff; /* A nice blue */
  color: white;
  border: none;
  padding: 10px 15px;
}
After adding this and saving the file, refresh your index.html in the browser. You should see your main heading and submit button are now styled. Every <h1> and <button> you add to your page will automatically get these styles.
Limitation: What if you wanted to style one paragraph differently from another? Or make one button bigger than the rest? An element selector is too general for that. This is where class and id selectors come in.
For a more formal definition, you can read about element selectors in this article.
The MDN Web Docs are an excellent, authoritative resource for web developers. We'll use their article 'Basic CSS selectors' to solidify our understanding.
Read the section titled 'Type selectors'. This section is short and reinforces what we've just discussed.
2. Class Selectors
The class selector is the most common and versatile selector you'll use. It lets you apply the same style to any number of different elements you choose.
Key characteristics:
- Syntax in CSS: A period (
.) followed by the class name (e.g.,.highlight). - Syntax in HTML: The
classattribute (e.g.,<p class="highlight">). - Reusability: You can apply the same class to as many elements as you want. An element can also have multiple classes.
Let's watch a quick explanation of how classes work.
CSS Tutorial — Selectors, Element, Class and ID (3/13)
Let's return to the ColorCode video to see how class selectors solve the problem of styling specific elements.
Watch from 01:18 to 04:00. Pay attention to how a class is defined in CSS (with a dot) and applied in HTML (with the class attribute).
Now, let's apply this to our project. Let's say we want to make our main form area stand out.
Your Task:
-
In
index.html, find your<form>element and add a class to it callededitor-form.<form class="editor-form"> <!-- Your textarea and button are inside here --> </form> -
In
style.css, add a new rule using this class selector:.editor-form { background-color: #ffffff; /* White */ padding: 20px; border-radius: 8px; /* Gives it slightly rounded corners */ box-shadow: 0 4px 8px rgba(0, 0, 0, 0.1); /* A subtle shadow */ }
Save both files and refresh your browser. Your form should now be contained within a nice-looking white card with a shadow. The power here is that you could apply this .editor-form class to any element to give it the same card-like appearance.
3. ID Selectors
The id selector is used to target one single, unique element on a page. While a class can be used many times, an id must be used only once per page.
Key characteristics:
- Syntax in CSS: A hash or pound symbol (
#) followed by the ID name (e.g.,#main-title). - Syntax in HTML: The
idattribute (e.g.,<h1 id="main-title">). - Uniqueness: An
idcan only be used for one element on the page.
Let's see a quick demonstration.
CSS Tutorial — Selectors, Element, Class and ID (3/13)
Finally, let's see how ID selectors work in the same ColorCode video. It's important to understand when to use an ID instead of a class.
Watch from 04:00 to 05:50. The key takeaway is that IDs are for one specific element.
IDs are best for major, unique structural elements, like the primary header, the main content area, or the footer.
Your Task:
-
In
index.html, let's give the<textarea>a unique ID. This will be very useful later when we need to grab its content with JavaScript.<textarea id="user-input" placeholder="Enter your text here..."></textarea> -
In
style.css, we can now target this specifictextareato style it without affecting any other textareas we might add later.#user-input { width: 100%; min-height: 150px; font-size: 16px; border: 1px solid #ccc; border-radius: 4px; }
Save your files and refresh. Your textarea should now be much larger and more prominent.
Test your understanding!
Given the following HTML snippet:
<div id="promo-banner">
  <p>Special offer today!</p>
  <a href="#" class="promo-link">Learn More</a>
</div>

<div>
  <p>This is a regular paragraph.</p>
  <a href="#" class="regular-link">Click here</a>
</div>
How would you write CSS selectors to do the following?
- Make the text of the "Special offer today!" paragraph
red. - Make the background color of the "Learn More" link
yellow. - Make all links (
<a>tags) on the page haveboldtext.
Show answer
Here are the CSS rules:
- To target the paragraph inside the unique
promo-bannerdiv, you can use a more specific selector:#promo-banner p { color: red; } - To target only the link with the
promo-linkclass:.promo-link { background-color: yellow; } - To target all link (
<a>) elements, you use an element selector:a { font-weight: bold; }
(Don't worry about the #promo-banner p syntax; it's called a descendant selector, which we'll cover in a future lesson. The main point is recognizing when to use an ID, class, or element selector.)
Summary: Which Selector to Use?
Here's a quick guide:
- Use an element selector (
h1,p) for general, site-wide default styles. - Use a class selector (
.btn,.card) for styles you want to reuse on multiple elements. This will be your most-used selector. - Use an ID selector (
#main-nav,#user-input) for a single, unique element on the page.
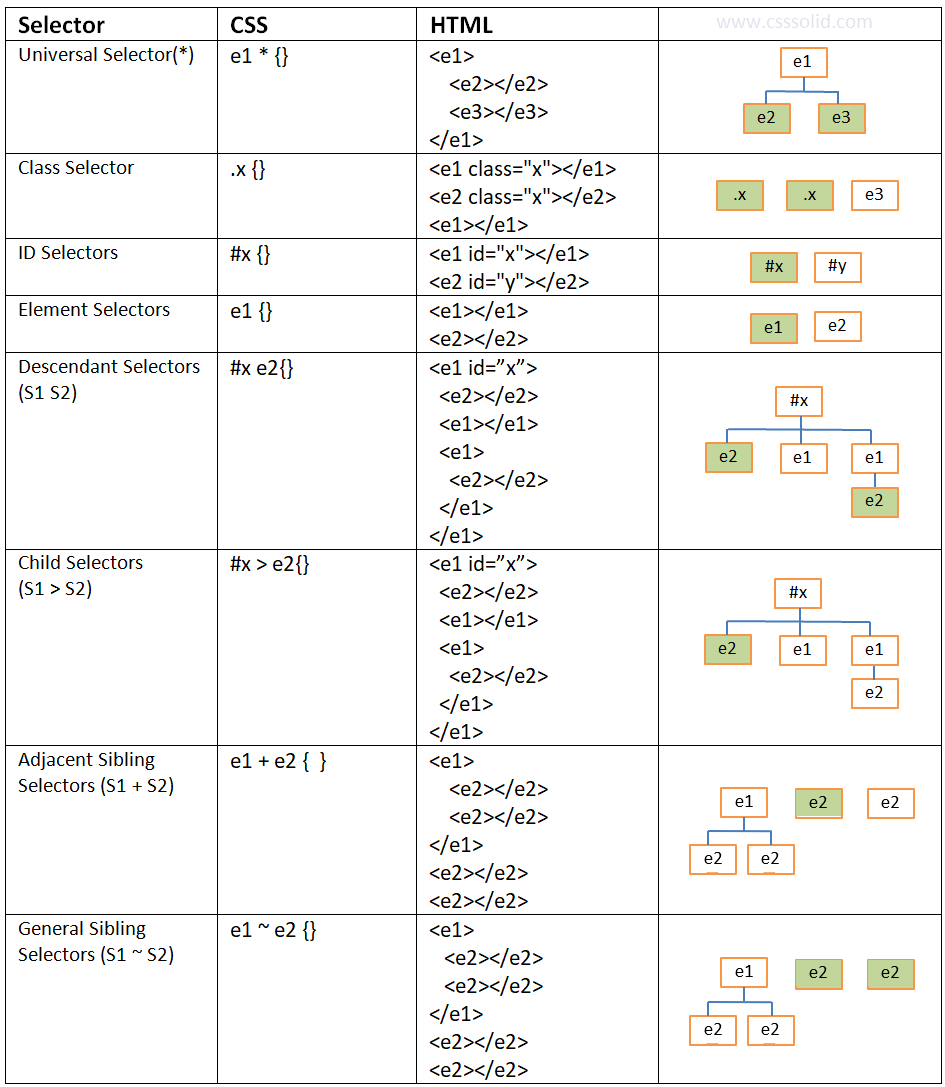
This "cheat sheet" is a great visual summary of the selectors we discussed and a few others we will learn about later. Focus on the Element, Class, and ID selectors for now.
Conclusion
Great work! You've just learned the single most important concept in CSS. Understanding how to correctly and efficiently target elements with element, class, and ID selectors is the foundation upon which all your styling work will be built.
Key Takeaways:
- Element Selectors (e.g.,
p) apply styles to all tags of a certain type. - Class Selectors (e.g.,
.important) apply styles to any element with that class attribute, and are reusable. - ID Selectors (e.g.,
#header) apply styles to one unique element on the page. - The syntax is crucial:
tagname,.classname, and#idname.
In our next lesson, we'll build on this knowledge. Now that you know how to select elements, we will explore more CSS properties to control the appearance of text using font, color, and size properties.