Introduction
Hello again! In our last lesson, you successfully implemented a physics system where objects are affected by forces like gravity. They now accelerate downwards realistically, which is a fantastic step forward. However, as you've likely noticed, they don't interact with anything; they simply fall through the "ground" and off into infinity.
Today, we will address this by implementing collision response. The goal of this lesson is to implement a simple 'stop' collision response for Axis-Aligned Bounding Box (AABB) intersections. This means that when a moving object hits a static object, it will come to a complete halt on the axis of collision, preventing it from passing through.
This process involves two distinct phases:
- Collision Detection: Determining if two objects are overlapping.
- Collision Resolution: Deciding what to do when an overlap is detected.
We've touched on detection before, but today our focus is on resolution—the logic that makes objects feel solid.
The Two Phases of Collision Handling
Before we dive into code, it's crucial to understand the conceptual separation between detection and resolution.
COMP4300 - Game Programming - Lecture 08 - Collision Detection & AABB
The following clip from a lecture by Dave Churchill at Memorial University clearly defines these two stages.
Watch from 2:35 to 3:49. The video explains that detection is a geometric problem (are shapes overlapping?), while resolution is a physics problem (what happens now?).
A Quick Review: AABB Intersection Detection
In a previous module, you learned how to detect if two AABBs are intersecting. The principle is straightforward: two AABBs intersect if and only if they overlap on all three axes (X, Y, and Z) simultaneously.
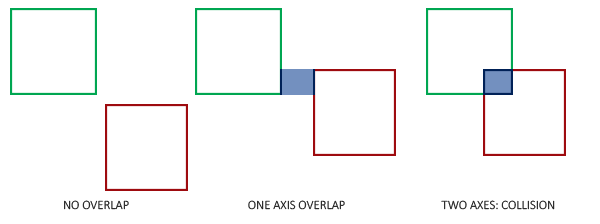
A clean way to implement this check is by comparing the distance between the centers of the two boxes to the sum of their "half-extents" (half of their width, height, and depth).
This PDF provides a concise C++ implementation of the AABB intersection test. While you've implemented this before, reviewing a clean example reinforces the concept.
Review the C++ function CollisionDetection::AABBTest. Notice how it calculates the difference (delta) between the positions and compares it to the sum of the half-sizes on each axis. This is the logic we will rely on.
A Naive Approach to Resolution: Post-Collision Correction
The most intuitive way to handle a collision is to:
- Move the object according to its physics simulation.
- Check if it's now overlapping with a static object.
- If it is, calculate the amount of overlap (the "penetration depth") and push the object back out.
This "move-then-correct" method is simple to understand and implement.
COMP4300 - Game Programming - Lecture 08 - Collision Detection & AABB
Let's watch a demonstration of this simple resolution technique.
Watch from 35:40 to 41:34. The video shows an entity moving, overlapping with a stationary block, and then being pushed out by the exact amount of the overlap. This is the core idea of post-collision correction.
The amount to "push back" the object is the penetration depth on the axis of minimum overlap. Why the minimum? Because that represents the shortest path to move the object out of collision.
The Flaw: The Tunneling Problem
While simple, the post-collision correction method has a significant flaw, especially in a game engine where objects can move at high speeds. This is often called the tunneling problem.
If an object's velocity is large enough, its entire volume can pass completely through a thin obstacle in a single time step (dt). In this case, the collision detection check in the next frame will find no overlap, and the collision will be missed entirely.
Arbitrary Rectangle Collision Detection & Resolution - Complete!
This video from javidx9 provides an excellent visual explanation of why this simple correction fails for fast-moving objects.
Watch from 13:02 to 15:57. Pay close attention to the diagrams showing an object moving per frame. You'll see how a fast object can penetrate or completely pass through a static one, leading to incorrect resolution or missed collisions.
This tells us we need a more robust solution—one that doesn't let the object get into an invalid state in the first place.
A Robust Solution: Proactive Collision Clipping
Instead of correcting a collision after it happens, we can prevent it from happening. The idea is to calculate how far an object can move along each axis before it hits something, and then limit its movement to that distance. This is a proactive "clipping" approach.
For each axis of movement (Y, then X, then Z):
- Determine the intended movement distance (
delta) on that axis based on velocity. - Check against all static colliders. For each one, calculate the maximum safe distance we can travel towards it before a collision occurs. This distance is the
clip. - If the intended
deltais greater than the calculatedclip, we cap our movement:delta = clip. - After checking all colliders, move the object by the final, potentially reduced,
deltaon that axis. - Repeat for the next axis.
The following article provides a clear implementation of this logic. While the code is in C#, the principles translate directly to C.
3D AABB Collision Detection and Resolution for Voxel Games
This article details the proactive clipping method. The core of the logic is in the GetClip functions.
Read the section starting with 'Okay, so how do we resolve collisions?'. Study the logic inside the GetClipX, GetClipY, and GetClipZ functions. Understand how they first check for overlap on other axes and then calculate the distance to the other AABB to determine the clip value.
Implementation
Let's integrate this robust "stop" response into your physics system.
1. Update Your Data Structures
First, we need to ensure our entities have AABB information. A simple way is to add the AABB's dimensions to the PhysicsBody component. Let's use half-extents, as this is common and simplifies calculations.
In your physics_component.h or similar file:
// Assuming you have a vec3 from cglm
typedef struct {
    vec3 velocity;
    vec3 force_accumulator;
    float mass;
    float inverse_mass;
    vec3 half_extents; // Add this! (width/2, height/2, depth/2)
} PhysicsBody;
You'll also need a way to distinguish moving entities from static ones. For now, we can continue to use inverse_mass: an inverse_mass of 0.0f signifies a static, immovable object.
2. Implement the GetClip Functions
Translate the logic from the C# example into C functions. These functions will take the moving AABB's properties, the static AABB's properties, and the intended movement delta, and return the clipped delta.
Here's an example for the Y-axis. You will need to create similar functions for X and Z.
// Helper functions you can put in physics_system.c

// Get the min/max corners of an AABB
void get_aabb_corners(vec3 pos, vec3 half_extents, vec3 min, vec3 max) {
    glm_vec3_sub(pos, half_extents, min);
    glm_vec3_add(pos, half_extents, max);
}

// Check for intersection on a single axis
bool intersects_on_axis(float min_a, float max_a, float min_b, float max_b) {
    return min_a < max_b && max_a > min_b;
}

float get_clip_y(Transform* moving_tf, PhysicsBody* moving_pb,
                 Transform* static_tf, PhysicsBody* static_pb,
                 float delta_y) {

    vec3 moving_min, moving_max, static_min, static_max;
    get_aabb_corners(moving_tf->position, moving_pb->half_extents, moving_min, moving_max);
    get_aabb_corners(static_tf->position, static_pb->half_extents, static_min, static_max);

    // Only clip if we could possibly collide on the other axes
    if (intersects_on_axis(moving_min[0], moving_max[0], static_min[0], static_max[0]) &&
        intersects_on_axis(moving_min[2], moving_max[2], static_min[2], static_max[2])) {

        // Moving up and are below the static object
        if (delta_y > 0 && moving_max[1] <= static_min[1]) {
            float clip = static_min[1] - moving_max[1];
            if (delta_y > clip) {
                delta_y = clip;
            }
        }
        // Moving down and are above the static object
        if (delta_y < 0 && moving_min[1] >= static_max[1]) {
            float clip = static_max[1] - moving_min[1];
            if (delta_y < clip) {
                delta_y = clip;
            }
        }
    }
    return delta_y;
}
Note: The C# code checks for m_maxY <= against.m_minY. In C, this is moving_max[1] <= static_min[1]. The logic is identical.
3. Modify the Physics Update Loop
Now, you must change your physics_system_update to use this axis-by-axis clipping method. The order is important to prevent weird corner-snagging issues. We resolve Y, move, then X, move, then Z, move.
3D AABB Collision Detection and Resolution for Voxel Games
The article we just read also provides the structure for the final Move function that brings this all together.
Study the Move() function. Note how it iterates through all colliders for each axis separately (foreach loop for Y, then move Y, then foreach for X, move X, etc.). Also, see how it zeros out the velocity on an axis if the movement was clipped. This is the 'stop' response.
Here's how you can adapt your physics_system_update function:
void physics_system_update(World* world, float dt) {
    // Iterate over all MOVING entities
    for (int i = 0; i < world->entity_count; ++i) {
        // Must have transform and physics components
        if ((world->entity_masks[i] & (COMPONENT_TRANSFORM | COMPONENT_PHYSICS_BODY)) !=
            (COMPONENT_TRANSFORM | COMPONENT_PHYSICS_BODY)) {
            continue;
        }

        PhysicsBody* physics = &world->physics_bodies[i];

        // Skip static objects
        if (physics->inverse_mass <= 0.0f) {
            continue;
        }

        Transform* transform = &world->transforms[i];

        // --- Standard physics update (from last lesson) ---
        vec3 gravity_force;
        glm_vec3_scale(GRAVITY, physics->mass, gravity_force);
        physics_body_add_force(physics, gravity_force);

        vec3 acceleration;
        glm_vec3_scale(physics->force_accumulator, physics->inverse_mass, acceleration);

        vec3 scaled_accel;
        glm_vec3_scale(acceleration, dt, scaled_accel);
        glm_vec3_add(physics->velocity, scaled_accel, physics->velocity);

        // --- NEW: Collision Resolution ---
        vec3 move_vector;
        glm_vec3_scale(physics->velocity, dt, move_vector);
        vec3 original_move_vector;
        glm_vec3_copy(move_vector, original_move_vector);

        // Resolve Y-axis
        for (int j = 0; j < world->entity_count; ++j) {
            if (i == j) continue; // Don't collide with self

            // Check against static objects
            if (world->physics_bodies[j].inverse_mass <= 0.0f) {
                move_vector[1] = get_clip_y(transform, physics, &world->transforms[j], &world->physics_bodies[j], move_vector[1]);
            }
        }
        transform->position[1] += move_vector[1];

        // Resolve X-axis (implement get_clip_x yourself!)
        for (int j = 0; j < world->entity_count; ++j) {
            if (i == j) continue;
            if (world->physics_bodies[j].inverse_mass <= 0.0f) {
                move_vector[0] = get_clip_x(transform, physics, &world->transforms[j], &world->physics_bodies[j], move_vector[0]);
            }
        }
        transform->position[0] += move_vector[0];

        // Resolve Z-axis (implement get_clip_z yourself!)
        for (int j = 0; j < world->entity_count; ++j) {
            if (i == j) continue;
            if (world->physics_bodies[j].inverse_mass <= 0.0f) {
                move_vector[2] = get_clip_z(transform, physics, &world->transforms[j], &world->physics_bodies[j], move_vector[2]);
            }
        }
        transform->position[2] += move_vector[2];

        // --- The 'Stop' Response ---
        // If movement was clipped on an axis, zero out the velocity on that axis.
        if (move_vector[0] != original_move_vector[0]) {
            physics->velocity[0] = 0.0f;
        }
        if (move_vector[1] != original_move_vector[1]) {
            physics->velocity[1] = 0.0f;
        }
        if (move_vector[2] != original_move_vector[2]) {
            physics->velocity[2] = 0.0f;
        }

        // --- Clear forces for next frame ---
        glm_vec3_zero(physics->force_accumulator);
    }
}
To test this, create a large, static entity (e.g., a floor) with an inverse_mass of 0, and a smaller, dynamic entity that starts above it. When you run your program, the falling object should now land perfectly on top of the floor and stop.
Conclusion
Fantastic work! You have now implemented one of the most fundamental features of a physics engine: making objects solid. You've gone beyond simple, flawed correction methods and implemented a robust clipping algorithm that prevents objects from tunneling through each other.
Key Takeaways:
- Collision handling is a two-step process: detection (if) and resolution (what to do).
- A simple "move-then-correct" resolution strategy is easy to implement but suffers from the tunneling problem, where fast objects can pass through thin walls.
- A more robust proactive clipping method prevents collisions by calculating the maximum safe travel distance along each axis before moving the object.
- A 'stop' response is achieved by not only clipping the object's movement but also zeroing out its velocity on the axis of collision.
Preview of the Next Lesson:
Our objects can now stop, but in the real world, things often bounce. In the next lesson, you will implement a 'bounce' collision response for sphere intersections. We will explore a different collider shape and learn how to reflect an object's velocity vector off a surface to create a convincing bounce effect.