Introduction
Hello! In our last lesson, you successfully implemented a first-person 'fly' camera. You can now navigate your 3D space by moving with the keyboard and looking around with the mouse. We established the core logic of using Euler angles to determine the camera's direction and the lookAt function to generate the view matrix.
However, as I hinted at the end of our last session, our current implementation has a subtle but significant flaw: the camera's movement speed is dependent on your computer's frame rate. This means on a faster machine, the camera will move faster, and on a slower one, it will crawl. This is not desirable for a consistent user experience.
Today's lesson focuses on refining our camera system to address this. Our learning outcome is to update the camera's view matrix each frame based on input, and we'll achieve this by creating a robust, frame-rate independent update loop. We will:
- Implement a
delta timemechanism to ensure consistent movement speed on all hardware. - Solidify the per-frame update cycle for the camera and view matrix.
- Take a deeper look at the mathematics behind the
lookAtfunction to strengthen your foundational knowledge.
1. Frame-Rate Independent Movement with Delta Time
The problem we need to solve is that our main loop runs as fast as it can. If your computer renders 500 frames per second, our keyboard processing function is called 500 times. If it renders 60 times per second, it's called 60 times. Since we move the camera by a fixed amount in that function, the total movement per second varies wildly.
The solution is to calculate the time it took to render the last frame. This value is commonly called deltaTime. We can then scale our movement by this value.
The logic is simple: velocity = speed * deltaTime.
- If a frame renders quickly (small
deltaTime), the movement for that frame is small. - If a frame takes a long time (large
deltaTime), the movement for that frame is larger.
The net result is that the camera moves a consistent distance over one second, regardless of the frame rate.
The LearnOpenGL article you read in the last lesson has an excellent, dedicated section on this exact topic. It clearly explains the problem and provides the code to solve it.
Read the section titled "Movement speed". It will show you how to declare the necessary time-tracking variables and calculate deltaTime each frame using glfwGetTime(). Pay close attention to how cameraSpeed is adjusted using this new value.
Here is how you would implement this in your C application. At the top of your main.c (or wherever your main loop is), you'll need two global or static variables:
// Timing
float delta_time = 0.0f; // Time between current frame and last frame
float last_frame = 0.0f; // Time of last frame
Then, at the very beginning of your main loop, you calculate deltaTime for the current frame:
// Inside your while(!glfwWindowShouldClose(window)) loop
float current_frame = glfwGetTime();
delta_time = current_frame - last_frame;
last_frame = current_frame;

// ... now you can use delta_time for this frame's updates
Finally, you'll update the camera_process_keyboard function from our last lesson to accept and use this delta_time.
// In camera.c
void camera_process_keyboard(Camera_Movement direction, float delta_time) {
    float velocity = camera_speed * delta_time;
    // ... update camera_pos using this velocity
}

// In main.c, when calling it
if (IsActionDown(ACTION_MOVE_FORWARD)) {
    camera_process_keyboard(CAM_FORWARD, delta_time);
}
2. The Per-Frame Update Cycle
With deltaTime in hand, we can now define the strict order of operations that must happen inside your main loop every single frame to ensure the camera works correctly.
- Calculate
deltaTime: As shown above, this should be the first step. - Process Input: Check for all keyboard and mouse inputs.
- Update State: Call your camera processing functions (
camera_process_keyboard,camera_process_mouse) to update the camera's internal state (e.g.,camera_pos,camera_yaw,camera_pitch). Make sure to passdeltaTimeto the movement function. - Generate View Matrix: Call
camera_get_view_matrix(). This function should use the newly updated state to calculate thefrontvector and then construct a freshviewmatrix usingglm_lookat. - Upload to Shader: Send the newly generated
viewmatrix to the GPU via aglUniformMatrix4fvcall. - Render: Call
glDrawArraysorglDrawElementsto draw your scene with the updated view.
This cycle ensures that the visuals rendered in a frame are a direct result of the input from that same frame, creating a responsive experience.
3. Deeper Dive: How lookAt Works
In the last lesson, we used the lookAt function as a convenient tool. Given your engineering background, you'll likely appreciate understanding the principles it implements. Using a high-level function is efficient, but knowing the underlying math is crucial for debugging and advanced work.
OpenGL doesn't really have a "camera". Instead, to give the illusion of moving the camera, it moves the entire world in the opposite direction. The view matrix is the transformation that does this. Therefore, the view matrix is the inverse of the camera's model matrix.
To construct this matrix, we need to define the camera's local coordinate system in the world.
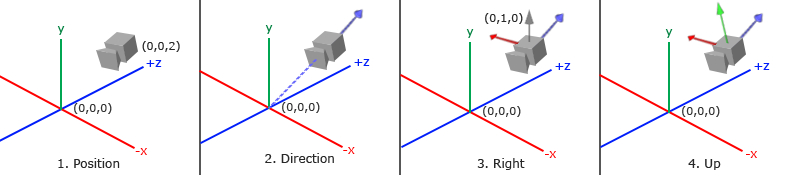
The lookAt matrix construction involves two main steps:
- Inverse Translation: A translation that moves the world so that the camera's position is at the origin (0, 0, 0). This is simply a translation by
-camera_pos. - Inverse Rotation: A rotation that aligns the camera's basis vectors with the world axes. The camera's
Rightvector should align with the world's X-axis,Upwith the Y-axis, andDirectionwith the Z-axis.
Since the camera's basis vectors are orthonormal, the inverse of this rotation matrix is simply its transpose.
This article from songho.ca gives a fantastic, concise explanation of this process. It breaks down the math into the translation and rotation components.
Read the "LookAt" section. It explains how the view matrix is composed of an inverse translation (MT) and an inverse rotation (MR). Focus on how the three basis vectors (forward, left, up) are calculated and used to form the rotation matrix.
Now, let's watch a video that derives this matrix from first principles. This will help solidify the theory before we see how to implement it.
OpenGL with C++ 5: Transformations
This video from GetIntoGameDev explains the view transformation and derives the view matrix. The presenter explains it as the inverse of the camera's model transform, which is a very powerful way to think about it.
Watch the segment from 36:45 to 48:39. The key takeaway is understanding how the final view matrix is constructed from the camera's right, up, and forward vectors, and its position. The derivation of the translation part (the dot products at the end) is particularly insightful.
4. Reconstructing the lookAt Logic
Let's review how we get the three vectors needed for the lookAt function from our camera's state.
- Eye Position: This is simply our
camera_posvector. - Target (Center) Position: This is where the camera is looking. We calculate it by adding the
camera_frontvector to our position:camera_pos + camera_front. Remember,camera_frontis the direction vector we calculate from ouryawandpitch. - Up Vector: This is the "world up" vector, which we use as a helper to construct the camera's true orientation. It's almost always
(0, 1, 0).
The lookAt function takes these three arguments and performs the following steps internally:
- Calculates the direction vector (Z-axis):
z_axis = normalize(eye - center). - Calculates the right vector (X-axis):
x_axis = normalize(cross(world_up, z_axis)). - Calculates the camera's up vector (Y-axis):
y_axis = cross(z_axis, x_axis). - Constructs the final matrix using these three axes and the eye position, as shown in the resources.
Now, let's see this logic being used to update the view matrix inside the game loop.
OpenGL with C++ 6: First Person Camera
The following video clip shows exactly how to calculate the vectors needed for lookAt from the player's state and pass them to the function each frame.
Watch from 29:50 to 37:34. This segment demonstrates: Calculating the 'center' and 'up' vectors needed for glm::lookAt. Calling the lookAt function to create the view matrix. A classic debugging moment: forgetting to upload the newly created matrix to the shader via glUniformMatrix4fv.
Conclusion
Today, we've made a crucial refinement to our camera system, ensuring it behaves consistently across different machines. You've also deepened your understanding of what the view matrix truly represents and how it's calculated.
Key Takeaways:
deltaTimeis essential for frame-rate independent physics and movement. All velocity calculations should be scaled bydeltaTime.- The game loop has a strict update order: Input -> Update State -> Render. The view matrix must be recalculated and re-uploaded to the shader every frame after the camera's state has been updated.
- The
viewmatrix performs an inverse transformation of the camera's position and orientation on the entire world. - The
lookAtfunction is a practical tool that builds this inverse matrix from the camera'seyeposition, acenterpoint it's looking at, and a worldupvector.
Preview of the Next Lesson:
We've spent a lot of time setting up our window, shaders, and camera controls. So far, however, the triangle we're drawing is hard-coded directly into our vertex shader. This isn't very flexible! In our next module, "The Graphics Pipeline and Shaders," we will begin to change that. Our first lesson will be: Define vertex data (e.g., position, color) and store it in a Vertex Buffer Object (VBO). This is the first step toward loading and rendering complex 3D models from our C application.