Introduction
Hello! In our last lesson, we built a fantastic abstract input mapping system. This decouples our game logic from specific hardware keys, allowing us to think in terms of actions like ACTION_MOVE_FORWARD instead of GLFW_KEY_W. Now, it's time to put that system to powerful use.
Today, we will implement one of the most exciting features for any 3D world: a first-person 'fly' camera. This camera will allow you to move freely through your scene using the keyboard and look around using the mouse, forming the foundation of how you'll navigate and interact with your game world.
We will connect our abstract input actions to camera movement and translate mouse motion into camera rotation. To do this, we'll need to dive into some core 3D math concepts, including Euler angles and vector cross products, to construct a view matrix that represents the camera's perspective each frame.
1. Defining a Camera in 3D Space
Before we can control a camera, we need to define what it is. In 3D graphics, a camera isn't a physical object but a set of mathematical properties that define a point of view. At its core, a camera is defined by its position in the world and its orientation.
We can describe this orientation using a local coordinate system made of three mutually perpendicular unit vectors:
- Position (
cameraPos): A vector representing the camera's location in world space. - Direction (
cameraFront): A vector pointing from the camera's position forward, indicating where it's looking. This is the camera's local Z-axis (often negative-Z by convention). - Up (
cameraUp): A vector pointing upwards relative to the camera. This is the camera's local Y-axis. - Right (
cameraRight): A vector pointing to the right relative to the camera. This is the camera's local X-axis.
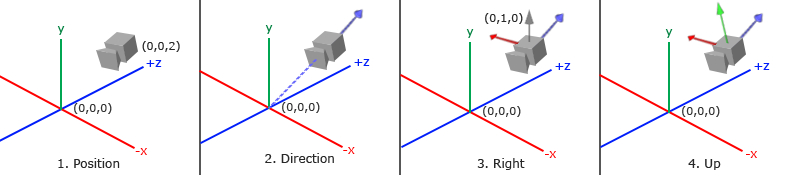
We only need to explicitly track a few of these. The Right vector, for instance, can always be calculated from the Front and a world Up vector using a vector cross product.
To start, let's read a clear explanation of these fundamental camera vectors. This will form the conceptual basis for our implementation.
Read the first part of the article, up to (but not including) the "Look At" section. Focus on understanding the role of the camera position, direction, right axis, and up axis.
Since you have a background in engineering, you might recognize that these three vectors (Right, Up, Front) form an orthonormal basis. This basis defines the camera's local coordinate space. The primary job of the view matrix is to transform all world coordinates into this camera space.
2. Looking Around: Mouse Input and Euler Angles
To control where the camera is looking, we need to translate 2D mouse movement into 3D rotation. A very intuitive way to manage 3D orientation is with Euler angles: pitch, yaw, and roll.
- Yaw: Rotation around the vertical (Y) axis. This corresponds to turning your head left or right.
- Pitch: Rotation around the side-to-side (X) axis. This corresponds to looking up and down.
- Roll: Rotation around the forward (Z) axis. This is like tilting your head sideways, and we won't be using it for our fly camera.
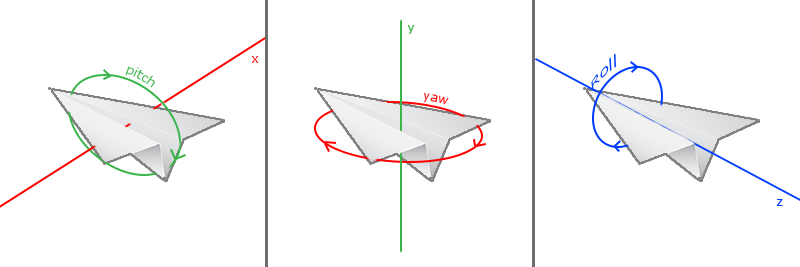
The process is as follows:
- Capture the mouse cursor so it doesn't leave the window.
- In a mouse callback, calculate how much the mouse has moved since the last frame (the offset).
- Update our
yawandpitchvariables based on this offset. - Apply constraints to the
pitchto prevent the camera from flipping upside-down (e.g., limit it to between -89 and +89 degrees). - Use trigonometry to calculate a new
cameraFrontdirection vector from the updatedyawandpitch.
The LearnOpenGL article provides an excellent, detailed walkthrough of this entire process, complete with the necessary trigonometry and GLFW code.
Read the section titled "Look around". It covers Euler angles, the math to convert them to a direction vector, and how to implement the mouse callback. Pay close attention to the mouse_callback function, as this is the core logic for looking around.
To see a practical demonstration of these steps, the following video implements a very similar system.
OpenGL with C++ 6: First Person Camera
This video from GetIntoGameDev walks through the implementation of mouse look, including setting the cursor mode and using the mouse offset to update Euler angles. It's helpful to see it coded live.
First, watch from 08:51 to 12:08 to see how the camera's position and Euler angles are set up as variables and how the GLFW input mode is set to hide the cursor. Then, watch from 23:30 to 29:31, where the developer implements the logic for updating the yaw and pitch from mouse movement and clamping the pitch.
3. Flying Around: Keyboard Input
Now that we can look around, let's implement movement. Thanks to our abstract input system, we can use IsActionDown() with our ACTION_MOVE_FORWARD, ACTION_STRAFE_LEFT, etc.
The key is to move the camera relative to its current orientation.
- Moving Forward/Backward: Add or subtract the
cameraFrontvector from thecameraPosvector. - Moving Left/Right (Strafing): We need the
cameraRightvector. As we learned earlier, we can get this by taking the cross product of thecameraFrontand the world'supvector (a constantvec3(0, 1, 0)). Then, we add or subtract this newcameraRightvector fromcameraPos.
OpenGL [Episode 33] Camera -- first-person movement with right vector
Before we write the code, it's crucial to understand why we need the cross product for strafing. This video from Mike Shah gives a perfect explanation.
Watch from 03:15 to 08:53. The video first shows why simply changing the camera's X position for left/right movement fails when rotated. It then masterfully explains the concept of the 'right vector' and how to compute it using the cross product of the view direction and the up vector.
Now that you understand the concept, the implementation is quite direct. We'll check which actions are active and update the cameraPos accordingly.
The LearnOpenGL article again provides a concise code example for implementing this movement logic.
Read the section "Walk around". In the code block, notice how forward/backward movement uses cameraFront, and left/right movement uses glm::normalize(glm::cross(cameraFront, cameraUp)). You will replace the glfwGetKey checks with your IsActionDown functions.
4. Putting It All Together: The view Matrix
We now have all the pieces. Each frame, we will:
- Process inputs.
- Update the camera's
yawandpitchfrom mouse movement, then recalculate thecameraFrontvector. - Update the camera's
cameraPosfrom keyboard actions (ACTION_MOVE...). - Use the final
cameraPosandcameraFrontto construct theviewmatrix.
The easiest way to create the view matrix is with the GLM function glm::lookAt. It takes three arguments:
- The camera's position (
cameraPos). - The target position (which is simply
cameraPos + cameraFront). - The world's up vector (
vec3(0, 1, 0)).
This function handles all the complex matrix construction for you. The resulting view matrix is then sent to your vertex shader and applied to your vertices before the projection matrix.
// Inside your main loop, after updating camera state
glm::mat4 view = glm::lookAt(cameraPos, cameraPos + cameraFront, cameraUp);

// Now, send this 'view' matrix to your shader
glUniformMatrix4fv(viewMatrixLocation, 1, GL_FALSE, glm::value_ptr(view));
The following video segment demonstrates constructing the lookAt matrix and highlights some common pitfalls, like forgetting to pass the matrix to the shader or passing variables by value instead of by reference.
OpenGL with C++ 6: First Person Camera
Let's watch the final part of the GetIntoGameDev video, where he assembles the lookAt matrix and debugs some common issues.
First, watch the brief section from 07:14 to 08:51, which explains where the view matrix fits into the shader's transformation pipeline (Model -> View -> Projection). Then, watch the main implementation from 29:31 to 42:03. Focus on how the forward, right, and up vectors are calculated and passed to glm::lookAt. Pay attention to the debugging process; it's very instructive!
5. Implementation in C
To keep our code organized, let's create a simple camera module. Here's a suggested structure for your camera.h file. You can then implement the corresponding functions in camera.c.
camera.h
#ifndef CAMERA_H
#define CAMERA_H


#include <cglm/cglm.h> // Assuming you use cglm for C

// Defines camera movement actions
typedef enum {
    CAM_FORWARD,
    CAM_BACKWARD,
    CAM_LEFT,
    CAM_RIGHT
} Camera_Movement;

// Camera state
extern vec3 camera_pos;
extern vec3 camera_front;
extern vec3 camera_up;

extern float camera_yaw;
extern float camera_pitch;
extern float camera_speed;
extern float mouse_sensitivity;

// Initializes camera with default values
void camera_init(vec3 position, vec3 up);

// Returns the view matrix calculated using Euler Angles and the LookAt Matrix
void camera_get_view_matrix(mat4 view);

// Processes input received from keyboard
void camera_process_keyboard(Camera_Movement direction, float delta_time);

// Processes input received from a mouse input system
void camera_process_mouse(float x_offset, float y_offset, bool constrain_pitch);


#endif
Your main loop will then call these functions:
camera_init()once at the start.camera_process_keyboard()inside yourif (IsActionDown(...))blocks.camera_process_mouse()inside your mouse callback.camera_get_view_matrix()every frame before you render.
Note: The delta_time parameter in camera_process_keyboard is a preview for our next topic. For now, you can just pass a small constant value like 0.05f.
Conclusion
Excellent work! You've just implemented a complete first-person fly camera, a cornerstone of 3D game development.
Key Takeaways:
- A camera's orientation can be intuitively managed using Euler angles (pitch and yaw).
- Mouse movement provides an offset that we use to update the pitch and yaw angles each frame.
- The
cameraFrontvector is calculated from the pitch and yaw using trigonometry. - Strafing (left/right movement) requires a
cameraRightvector, which is found by taking the cross product of thecameraFrontvector and the worldupvector. - The
glm::lookAt(orglm_lookatin cglm) function is the standard tool for creating aviewmatrix from the camera's position, target, and up vectors.
Preview of the Next Lesson:
Our current camera has a small issue: its movement speed is tied to your computer's frame rate. A faster computer will have a faster camera. The next lesson is titled "Update the camera's view matrix each frame based on input," where we will refine our update loop. We'll focus on implementing a frame-rate independent update mechanism using delta time to ensure your camera moves at the same speed on all hardware.