Introduction
Welcome back! In our last lesson, you successfully rendered a spinning 3D cube using indexed drawing. This was a huge step, as you now have a complete pipeline for defining and rendering 3D models efficiently.
However, as I mentioned, you might have noticed a visual glitch as your cube spins. Sometimes, the faces at the back of the cube are drawn on top of the faces at the front, shattering the illusion of a solid object. This happens because, by default, OpenGL simply draws triangles in the order they're given, without any sense of depth.
Today's lesson directly addresses this issue and its learning outcome: Enable depth testing to ensure correct rendering of overlapping objects. We will explore the fundamental algorithm that solves this "visibility problem," learn how to enable it in OpenGL, and discuss a common artifact called Z-fighting that can arise. By the end, your cube will finally look like a proper, solid 3D object.
The Visibility Problem
When we render multiple objects, or even multiple faces of a single complex object, some parts will inevitably be hidden behind others from the camera's perspective. The challenge of figuring out which surfaces are visible and which are hidden is called the visibility problem or hidden surface removal.
A naive approach might be to sort all the triangles from back to front before drawing them (a technique called the Painter's Algorithm). However, this is slow and fails in many cases, such as with intersecting objects.
The video below demonstrates this problem perfectly and explains why simple sorting isn't enough.
3D Programming Fundamentals [Z-Buffer] Tutorial 11
Watch this introductory clip from ChiliTomatoNoodle's '3D Programming Fundamentals' series. It clearly shows the rendering errors that occur without proper occlusion and sets the stage for a better solution.
Watch from the beginning to 02:27. Pay attention to how one cube incorrectly renders on top of the other, even when it's supposed to be behind it.
The Solution: The Depth Buffer (Z-Buffer)
The standard, modern solution to the visibility problem is an elegant and efficient algorithm using a depth buffer, also known as a Z-buffer.
A depth buffer is a 2D grid of values, with the same width and height as your game window. Each cell in this grid stores a single number representing the "depth" of the pixel currently drawn at that location. The depth is usually the Z-coordinate of the pixel in screen space.
Here’s how the algorithm works, a process managed automatically by the GPU:
- Initialization: At the start of each new frame, the depth buffer is cleared, with every pixel's depth being set to a value representing the farthest possible distance (effectively, infinity).
- Depth Test: For every single pixel (or "fragment") that the GPU wants to draw, it first compares the depth of the new pixel to the depth value already stored in the depth buffer at that same coordinate.
- Update or Discard:
- If the new pixel is closer to the camera (has a smaller depth value), it "wins." Its color is written to the screen, and its depth value updates the depth buffer.
- If the new pixel is farther away (has a larger depth value), it is "lost" and simply discarded. It is not drawn.
This pixel-by-pixel test ensures that only the closest surfaces are rendered, regardless of the order in which triangles are drawn.

The following video provides an excellent conceptual breakdown of this process.
3D Programming Fundamentals [Z-Buffer] Tutorial 11
Let's return to the ChiliTomatoNoodle video. This next segment explains the Z-buffer algorithm in detail, walking through the logic of initializing the buffer and performing the per-pixel depth comparison.
Watch from 02:27 to 07:08. Focus on understanding the relationship between the color buffer (what you see) and the depth buffer (the depth data).
Implementing Depth Testing in OpenGL
The great news is that you don't need to implement a Z-buffer yourself. It's a core feature of all modern graphics hardware. All we need to do is tell OpenGL to use it. This involves two simple changes to your code.
This reading from LearnOpenGL is the definitive guide for this task. It explains the necessary functions and their purpose.
Read the following sections from the LearnOpenGL article on Depth Testing. It will show you the exact OpenGL functions needed to enable and use the depth buffer.
Read the sections 'Depth testing' and 'Depth test function'. Focus on: The purpose of glEnable(GL_DEPTH_TEST). Why you need to add GL_DEPTH_BUFFER_BIT to your glClear call. The glDepthFunc function and its default setting, GL_LESS.
Let's put that into practice.
1. Enable Depth Testing
First, you need to enable the depth test feature. This is a global state in OpenGL and only needs to be set once during your application's initialization, after you've created your window and loaded OpenGL functions.
// In your initialization code, after gladLoadGLLoader
glEnable(GL_DEPTH_TEST);
2. Clear the Depth Buffer
Just as you clear the color buffer at the start of every frame, you must also clear the depth buffer. If you don't, you'll be comparing new pixels against the depth values from the previous frame, leading to bizarre visual artifacts.
You can do this by adding a bitwise OR to your existing glClear call in the main render loop.
// In your main render loop
glClearColor(0.1f, 0.1f, 0.1f, 1.0f);
glClear(GL_COLOR_BUFFER_BIT | GL_DEPTH_BUFFER_BIT); // <-- Add this bit
And that's it! With these two lines, your spinning cube should now render correctly, with faces properly occluding each other. The GPU handles the rest.
A Common Problem: Z-Fighting
As you continue developing, you will eventually encounter a common artifact related to depth testing known as Z-fighting. This happens when two surfaces are extremely close together, or even co-planar (occupying the same space). Due to the limited precision of the depth buffer, the GPU can't consistently determine which surface is in front. The result is a noisy, flickering pattern where pixels from both surfaces seem to "fight" for visibility.
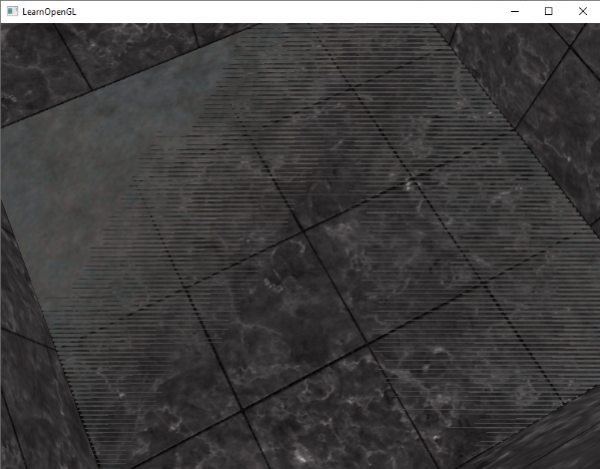
The same LearnOpenGL article you just read also explains why this happens and how to prevent it.
Now, read the final section of the LearnOpenGL article to understand Z-fighting and its solutions.
Read the section 'Z-fighting'. Focus on the three practical techniques for preventing it.
Here are the key strategies to prevent Z-fighting, from most to least common:
- Never place objects in the same plane. The easiest and most effective fix is to introduce a very small, imperceptible offset between overlapping surfaces. If your floor is at
y = 0.0, place the object on top of it aty = 0.001, noty = 0.0. - Set the near plane as far as possible. Depth buffer precision is not linear; it's highest near the camera's near plane and lowest near the far plane. Pushing the near plane further away (e.g., from
0.1to1.0) gives you better precision over the entire scene, but be careful not to clip objects that are close to the camera. - Use a higher-precision depth buffer. Most systems default to a 24-bit depth buffer. Using a 32-bit buffer provides more precision at a small performance cost. This is a more advanced topic we'll revisit if needed.
For now, simply being aware of Z-fighting and the first prevention technique will save you a lot of debugging headaches in the future.
Conclusion
Congratulations! You've just implemented one of the most fundamental features of a 3D renderer. By enabling depth testing, you've ensured that objects in your world have a sense of solidity and depth, rendering in a way that is visually correct and intuitive.
Key Takeaways:
- The visibility problem is the challenge of determining which surfaces are visible to the camera.
- The depth buffer (Z-buffer) solves this by storing the depth of the closest pixel at each screen coordinate.
- The GPU performs a depth test for each fragment, discarding it if it's behind a pixel that has already been drawn.
- In OpenGL, you enable this with
glEnable(GL_DEPTH_TEST)and by clearing theGL_DEPTH_BUFFER_BITin your main loop. - Z-fighting is a precision artifact that occurs when surfaces are too close. It can be prevented by introducing small offsets between objects.
Preview of the Next Lesson:
Your cube now looks solid, but it's still just a uniformly-colored box. To bring our scenes to life, we need to control how faces are drawn. In the next lesson, we will explore back-face culling, a crucial performance optimization that tells the GPU to ignore triangles that are facing away from the camera, saving valuable rendering time.