Introduction
Hello again! In our last lesson, we put together the complete Phong lighting model in our fragment shader. We learned how ambient, diffuse, and specular components combine to create a convincing lighting effect. However, we left a critical piece of the puzzle unsolved: the shader needs to know the direction each surface is facing to calculate how light reflects. This directional information is provided by surface normals.
This lesson directly addresses that gap. Our goal is to define surface normals as a vertex attribute for lighting calculations. We'll explore what normals are, how to incorporate them into our vertex data structures in C, and, most importantly, how to configure OpenGL to read this new attribute. By the end of this lesson, you will have provided the final piece of data your Phong shader needs to bring your 3D objects to life.
What is a Surface Normal?
A surface normal is a unit vector (a vector with a length of 1) that is perpendicular to a surface at a specific point. Think of it as an arrow sticking straight out from the surface, indicating which way it's "facing." This direction is fundamental for lighting calculations. For diffuse lighting, the angle between the normal and the light's direction determines the surface's brightness. For specular lighting, the normal determines how the light reflects toward the camera.
To see a quick recap of this concept, the following video segment is helpful.
This short clip from a tutorial by Victor Gordan re-introduces normals and their purpose in lighting.
Watch from 02:20 to 02:43. This will reinforce the idea that we are adding a new piece of data—the normal—to each vertex.
Updating Our Vertex Data
To get normals into the shader, we first need to add them to our vertex data in our C application. Up until now, a vertex has likely contained a position (vec3) and maybe texture coordinates (vec2). Now, we need to add a normal vector (vec3).
A clean way to organize this in C is with a struct:
// In a new header file, e.g., "vertex.h"
typedef struct {
    vec3 position;
    vec3 normal;
    vec2 tex_coords;
} Vertex;
(Note: vec3 and vec2 are not standard C types. You'd typically use a struct or an array from a math library like cglm, e.g., float position[3];)
Our big array of vertex data will now be an array of these Vertex structs.
The Problem with Shared Vertices: The Cube Example
Let's consider rendering a cube. A cube has 8 corners (unique positions in space) but 6 faces. An EBO/IBO (Element Buffer Object / Index Buffer Object) is great for this, as we can define the 8 positions and then use indices to describe the 24 vertices that form the 12 triangles of the cube.
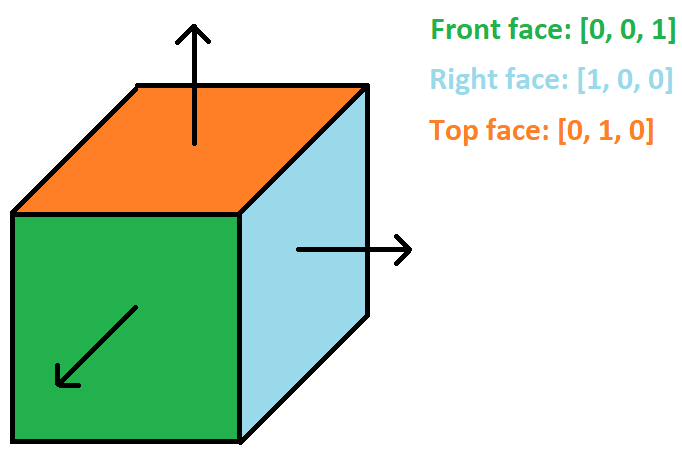
However, lighting complicates this. A single corner position is shared by three faces (e.g., front, right, and top). Each of those faces has a different normal. But a single vertex can only have one normal attribute.
This leads to a crucial insight: a vertex in computer graphics is not just a position. It's the complete bundle of attributes: position + normal + texture coordinate + etc.
Vertex Attributes and Layouts in OpenGL
The Cherno provides an excellent clarification on this exact point. Understanding this distinction is key to structuring graphics data correctly.
Watch from 02:50 to 04:11. Pay close attention to the distinction between a 'vertex' and a 'position'.
Because a single corner position needs to be associated with three different normals, we can't represent it with a single graphics vertex. We must effectively "un-share" it. This means we have to define separate Vertex structs for each corner of each face. For a cube, instead of 8 unique vertices, we will need 24 (4 vertices per face * 6 faces), and we won't use an EBO for this simple cube model. Our vertex buffer will contain all 36 vertices needed to draw the 12 triangles.
The article below explains this necessity very clearly.
This text from CodeSignal Learn explains why we must duplicate vertex data when normals differ for a shared position.
Read the two paragraphs starting with 'Now let's examine how we structure our vertex data...' and ending with '...because different faces require different normals at shared corners.' This clearly explains the interleaved format and the need for separate vertices.
Here is an example of what the data for two vertices of the cube's front face would look like. Notice how the normal (0.0f, 0.0f, 1.0f) is the same for both.
float vertices[] = {
    // positions          // normals           // texture coords
    -0.5f, -0.5f,  0.5f,  0.0f,  0.0f,  1.0f,  0.0f, 0.0f, // Front face vertex 1
     0.5f, -0.5f,  0.5f,  0.0f,  0.0f,  1.0f,  1.0f, 0.0f, // Front face vertex 2
     // ... and so on for all 36 vertices
};
Configuring the Vertex Attribute Pointers
Now that our vertex buffer contains positions, normals, and texture coordinates all packed together (an "interleaved" array), we must tell OpenGL how to read it. This is done with glVertexAttribPointer.
Since we now have three attributes, we will need three calls to this function, one for each attribute. The key parameters to get right are the stride and the offset (the last two arguments).
- Stride: This tells OpenGL the byte offset between consecutive vertices. In our case, each vertex is 8 floats (
3for position +3for normal +2for texture coords), so the stride is8 * sizeof(float). - Pointer (Offset): This tells OpenGL the byte offset of the first component of an attribute within a single vertex.
- For position, the offset is
0. - For the normal, the offset is
3 * sizeof(float)(to skip over the position). - For texture coordinates, the offset is
6 * sizeof(float)(to skip position and normal).
- For position, the offset is
The following video gives an extremely thorough explanation of every parameter of glVertexAttribPointer.
Vertex Attributes and Layouts in OpenGL
This is the most important part of the lesson. The Cherno will walk you through glVertexAttribPointer in detail, using a multi-attribute example just like ours.
Watch from 05:50 to 12:38 for the main explanation of glVertexAttribPointer. Then, watch from 15:59 to 17:05 to understand why glEnableVertexAttribArray is also necessary.
Here’s how you would set up the attribute pointers in your C code after binding your VAO and VBO:
// Stride is the size of one complete vertex in bytes
GLsizei stride = 8 * sizeof(float);

// Attribute 0: Position
glVertexAttribPointer(0, 3, GL_FLOAT, GL_FALSE, stride, (void*)0);
glEnableVertexAttribArray(0);

// Attribute 1: Normal
// The offset is the size of the position data
glVertexAttribPointer(1, 3, GL_FLOAT, GL_FALSE, stride, (void*)(3 * sizeof(float)));
glEnableVertexAttribArray(1);

// Attribute 2: Texture Coordinate
// The offset is the size of position + normal data
glVertexAttribPointer(2, 2, GL_FLOAT, GL_FALSE, stride, (void*)(6 * sizeof(float)));
glEnableVertexAttribArray(2);
Updating the Vertex Shader
The final step is to modify our vertex shader to accept the new aNormal attribute. We then pass it to the fragment shader, which we already prepared to receive it in the last lesson.
#version 330 core
layout (location = 0) in vec3 aPos;
layout (location = 1) in vec3 aNormal;     // NEW: Normal attribute
layout (location = 2) in vec2 aTexCoord;

// Outputs to the fragment shader
out vec3 FragPos;
out vec3 Normal;                          // NEW: Pass normal to fragment shader
out vec2 TexCoord;

uniform mat4 model;
uniform mat4 view;
uniform mat4 projection;

void main()
{
    // Standard transformations
    gl_Position = projection * view * model * vec4(aPos, 1.0);
    FragPos = vec3(model * vec4(aPos, 1.0));
    TexCoord = aTexCoord;

    // Pass the normal to the fragment shader
    Normal = aNormal;
}
The fragment shader, as designed previously, will take in vec3 Normal; and use it for its lighting calculations. With these changes, your lighting model should now work!
A Quick Note on Flat vs. Smooth Shading
Because we used unique vertices for each face of our cube, with normals that are constant across that face, we will get what is called flat shading. Each polygon will be clearly visible. This is appropriate for a hard-edged object like a cube.
If we were rendering a curved object like a sphere, we would want smooth shading. In that case, the vertices at the same position would share a normal, which would be the average of the normals of the surrounding faces. This causes the lighting to be smoothly interpolated, hiding the polygonal nature of the model.
This clip quickly explains the visual difference between flat and smooth shading and when you would choose one over the other.
Watch from 02:43 to 03:39. This will give you context on why our approach with the cube results in flat shading and introduces the alternative.
Conclusion
In this lesson, you bridged the gap between lighting theory and implementation. You learned how to provide the essential surface normal data that your Phong shader needs to function.
Key Takeaways:
- A surface normal is a unit vector perpendicular to a surface, crucial for lighting calculations.
- A "vertex" in graphics is a collection of attributes (position, normal, etc.), not just a position.
- For objects with hard edges like a cube, vertices at the same position must be duplicated if they belong to faces with different normals. This results in flat shading.
- We add normals to our vertex data in an interleaved array.
- We must configure OpenGL to parse this data using
glVertexAttribPointer, carefully setting the stride and offset for each attribute. - Finally, the vertex shader must be updated to accept the normal as an
inattribute and pass it to the fragment shader.
Preview of the Next Lesson:
In our vertex shader, we simply passed the normal straight through: Normal = aNormal;. This is a simplification that only works if the object is not rotated or non-uniformly scaled. When we transform our object with a model matrix, the normals need to be transformed too, but not in the same way as positions. In the next lesson, Transform normals into world space to ensure correct lighting on rotated objects, we will explore the correct way to handle this using a special "normal matrix."