Introduction
Hello! In the last lesson, we took a major step by preparing our application to handle textures. We updated our vertex data to include UV coordinates, reconfigured our vertex attribute pointers, and modified the vertex shader to pass this new information down the pipeline. We now have a 3D model with a "map" and a texture loaded onto the GPU, but they are still separate.
Today, we will complete the process. This lesson focuses on the learning outcome: Sample from a texture in the fragment shader. We'll dive into the GLSL code that performs the magic of looking up a color from a texture using the coordinates provided by the vertex shader. This is the final piece of the puzzle to see your texture appear on your object.
By the end of this lesson, you will understand how the C application, OpenGL state, and fragment shader all work together to render a textured surface.
The Fragment Shader: Tying it all Together
Let's revisit the fragment shader code from our previous lesson's preview. This short program is the heart of texture sampling.
#version 330 core
out vec4 FragColor;

// Input: Interpolated texture coordinate for this specific fragment
in vec2 TexCoord;

// The texture we want to sample from
uniform sampler2D ourTexture;

void main()
{
    // Look up the color from the texture at the given coordinate
    FragColor = texture(ourTexture, TexCoord);
}
This code has two crucial parts we need to understand deeply: the uniform sampler2D variable and the texture() function.
Samplers and Texture Units: The Link Between C and GLSL
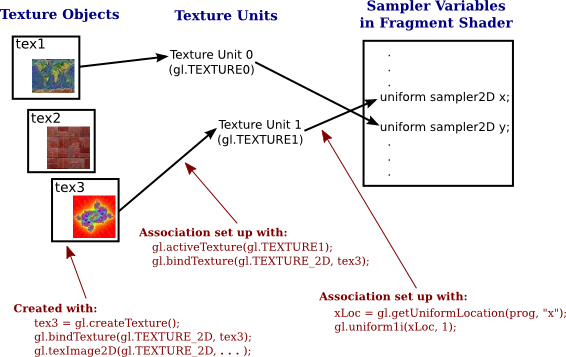
You might be wondering how the ourTexture variable in the shader "knows" which texture to use, especially since we just loaded it into an OpenGL object in our C code. This connection is managed through Texture Units.
Think of Texture Units as a set of slots on the GPU where you can place textures to make them accessible to shaders. OpenGL guarantees at least 16 texture units, numbered GL_TEXTURE0 through GL_TEXTURE15.
A sampler2D uniform in GLSL is not the texture data itself. Instead, it's an opaque type that holds a single integer: the index of the texture unit to sample from.
Here is the complete chain of command that you establish in your C code:
- Activate a Texture Unit: You pick a slot, for example, slot 0.
glActiveTexture(GL_TEXTURE0); - Bind a Texture: You place your texture object (which you created with
glGenTexturesand filled withglTexImage2D) into that active slot.glBindTexture(GL_TEXTURE_2D, textureID); // textureID is the ID of your texture - Tell the Shader which Unit to Use: You set the value of the
sampler2Duniform in your shader to match the index of the texture unit you chose (in this case,0).// After calling glUseProgram(shaderID) glUniform1i(glGetUniformLocation(shaderID, "ourTexture"), 0);
This three-step process connects your C application's texture resource to your shader's sampler. The image below provides an excellent visualization of this relationship.
Now, let's see this in action and read a detailed explanation.
The Cherno's video provides a great practical demonstration of writing the fragment shader code and setting the sampler uniform from the C++ side.
Watch from 44:13 to 46:58. This part covers two key steps: Modifying the fragment shader to use sampler2D and the texture() function. In the application code, setting the integer uniform of the sampler to 0, linking it to texture unit 0.
With the connection established, the texture() function in GLSL now knows exactly which texture to read from (ourTexture points to texture unit 0) and where on that texture to look (TexCoord provides the coordinates).
The texture() Function and Filtering
The texture() function performs the actual color lookup. However, the incoming TexCoord is a floating-point value, and it will rarely align perfectly with the center of a single pixel (or texel) in your texture image. So, how does OpenGL decide what color to return?
This is controlled by texture filtering modes, which you set with glTexParameteri when you first create the texture. The two most fundamental modes for scaling a texture up (magnification) or down (minification) are:
GL_NEAREST: Also known as point filtering. OpenGL selects the texel whose center is closest to the texture coordinate. This is very fast and results in a sharp, blocky, or "pixelated" look. It's often preferred for retro-style games or pixel art.GL_LINEAR: Also known as bilinear filtering. OpenGL takes the four texels nearest to the texture coordinate and calculates a weighted average of their colors based on their distance to the coordinate. This produces a smoother, often blurrier, appearance that is more suitable for realistic images.
The LearnOpenGL article on Textures has a fantastic section explaining filtering with clear visual comparisons.
Please read the section titled 'Texture Filtering'. It provides excellent diagrams that show the difference between GL_NEAREST and GL_LINEAR, helping you build an intuition for how they work.
Putting It All Together: A Complete Example
Let's review the complete process for rendering one textured object.
-
Initialization (done once):
- Load your vertex data (positions + UVs) into a VBO and configure the VAO with two attribute pointers.
- Load your image data using a library like
stb_image. - Create and bind a texture object, set its wrapping and filtering parameters (
glTexParameteri), and upload the image data (glTexImage2D). - Compile your vertex and fragment shaders into a shader program.
-
Render Loop (done every frame):
- Clear the screen.
glUseProgram(shaderID);- Set your MVP matrix uniforms.
glActiveTexture(GL_TEXTURE0);glBindTexture(GL_TEXTURE_2D, textureID);glUniform1i(glGetUniformLocation(shaderID, "ourTexture"), 0);(Note: Since this uniform value doesn't change, you can also set it once after creating the shader program outside the loop).glBindVertexArray(VAO);glDrawElements(...)orglDrawArrays(...)
A Common Pitfall: Upside-Down Textures
When you first run your code, you will very likely find that your texture appears upside-down. This is a classic "rite of passage" in OpenGL development. It happens because OpenGL's texture coordinate system assumes (0,0) is the bottom-left corner, while most image formats (like PNG, JPG) and loading libraries define (0,0) as the top-left corner.
Fortunately, the stb_image library has a simple fix. Just add this line of code before you call stbi_load:
stbi_set_flip_vertically_on_load(true);
This tells the library to flip the image during the loading process so it aligns with OpenGL's expectations.
To see how filtering and the vertical flip are handled in practice, watch this last segment from The Cherno's video.
Watch from 47:31 to 49:50. The presenter first changes the filtering from GL_LINEAR to GL_NEAREST to get a sharp look, then uses stbi_set_flip_vertically_on_load to fix the upside-down texture.
Conclusion
Congratulations! You have now mastered the final and most crucial step in the texturing pipeline. By writing the fragment shader and correctly linking it to your texture resource, you can now apply detailed 2D images to your 3D models.
Key Takeaways:
- The fragment shader uses the
texture()function to sample a color from a texture at a givenTexCoord. - A
sampler2Duniform acts as a handle, holding an integer index that points to a Texture Unit. - The C application code is responsible for activating a texture unit, binding a texture to it, and telling the shader's sampler which unit to use via a uniform.
- Texture filtering (
GL_NEAREST,GL_LINEAR) determines the visual quality when a texture is scaled and thetexture()function needs to sample between or near texels. - The
stbi_set_flip_vertically_on_load(true)call is essential for correcting the orientation of most loaded images.
Preview of the Next Lesson:
Our object now has color and surface detail from the texture, but it still looks flat and disconnected from its environment. It doesn't react to light. In our next lesson, we will begin to change that by tackling our next learning outcome: Implement the Phong lighting model (ambient, diffuse, specular) in the fragment shader. We will learn how to combine the sampled texture color with lighting calculations to create surfaces that appear to be realistically illuminated.
For example, your fragment shader will evolve to do something like this, where texColor is what we learned today, and the rest is what we'll learn next:
// From today's lesson
vec4 texColor = texture(texUnit, DataIn.texCoord);

// Preview of next lesson
float intensity = max(dot(normal, lightDirection), 0.0);
vec4 diffColor = intensity * diffuseMaterialColor * texColor;
vec4 ambColor = ambientLightColor * texColor;

colorOut = diffColor + ambColor;
This will bring a new level of depth and realism to your 3D engine.