Hello! Welcome to the first lesson in our module on "Essential Website Tools and Analytics."
In our last lesson, we built your website's primary navigation menu, giving it a basic structure. Now that the architectural foundation is in place, it's time to equip your site with the essential tools it needs to function effectively and securely. We'll do this using WordPress plugins.
Today's learning outcome is to install and configure essential WordPress plugins for SEO, caching, and security. These three areas are the pillars of a healthy, successful website, especially for an affiliate marketer.
- SEO (Search Engine Optimization): Helps people find your site on Google.
- Caching (Speed): Makes your site load quickly, which visitors and Google love.
- Security: Protects your hard work from hackers and malicious bots.
By the end of this lesson, your website will have a basic toolkit to help it rank in search engines, deliver a fast user experience, and defend against common online threats.

What Are WordPress Plugins?
Think of plugins as apps for your website. WordPress, by itself, is a powerful content management system. But plugins allow you to add almost any feature imaginable—from contact forms and photo galleries to e-commerce stores and, of course, the tools we're adding today.
A key principle of managing a WordPress site is to be selective. While there are thousands of free plugins, installing too many can slow down your site or create security vulnerabilities. Our goal is to install a few high-quality, essential plugins that provide the most benefit.
Part 1: Search Engine Optimization (SEO) with All in One SEO
An SEO plugin is arguably the most important plugin for an affiliate website. It doesn't magically rank you on page one of Google, but it gives you the tools to optimize your pages and posts so that search engines can understand what your content is about and show it to the right people.
We will install All in One SEO (AIOSEO), one of the most popular and beginner-friendly SEO plugins available.
Let's start by installing the plugin and running through its initial setup wizard.
WordPress SEO Tutorial for Beginners 2025 | All in One SEO Plugin Tutorial
This video from Stewart Gauld will guide us through installing and setting up the All in One SEO plugin. It's a clear, practical walkthrough.
Please watch the following segments to install and configure the plugin: Installing the Plugin (00:32 - 01:29): Follow these steps to find and install AIOSEO from your WordPress dashboard. Setup Wizard Part 1 (02:17 - 05:09): This is the most important part. Pay close attention to how you set your Homepage Title and Meta Description. This is your first taste of on-page SEO! Setup Wizard Part 2 (05:09 - 06:23): Here, you'll select the basic features to enable. The defaults shown in the video (Search Appearance, Sitemaps) are perfect for now.
Your Turn: Install and Configure AIOSEO
Now, follow the steps from the video in your own WordPress dashboard.
- Install and Activate:
- Go to Plugins > Add New Plugin.
- Search for "All in One SEO".
- Click Install Now, then Activate.
- Run the Setup Wizard:
- The AIOSEO setup wizard should start automatically. Click "Let's Get Started".
- Step 1: Website Category. Choose the category that best fits your niche (e.g., "Blog").
- Step 2: Homepage SEO. This is critical.
- For the Homepage Title, write something that includes your site's name and the main topic. For example:
YourSiteName - Honest Reviews for [Your Niche]. - For the Homepage Meta Description, write a short (under 160 characters) summary of what your site is about. Think of it as an advertisement for your site on Google's search results page.
- For the Homepage Title, write something that includes your site's name and the main topic. For example:
- Step 3: Site Information. Fill this out as a "Person" or "Organization." If you have social media profiles for your site, add them here.
- Step 4: Enable SEO Features. The free features like "Sitemaps" and "Search Appearance" are the most important. You can leave the rest unchecked for now, as we'll set up analytics separately later.
- Step 5: Search Appearance. The default settings here are fine. It just shows you a preview of how your site might look in search results.
- Finish the Setup: Complete the wizard and go to the dashboard.
You've now installed your SEO plugin and configured the basic settings. You'll see a new "AIOSEO" menu in your sidebar, which we will use extensively in future lessons when we start creating content.
Part 2: Website Speed with W3 Total Cache
Website speed is a crucial factor for both user experience and SEO. If a page takes too long to load, visitors will leave. Caching is the most effective way to improve your site's speed.
In simple terms, caching creates and stores a static copy of your pages. When a visitor arrives, the server can deliver this pre-built copy almost instantly, instead of having to run scripts and query the database to build the page from scratch every time.
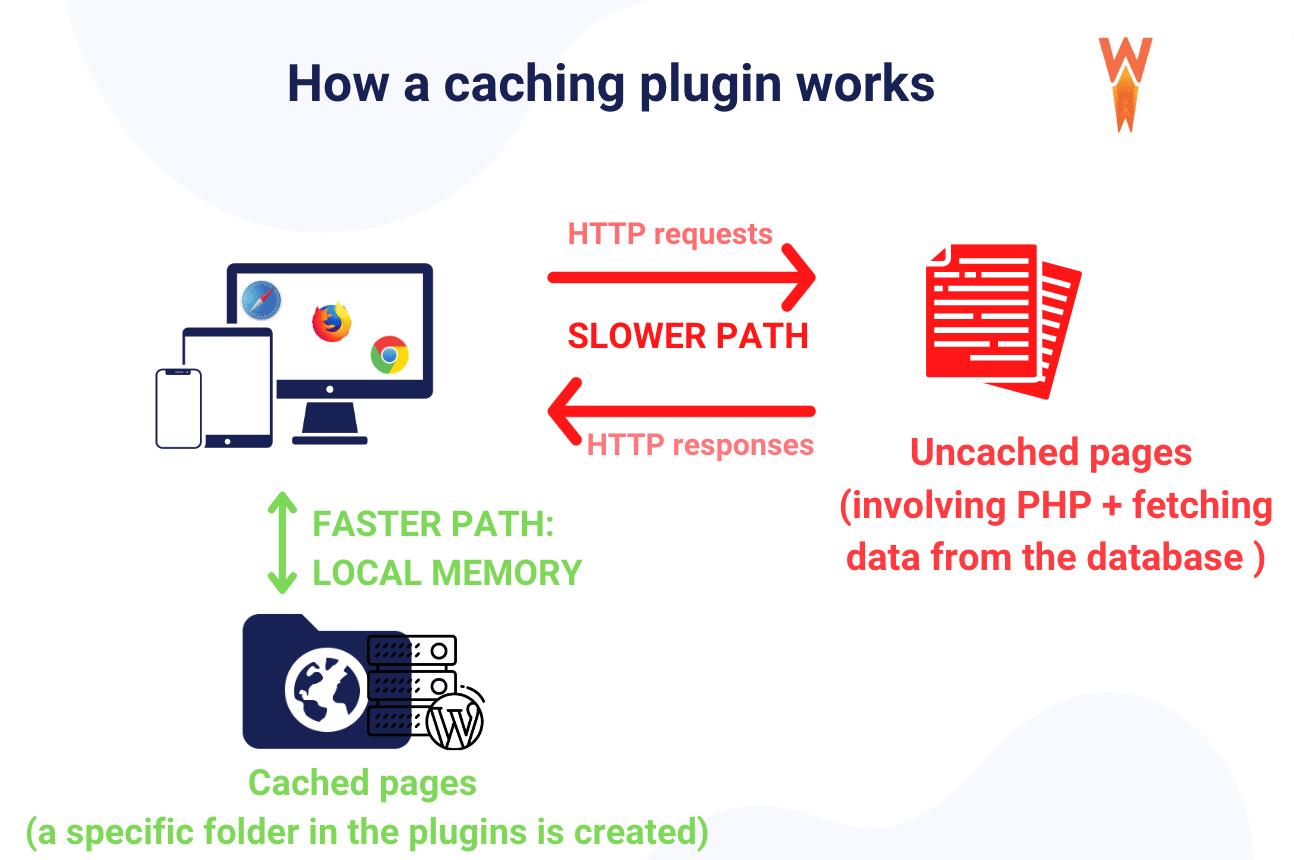
We will use W3 Total Cache (W3TC), a powerful and popular free caching plugin. It has many advanced options, but we will focus on the two most important settings for beginners.
What is W3 Total Cache - Learn WordPress
The official WordPress lesson plan for W3 Total Cache provides a clear and safe introduction to this plugin. We will use its guidance to perform a basic but effective setup.
Please read the following sections to understand the core functions and how to configure them: Installing W3 Total Cache: Familiarize yourself with the installation process and the recommendation to back up your site first. Page Cache: Understand what page caching is and why it's the primary feature we want to enable. Browser Cache: Learn how this second type of caching speeds up the site for repeat visitors. Lesson Wrap Up: This provides a simple, 4-step algorithm for beginners, which is exactly what we will follow.
Your Turn: Install and Configure W3 Total Cache
- Install and Activate:
- Go to Plugins > Add New Plugin.
- Search for "W3 Total Cache".
- Click Install Now, then Activate.
- Navigate to General Settings:
- In your WordPress sidebar, you'll see a new menu item called Performance. Hover over it and click General Settings.
- Enable Page Cache:
- Scroll down to the "Page Cache" section.
- Check the box for Enable.
- Leave the "Page Cache Method" as Disk: Enhanced. This is the recommended setting for most hosting environments.
- Enable Browser Cache:
- Scroll down to the "Browser Cache" section.
- Check the box for Enable.
- Save Your Settings:
- Click any of the Save all settings buttons on the page.
That's it for now. With just those two clicks, you have enabled the most important speed-boosting features. We will not touch the "Minify" settings at this stage, as they can sometimes cause issues with themes and require more advanced troubleshooting.
Part 3: Website Security with Wordfence
Security is non-negotiable. As your site grows, it will become a target for automated bots and hackers. A good security plugin acts as a firewall, a malware scanner, and a login protection system.
We will install Wordfence, the most popular WordPress security plugin. It has a robust free version that provides excellent protection.
Wordfence Security Plugin Tutorial | Step-by-Step Setup
This tutorial by Matt Tutorials is a comprehensive guide to setting up Wordfence. We will focus on the most critical initial steps to secure your site.
Follow along with these sections to install and configure Wordfence: Installation and License (00:36 - 01:45): This shows how to install the plugin and get your free license key via email. Firewall Optimization (02:24 - 04:31): This is a crucial one-time step that makes the firewall much more effective. Pay close attention to the process of downloading the .htaccess file before continuing. Brute Force Protection (04:43 - 07:41): Learn how to lock out bots that try to guess your password. The recommended settings in the video are excellent. Two-Factor Authentication (2FA) (10:58 - 14:06): This is one of the single best things you can do to secure your account. The video explains how to set it up with an authenticator app on your phone (like Google Authenticator or Authy).
Your Turn: Install and Configure Wordfence
This setup is slightly more involved, but it's essential.
- Install and Get License:
- Go to Plugins > Add New Plugin, search for "Wordfence Security", and install/activate it.
- Follow the prompts to get a free license. You will need to provide an email address, and the key will be sent to you.
- Install the license key when prompted.
- Optimize the Firewall:
- Go to Wordfence > Firewall.
- You will see a banner prompting you to "Optimize the Wordfence Firewall." Click it.
- It will show you a recommended configuration. Download the
.htaccessbackup file as it suggests, then click Continue.
- Configure Brute Force Protection:
- Go to Wordfence > Firewall and click on the All Firewall Options tab.
- Scroll down to the Brute Force Protection section.
- Adjust the settings as shown in the video. Good starting points are:
- Lock out after 4 login failures.
- Lock out after 3 password reset attempts.
- Amount of time a user is locked out: 1 day.
- Click Save Changes at the top right.
- Set Up Two-Factor Authentication (2FA) - Strongly Recommended:
- Go to Wordfence > Login Security.
- You'll see a QR code. Open an authenticator app on your phone (e.g., Google Authenticator, Microsoft Authenticator, Authy).
- Scan the QR code, enter the six-digit code from your app into the field on your WordPress site, and click Activate.
- Crucially, download and save your recovery codes! If you lose your phone, these codes are the only way to get back into your site.
Your site is now protected by a firewall, hardened against brute force attacks, and your own user account is secured with 2FA.
Conclusion
Fantastic work! You've just completed a series of technical but incredibly important steps. Your website is no longer a blank slate; it's now a properly equipped platform ready for you to build your business on.
Here are your key takeaways from this lesson:
- Plugins are essential tools that extend the functionality of WordPress.
- The three most important categories of plugins for a new affiliate site are SEO, Caching (Speed), and Security.
- You installed and configured All in One SEO to help your site get found by search engines.
- You enabled page and browser caching with W3 Total Cache to ensure your site loads quickly.
- You secured your site with the Wordfence firewall, brute force protection, and two-factor authentication.
Preview of the next lesson:
With the technical foundation of your site now solid, we'll turn our attention to some essential content. In the next lesson, you will create and publish the necessary legal pages for your site, including a Privacy Policy, Terms of Service, and an Affiliate Disclosure. This is a crucial step for building trust and complying with legal requirements.