Hello! Welcome to your next lesson.
In our last session, you did some crucial technical work on your new WordPress site by installing and configuring essential plugins for SEO, caching, and security. Your website is now fast, secure, and ready to be optimized for search engines.
Today, we shift from the technical backend to essential frontend content. Our learning outcome is to create and publish the essential legal pages for your website: a Privacy Policy, Terms of Service, and an Affiliate Disclosure.
These pages might not seem as exciting as writing your first product review, but they are a non-negotiable foundation for any legitimate online business. They are vital for:
- Building Trust: Being transparent with your audience shows you are professional and trustworthy.
- Legal Compliance: Laws like the GDPR in Europe and regulations from the FTC in the US require you to have these disclosures.
- Affiliate Program Requirements: Most affiliate networks, including ClickBank, require you to have these pages in place before they will approve you.
By the end of this lesson, your website will have the necessary legal framework to operate professionally and ethically.
Disclaimer: Please note that I am an AI tutor, not a lawyer. This lesson provides information for educational purposes only and does not constitute legal advice. It's always best practice to consult with a legal professional for your specific situation.
Why Legal Pages Are a Must-Have
Before we dive into creating the pages, it's important to understand their purpose. Running a website, especially one that aims to generate income, comes with responsibilities.
9 Must-Have Legal Pages for Any WordPress Website
To get a solid overview of why these pages are so important, please read a few sections from the article "9 Must-Have Legal Pages for Any WordPress Website" by Qode Interactive.
Read the following sections to understand the purpose of each page we'll be creating: Start with "Why You Need to Have Legal Pages on Your Website" to grasp the overall importance. Then, read the sections for "Privacy Policy Page," "Terms & Conditions Page," "Disclaimer Page," and "Affiliate Disclaimer Page." Focus on the purpose of each document—what it protects and who it informs.
As the article explains, these pages protect both you and your visitors. They set clear expectations, define rules, and ensure you are complying with data privacy laws. Now, let's look at each of the three pages we will create today in more detail.
1. The Affiliate Disclosure
For an affiliate marketer, this is arguably the most important piece of legal text on your site. Its purpose is simple: to tell your readers that you may earn a commission if they buy a product through your links. This is a strict requirement from the U.S. Federal Trade Commission (FTC).
The key principle is transparency. Your readers have a right to know that you have a financial relationship with the companies whose products you recommend. Being upfront about this doesn't hurt your sales; in fact, it builds trust.

To learn how to write an effective and compliant disclosure, we'll watch a video that breaks it down perfectly for new bloggers.
How to Write an Affiliate Disclosure for Your Blog [with EXAMPLES]
This video, "How to Write an Affiliate Disclosure for Your Blog," from Lucrezia Iapichino's channel, is an excellent guide. It explains the 'what,' 'why,' and 'how' of creating a disclosure that is both compliant and reader-friendly.
Please watch the following segments: What is an Affiliate Disclosure? (00:00 - 01:48): This explains the legal necessity (FTC rules) and the importance for building trust. Keep it Simple & Visible (01:48 - 03:52): This part gives you a simple, effective disclosure statement you can use and explains the need for a more detailed page. Placement is Key (04:32 - 05:55): Pay close attention to where you must place your disclosure on every page that contains affiliate links. It needs to be seen before the reader encounters any links.
Key Takeaways for Your Affiliate Disclosure:
- Clarity is crucial: Don't use confusing jargon. A simple statement like, "This post contains affiliate links. If you buy something through these links, I may earn a commission at no extra cost to you," is a good start.
- Placement matters: Your disclosure must appear "clearly and conspicuously" at the top of any blog post or page that contains affiliate links, before the links themselves.
- You need two parts:
- A short disclosure statement on every relevant post (as mentioned above).
- A dedicated "Affiliate Disclosure" or "Disclaimer" page with a more detailed explanation, which you can link to from the short statement and from your website's footer.
2. The Privacy Policy
This page is legally required for almost every modern website. It informs your users about what personal data you collect from them, how you use it, and how you keep it secure.
Even if you don't think you're collecting data, you are. WordPress itself, along with comments, contact forms, and the analytics tools we'll install later, all collect user data (like names, email addresses, and IP addresses).
How to Add a Privacy Policy in WordPress (Really Easy!)
WordPress comes with a built-in tool to help you get started with a Privacy Policy. This video from WPBeginner shows you how to use it.
Watch the first four minutes of the video to see how to access, edit, and publish the default Privacy Policy page that WordPress creates for you. Accessing the Privacy Policy (01:14 - 02:52): Learn where to find the pre-generated page in your WordPress settings. Editing and Publishing (02:52 - 03:57): See how to use the editor to review and publish the page.
The default WordPress policy is a good starting point, but it's a generic template. To create a more comprehensive policy tailored to your affiliate site, using a policy generator is highly recommended. These tools ask you a series of questions about your site and generate a policy based on your answers.
The article "12 Best Privacy Policy Generators" from Dealfuel (LINK) that we'll look at in the next section lists several excellent free and paid options, such as WP Legal Pages, PrivacyPolicies.com, and TermsFeed.
3. The Terms of Service (or Terms & Conditions)
This page sets the rules for using your website. While not always legally mandatory in the same way a Privacy Policy is, it's essential for protecting your content and your business.
Your Terms of Service (T&S) page should cover things like:
- Intellectual Property: Stating that the content on your site is yours and cannot be copied without permission.
- Limitation of Liability: Clarifying that you are not responsible for how people use the information on your site.
- Rules of Conduct: Forbidding spam or abuse in comments.
- Governing Law: Specifying which country's or state's laws govern the agreement.
Like the Privacy Policy, you can use a generator to create a solid T&S page.
Your Turn: Create and Publish Your Legal Pages
Now for the practical part. The most straightforward way to create all three pages and ensure they are properly formatted is to use a dedicated WordPress plugin. In the last lesson, you learned how to install plugins, so this process should feel familiar.
We will use the free version of the WP Legal Pages plugin, which is specifically designed for this task.
12 Best Privacy Policy Generators For Your Website in 2026
The article "12 Best Privacy Policy Generators" provides a fantastic step-by-step guide for using the WP Legal Pages plugin. We will follow these instructions precisely.
Please read the section titled "How to Create Your Privacy Policy with WP Legal Pages (Step-by-Step)." This will walk you through installing the plugin and using its setup wizard to create a page. We are going to adapt this process to create all three of our required pages.
Step-by-Step Guide
Follow these steps in your WordPress dashboard. This entire process should take about 20-30 minutes.
1. Install WP Legal Pages:
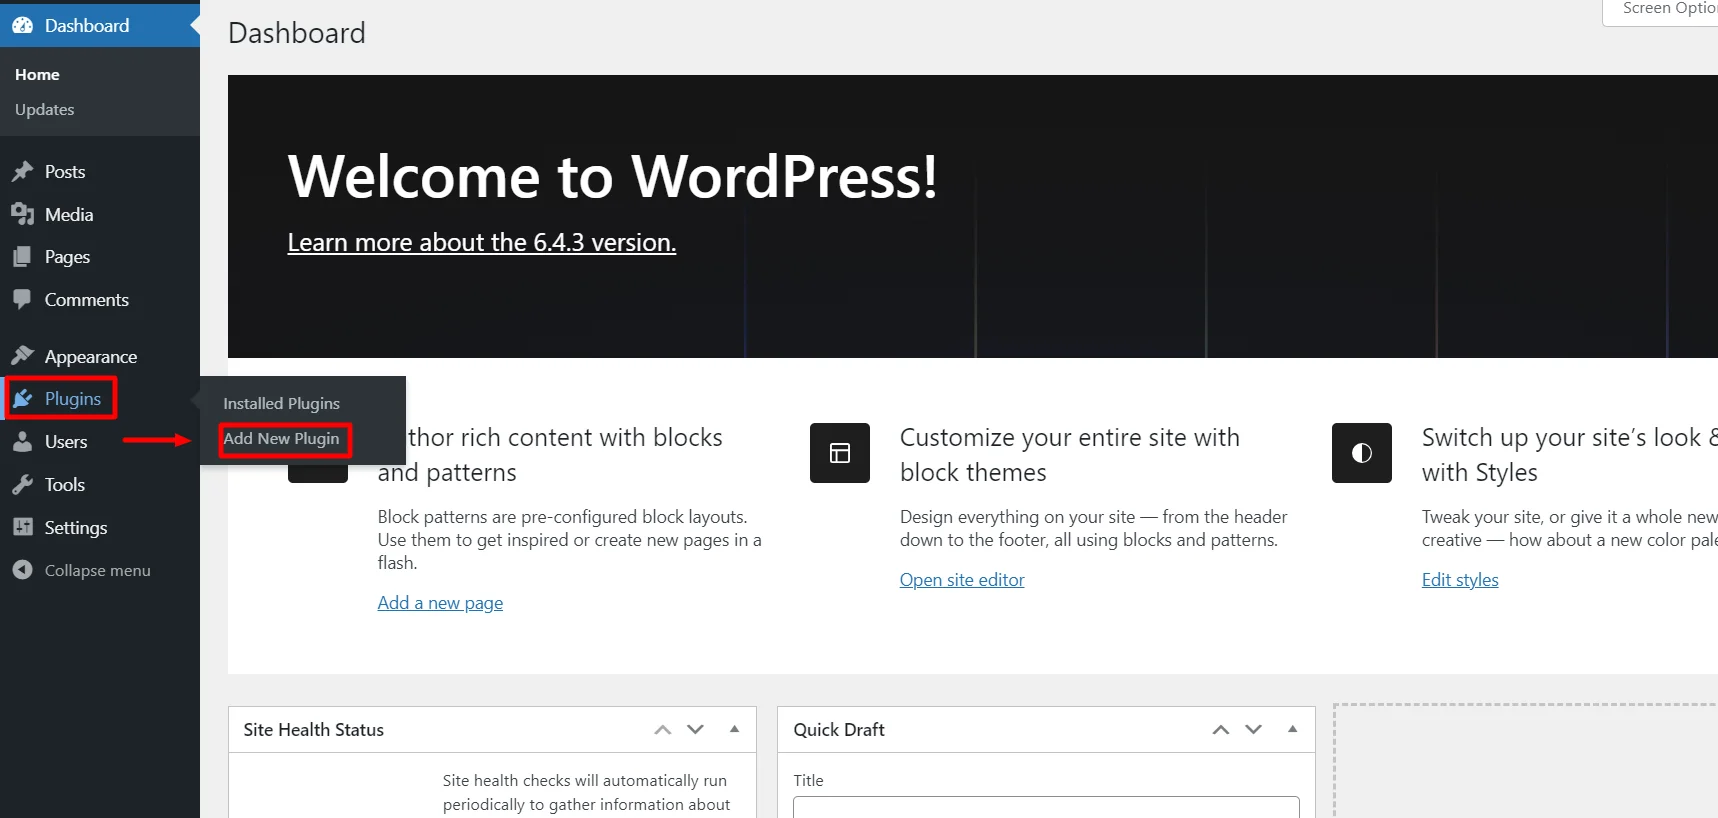
- Navigate to Plugins > Add New Plugin.
- Search for "WPLegalPages".
- Click Install Now, then Activate.
2. Create Your Affiliate Disclosure Page:
- In the left-hand menu, go to WP Legal Pages > Create Legal Page.
- You will see a list of available templates. Find and select the Affiliate Disclosure template.
- The plugin will present you with pre-written text. Read through it carefully. It's a good generic template, but you can edit it to better fit your voice.
- Click Publish.
3. Create Your Privacy Policy Page:
- Go back to WP Legal Pages > Create Legal Page.
- Select the Standard Privacy Policy template.
- The plugin will launch a setup wizard. Fill in your website details (name, country, email address, etc.). Be as accurate as possible.
- The wizard will generate a policy for you. Review the generated text in the editor.
- Click Publish.
4. Create Your Terms of Service Page:
- Go to WP Legal Pages > Create Legal Page one more time.
- Select the Terms and Conditions template.
- Like the Privacy Policy, this will use a wizard to ask for your details and generate the document.
- Fill in the information, review the generated text, and click Publish.
5. Add the Pages to Your Website's Footer:
Your pages are now live, but visitors need to be able to find them. The standard practice is to place links in your website's footer.
- Navigate to Appearance > Menus.
- At the top, click the "create a new menu" link. Name it "Legal Menu" and click Create Menu.
- On the left, under "Pages," you should see your newly created pages (Affiliate Disclosure, Privacy Policy, Terms and Conditions). Check the box next to each one and click Add to Menu.
- Click Save Menu.
- Now, go to Appearance > Widgets.
- Find your footer widget area (it might be called "Footer 1," "Footer Column 1," etc.). Click on it.
- Click the "+" icon to add a new block. Search for and select the Navigation Menu block.
- Give it a title if you wish (e.g., "Legal").
- From the "Select Menu" dropdown, choose the "Legal Menu" you just created.
- Click Update in the top right corner.
Now, visit your website. Scroll down to the bottom, and you should see the links to your three new legal pages in the footer.
Conclusion
Excellent work! You've just completed a fundamental step in building a professional and trustworthy affiliate marketing business. While it may feel like administrative work, having these pages in place is a sign that you are taking your business seriously.
Your key takeaways from this lesson are:
- Legal pages build trust and ensure compliance. They are not optional.
- An Affiliate Disclosure is required by the FTC and must be clearly visible on any page with affiliate links.
- A Privacy Policy is legally mandated to inform users how you handle their data.
- Terms of Service protect your content and set the rules for your website.
- Using a plugin like WP Legal Pages is an efficient way for beginners to generate and publish these essential documents.
Preview of the next lesson:
Now that the foundational technical and legal elements are in place, we'll continue building out your site's core pages. In the next lesson, you'll create a simple 'About' page to connect with your audience and build personal trust. We will also take the first step into analytics by installing the Google Analytics tracking code on your website.