Hello! Welcome to the final lesson in our module on building your affiliate website.
In our last lesson, you chose and installed a theme, giving your new website its visual design. Your site now has a "skin," but it doesn't yet have a "skeleton" to hold it together.
Today, we'll build that skeleton. The goal of this lesson is to create a primary navigation menu and set up a basic site structure. A navigation menu is the roadmap you provide for your visitors, guiding them to the most important parts of your site. A clear, logical menu is crucial for a good user experience and helps visitors find the valuable content you'll be creating.
Planning Your Site's Structure
Before we jump into the technical steps, let's think about the structure of a typical affiliate content site. Your menu should be simple and guide visitors toward the information they need to make a decision. For now, we'll plan for a basic but effective structure. Most successful affiliate blogs include these key sections:
- Home: The front door to your website.
- Blog: A central hub where all your articles, reviews, and comparison posts will live. This will be the heart of your site.
- About: A page to tell your story, explain your site's purpose, and build trust with your audience.
- Contact: A simple way for visitors to get in touch with you.
- Legal Pages: Pages like Privacy Policy, Terms of Service, and an Affiliate Disclosure are legally required in many jurisdictions. We will create these later, but we can plan for them now.
Our goal today is to create a menu that includes links to these core sections.
Creating and Managing Menus in WordPress
WordPress has a dedicated, user-friendly interface for managing menus. To get a comprehensive overview of how it works, let's start with a foundational guide.
How to Add a Navigation Menu in WordPress (Beginner's Guide)
The article 'How to Add a Navigation Menu in WordPress' from WPBeginner is a detailed, step-by-step guide that covers everything you need to know. It will serve as our main reference for this lesson.
Please read the following sections: Creating Your First Custom Navigation Menu: This shows you how to find the menu editor, name your menu, add pages, and assign it to a theme location. Creating Drop-Down Menus in WordPress: This explains how to nest items, which is useful for organizing legal pages neatly. Adding Categories to WordPress Menus: This is a key skill for later, when you'll want to help visitors browse your content by topic. Focus on understanding the drag-and-drop interface for organizing your menu items.
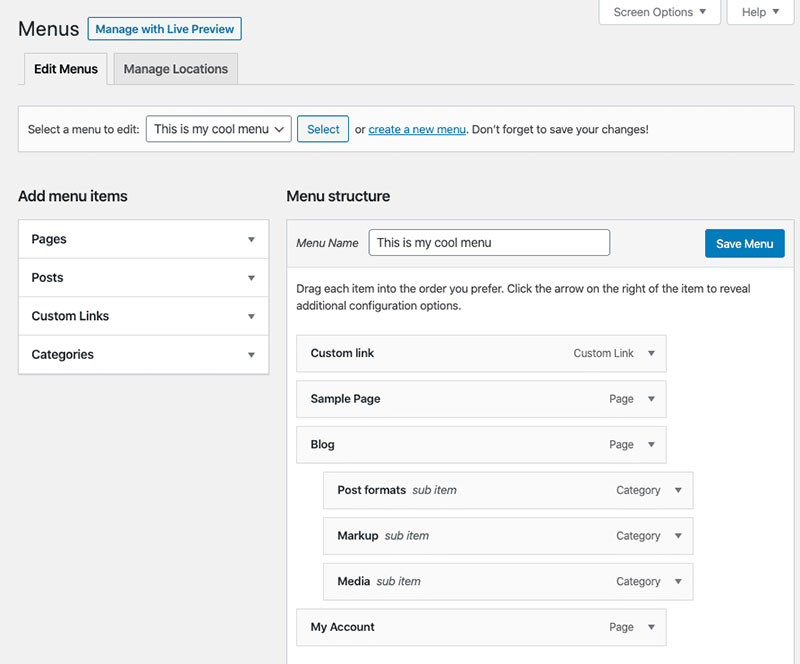
The process described in the article is the classic and most common way to handle menus. Below is a screenshot of the main menu editor, which should now look familiar.
Visual Walkthrough: Building Your Menu
While text guides are great for reference, seeing the process in action can make it click. The following short videos demonstrate how to create a menu, one using the classic editor and one using the theme customizer. Your interface might look slightly different depending on your theme, so it's helpful to see both.
How to Create a Menu in WordPress
First, let's watch 'How to Create a Menu in WordPress' by Create a Pro Website. This video uses the theme customizer (Appearance > Customize), which is a common approach with modern themes like Astra.
Watch the following clips: Creating and Naming the Menu (01:14 - 02:05): See how to create a new menu and assign its location. Adding Pages to the Menu (02:05 - 03:24): Watch how to add existing pages and reorder them. Creating Dropdown Menus (04:13 - 04:53): This shows the simple drag-and-indent method for creating sub-menus.
How To Create A Menu In WordPress [2023 GUIDE]
Next, this video, 'How To Create A Menu In WordPress [2023 GUIDE]' from Create WP Site, demonstrates the classic editor (Appearance > Menus) that you read about in the WPBeginner article.
Watch the segment from the beginning until 02:13. Pay attention to how categories are added to the menu and how items are dragged to the right to become 'sub items' in a dropdown.
Now you've seen the theory and the process. It's time to build your own menu.
Your Turn: Create Your Primary Menu
Let's apply what you've learned. In this exercise, you will create the basic menu structure we planned earlier. Some of these pages don't exist yet, so we'll create them as blank placeholders.
Follow these steps in your WordPress dashboard:
- Navigate to the Menu Editor: Go to Appearance > Menus.
- Create a New Menu:
- Click the "create a new menu" link.
- Give it a name. "Primary Menu" is a good, descriptive choice.
- Click the Create Menu button.
- Create Placeholder Pages: We need pages for our menu to link to.
- Open a new browser tab and go to Pages > Add New in your dashboard.
- Create a page titled "About". Leave the content blank and click Publish.
- Repeat this process to create blank pages titled "Blog" and "Contact".
- Add Items to Your Menu:
- Go back to your menu editor tab (Appearance > Menus). You may need to refresh the page to see your new pages.
- In the "Add menu items" box on the left, find the "Pages" section.
- Check the boxes for Home, About, Blog, and Contact.
- Click the Add to Menu button.
- Arrange Your Menu:
- On the right, under "Menu structure", your pages will appear.
- Drag and drop them into this order: Home, Blog, About, Contact.
- Set the Display Location:
- Under "Menu Settings" at the bottom, find the "Display location" option.
- Check the box for "Primary Menu" (or a similar name like "Main Navigation"—this depends on your theme).
- Save and Verify:
- Click the blue Save Menu button.
- Visit your website's homepage. You should now see your new menu at the top of the page!
Congratulations! You have just created the primary navigation for your website. It's a simple but foundational element that gives your site a logical structure.
Conclusion
In this lesson, you moved from design to architecture. You've successfully defined your site's basic structure and created a primary navigation menu that will guide your future visitors.
Here are your key takeaways:
- A navigation menu provides a roadmap for your website, improving user experience and organization.
- A basic affiliate site structure includes Home, Blog, About, and Contact pages.
- Menus are created and managed in the
Appearance > Menussection of the WordPress dashboard. - You can add pages, posts, categories, and custom links to your menu and arrange them with a simple drag-and-drop interface.
- Assigning your menu to a "Display Location" makes it appear on your live site, typically at the top of the page.
Preview of the next lesson:
You've now completed the "Building Your Affiliate Website" module. You have a domain, hosting, WordPress installed, a theme chosen, and a basic menu structure. In the next module, "Essential Website Tools and Analytics," we'll start by equipping your site with the tools it needs to succeed. Our first lesson will focus on installing and configuring essential WordPress plugins for SEO, caching, and security.