Hello! Welcome to the third lesson in our module on building your affiliate website.
In the previous lessons, you registered your unique domain name (the address for your site) and learned how to select a web hosting provider (the land and utilities). Assuming you have now chosen and purchased a hosting plan, it's time for one of the most exciting steps: laying the foundation for your website.
Today, we will install WordPress on your hosting account and perform the initial setup. By the end of this lesson, you will have a live, functioning (though empty) WordPress site and will have configured its most essential settings, like your site title and timezone.
WordPress.org vs. WordPress.com: A Crucial Distinction
Before we install anything, it's vital to understand a common point of confusion. There are two "versions" of WordPress, and we are interested in only one of them.
- WordPress.org: This is a free, open-source software platform that you install on your own web host. It gives you complete freedom and control to build any kind of website, install any theme or plugin, and monetize it however you wish. This is the professional choice and what we will be using.
- WordPress.com: This is a for-profit service that hosts a limited version of the WordPress software for you. While it can be easier to start with, it comes with significant restrictions on themes, plugins, and monetization, especially on the cheaper plans.
The "1-click installation" offered by your hosting provider will install the powerful, self-hosted WordPress.org software for you.
WordPress Tutorial For Beginners 2026 - (Easy Step by Step Guide)
The video 'WordPress Tutorial For Beginners' from the Create a Pro Website channel provides an excellent explanation of this difference. Understanding this will confirm why self-hosting is the right path for our affiliate marketing business.
Watch from 00:58 to 02:16 to see the comparison between WordPress.org and WordPress.com.
Installing WordPress on Your Hosting Account
Now, let's get WordPress installed. Thankfully, the days of manually uploading files are long gone. Almost every modern web host provides a "1-click" or automated installer that makes this process incredibly simple.
While the specific look of your hosting dashboard will vary (Hostinger's looks different from SiteGround's, which looks different from Bluehost's), the steps are fundamentally the same:
- Log in to your web hosting account.
- Find the section for website creation or software installation (often called "WordPress Installer," "Auto Installer," "Softaculous," or similar).
- Choose the domain name on which you want to install WordPress.
- Fill in the required information: Create an administrator username, a strong password, and provide your email address.
- Click the "Install" button.
Security Tip: For your administrator username, do not use "admin." This is the first username hackers will try to guess. Choose something unique to you. Be sure to save your username and password in a secure location.
WordPress Tutorial For Beginners 2026 - (Easy Step by Step Guide)
To see what this process looks like in practice, let's watch the installation process on a popular host, Hostinger. Your interface may differ, but the core actions of choosing a domain and creating a login will be the same.
Watch the segment from 04:53 to 06:20. Notice how the installer asks for an admin email and password before beginning the installation.
The installation process usually only takes a minute or two. Once it's complete, you will have a live WordPress website!
Accessing Your New WordPress Dashboard
Your WordPress dashboard is the control center for your entire website. It's where you will write content, change the site's appearance, and manage all its settings.
To log in, you simply add /wp-admin to the end of your domain name.
Login URL: http://www.yourdomain.com/wp-admin
You will be greeted by a login screen where you'll enter the username and password you created during the installation process.
WordPress Tutorial For Beginners 2026 - (Easy Step by Step Guide)
Let's watch a quick clip that shows you exactly how to find the login page and access your dashboard for the first time.
Watch from 06:20 to 07:05. Pay attention to the URL structure used to access the login page: yourdomain.com/wp-admin.
Performing the Initial Setup
Welcome to your WordPress dashboard! It can look a little busy at first, but we'll get familiar with it over the next few lessons. For now, we just need to configure a few basic but important settings.
Navigate to Settings → General in the left-hand menu.
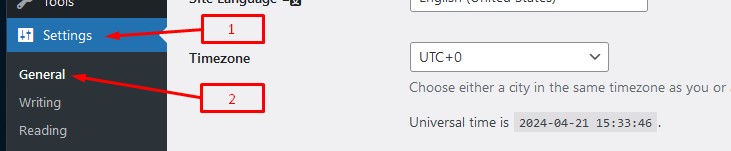
On this page, you will set the following:
- Site Title: This is the name of your website. It will appear in the browser tab and in the header of many themes. Make it the name you decided on, for example, "Clever Canine Guide."
- Tagline: This is a short phrase or slogan that describes your site. For example, "Your friendly guide to happy dog ownership." It helps visitors and search engines understand what your site is about. You can always change this later.
- Timezone: This is a crucial setting. By default, it may be set to UTC+0. You should set it to your local timezone or the timezone where you expect most of your audience to be. This ensures that when you schedule posts to be published at a certain time, they go live when you intend them to.

After you've updated these fields, scroll to the bottom of the page and click the Save Changes button.
The #1 WordPress Tutorial for Beginners: From Zero to Live Site
For a quick written reference on these initial steps, please review the following short article from Jetpack.
Read section 3, 'Access your WordPress dashboard and basic settings.' This will reinforce how to log in and where to find the Site Title, Tagline, and Timezone settings.
Your Turn: Action Steps
It's time to put this lesson into practice. Your task is to complete the installation and initial setup for your own website.
- Log in to your web hosting account.
- Locate the WordPress installer and begin the installation process for your domain.
- Choose a secure username (not "admin") and a strong password. Note them down securely.
- Once the installation is complete, navigate to
yourdomain.com/wp-adminand log in to your WordPress dashboard. - Go to Settings → General.
- Enter your Site Title and a preliminary Tagline.
- Set your correct Timezone.
- Click Save Changes.
Congratulations! You now have a live WordPress website ready to be built.
Conclusion
In this lesson, you accomplished a major technical milestone. You've moved from the planning stage to execution by installing the core software that will power your affiliate marketing business.
Here are your key takeaways:
- You are using the self-hosted version of WordPress (WordPress.org), which provides full control and is installed via your hosting provider.
- The installation process is automated through a "1-click installer" and requires you to set an admin username and password.
- You can always access your website's backend by navigating to
yourdomain.com/wp-admin. - The first essential setup steps are to set your Site Title, Tagline, and Timezone in the
Settings > Generalarea.
Preview of the next lesson:
Now that you're inside the WordPress dashboard, what's next? In our next lesson, we'll take a guided tour. You will learn to navigate the WordPress dashboard, distinguishing between Posts, Pages, and the Media Library. This will give you the lay of the land before we start adding content.