Hello and welcome back!
In our last lesson, you successfully set up your MailerLite account and created your first subscriber group. You now have the essential infrastructure for an email list, but it's currently an empty container. This brings us to a crucial question: how do you persuade people to join your list?
Simply asking them to "subscribe to your newsletter" is rarely effective. People are protective of their inboxes. To earn a spot, you need to offer them something of clear and immediate value. This is where a lead magnet comes in.
This lesson is all about creating that initial, irresistible offer. We will cover the strategy behind a great lead magnet and then walk through the practical steps of creating one. By the end of this lesson, you will be able to outline and create a simple lead magnet, such as a checklist or short guide, designed to attract your ideal subscribers.
1. What Makes a Great Lead Magnet?
A lead magnet is a free resource or service you give away in exchange for an email address. Its purpose is to "attract" potential customers (leads) to your email list.
In affiliate marketing, a lead magnet is your first opportunity to build trust. It's your chance to prove you understand your audience's problems and can provide real solutions. A well-crafted lead magnet makes your new subscriber think, "If their free content is this helpful, their recommendations must be trustworthy."
To understand the core purpose of a lead magnet, let's start with a short video.
3-Step Lead Magnet Tutorial: How To Create A High-Converting Lead Magnet
In this clip from her '3-Step Lead Magnet Tutorial', marketer Alex Cattoni explains what a lead magnet is and why the core of any good one is to solve an immediate problem for your audience.
Watch from 00:35 to 02:36. Focus on the idea that people don't want more emails; they want help with their problems.
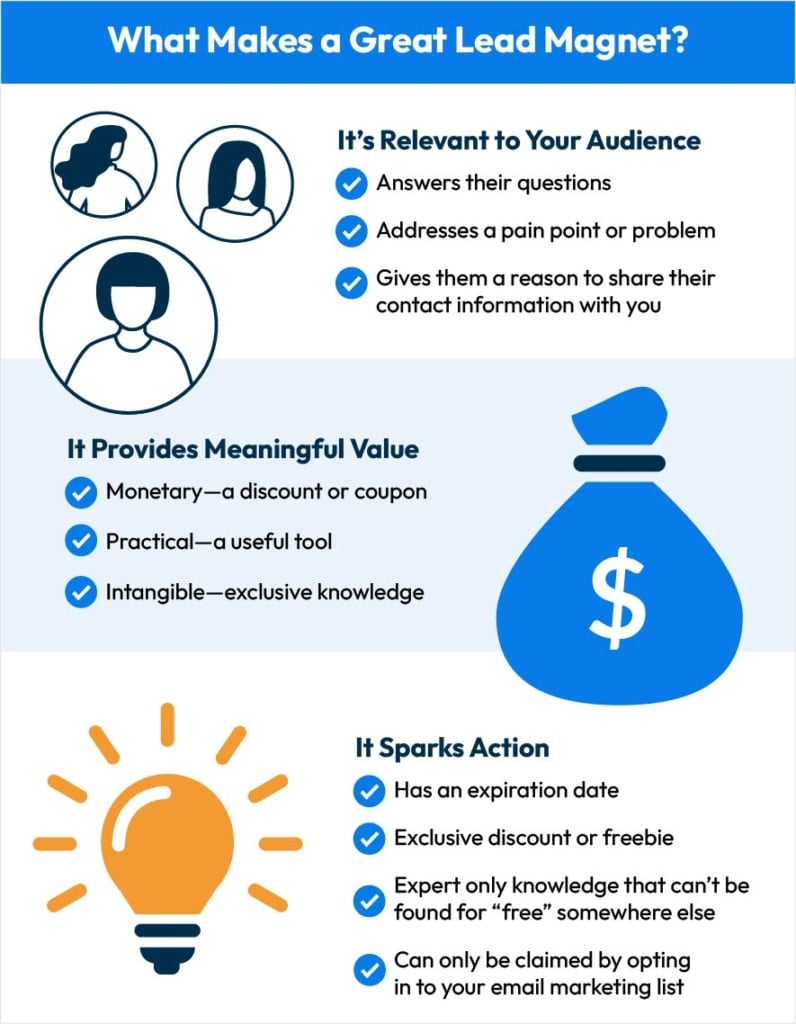
As Alex explained, a great lead magnet isn't just random content. It must have three key characteristics:
- It's Valuable: It solves a real, specific problem or answers a burning question. It provides a "quick win" that your audience can immediately appreciate.
- It's Specific: It targets one particular problem for one particular audience. "The Ultimate Guide to Fitness" is too broad. "A 7-Day Meal Plan for Busy Professionals Trying to Lose Weight" is specific and far more compelling.
- It's Actionable: Your audience should be able to consume and apply the information easily. A one-page checklist often provides more value than a 50-page ebook because it's easy to use.
This infographic summarizes these points well:
To dive deeper into these characteristics and learn about common mistakes to avoid, the following article is an excellent read.
How to Create Your First Lead Magnet (That People Actually Want)
The article 'How to Create Your First Lead Magnet' from Showit.com provides a fantastic breakdown of what works and what doesn't. We will use this article throughout the lesson.
Please read sections 1 ('What Makes a Lead Magnet Actually Work?') and 6 ('Five Lead Magnet Mistakes That Kill Conversions'). Focus on understanding the difference between valuable vs. broad content, and the common pitfalls like making the lead magnet too complicated.
2. Brainstorming Your Lead Magnet Idea and Format
Now that you know the theory, it's time to generate ideas for your own lead magnet. The process starts with your audience.
Step 1: Identify Your Audience's #1 Frustration
Think back to the niche and audience research you did in Module 3. What is a small but persistent problem your audience faces?
- What questions do they ask over and over in forums, on Reddit, or in Facebook groups?
- What are they confused or overwhelmed by?
- What's the first hurdle they face when starting out in your niche?
Your goal is to find a problem that you can solve for them in under 15 minutes.
Step 2: Choose a Beginner-Friendly Format
The format of your lead magnet should match the problem you're solving. As a beginner, it's best to start with something simple to create. The article you just read mentions several formats. Let's focus on the easiest and most effective ones.
How to Create Your First Lead Magnet (That People Actually Want)
Let's return to the Showit.com article to explore different lead magnet formats. Pay close attention to the 'My Top Picks' section.
Read section 3, 'Ten Lead Magnet Formats That Actually Convert.' Focus on the descriptions for Checklist, Template, Cheat Sheet, and Resource List. These are the best formats to start with.
For your first lead magnet, a checklist or cheat sheet is almost always the best choice. They are highly valuable, easy to consume, and simple for you to create.
3. Outlining Your Lead Magnet
Before you open any design software, create a simple outline. This will keep you focused and ensure your lead magnet is concise and valuable.
A simple 2-3 page lead magnet can be structured like this:
-
Page 1: The Title Page
- An attention-grabbing title (e.g., "The 5-Minute Kitchen Cleanup Checklist").
- A short subtitle explaining the benefit (e.g., "Get your kitchen spotless before bed, every night").
- Your name or website name.
-
Page 2: The Core Content
- A brief introduction (1-2 sentences) reinforcing the problem.
- The checklist, cheat sheet, or resource list itself. Keep it clean and easy to read.
-
Page 3: The "Next Step" or "About" Page
- A very brief bio about you or your site.
- A call to action that bridges to your affiliate offers. This doesn't have to be a hard sell. It can be as simple as: "Now that you have your kitchen cleanup routine, are you looking for the best eco-friendly cleaning products? Check out my top recommendations here." This is where you can link to a review article on your future website.
4. How to Create Your Lead Magnet with Canva
Now for the hands-on part. We'll use a free tool called Canva to design and create a professional-looking PDF lead magnet. Canva is a web-based graphic design tool that is perfect for beginners, with thousands of free templates.
The following video is a detailed walkthrough of creating an interactive digital checklist. We'll use it to guide you through the creation of your own lead magnet.
How to Create a Digital PDF Checklist in Canva | Perfect for Freebies & Lead Magnets
This tutorial by Mariah Magazine on YouTube provides a clear, step-by-step process for designing a checklist in Canva and making it interactive.
This video will be your guide for the final exercise. Watch it in segments as you work: Design (01:28 - 09:37): Follow along to design your title page, content page, and about page. Pay attention to how she uses templates and customizes them. Adding Links (09:37 - 13:55): Learn how to add clickable links to your PDF. This is useful for the 'About' page where you might link to your social media or website. Making it Interactive (13:55 - 18:05): This part shows how to use a free tool (PDFescape) to make your checkboxes clickable. This is a great professional touch, but it's an optional bonus step for now. A simple, printable PDF is perfectly fine for your first lead magnet.
Your Action Plan: Create Your First Lead Magnet
It's time to put all this together. Your task is to outline and create a simple lead magnet for your niche. Set aside about 45-60 minutes for this.
- Brainstorm (5 mins): Revisit your niche. Identify one small, specific problem your target audience faces.
- Choose a Format (1 min): Decide between a checklist, a cheat sheet, or a simple resource list.
- Outline (10 mins): On a piece of paper or a simple text document, write out the outline for your 2-3 page lead magnet using the structure described in Part 3.
- Create in Canva (30-45 mins):
- Go to Canva.com and create a free account if you don't have one.
- Search for "Checklist" or "A4 Document" templates to get started.
- Following the guidance from the video tutorial, build your lead magnet based on your outline. Don't strive for perfection; aim for "done and helpful."
- When finished, click Share > Download, select PDF Standard as the file type, and download your file.
You've now created a valuable asset that will be the cornerstone of your list-building efforts!
Conclusion
In this lesson, you moved from understanding the theory of email marketing to creating a tangible asset for your business. This is a significant step.
Key Takeaways:
- A lead magnet is a valuable freebie offered in exchange for an email address.
- The best lead magnets are specific, valuable, and deliver a quick win for the user.
- For beginners, simple formats like checklists and cheat sheets are the most effective and easiest to create.
- Tools like Canva allow you to create a professional-looking lead magnet for free, with no design experience needed.
Preview of the next lesson:
You now have a fantastic lead magnet ready to go. But how do you deliver it to your website visitors? In the next lesson, we will learn how to build a simple opt-in form using MailerLite and add it to your website to start capturing those email addresses.