Hello! Welcome back to our module on containerizing your FastAPI application.
In the last lesson, you crafted a professional, multi-stage Dockerfile. You learned how to separate the build environment from the final runtime environment to create a lean, secure, and optimized image.
Today, we'll take that Dockerfile and use it to achieve our learning outcome: Build a Docker image from the Dockerfile. This is the crucial step where your application and its environment are packaged into a single, portable artifact that can be run anywhere Docker is installed.
1. The Build Workflow
Before we type any commands, let's visualize where this step fits into the overall process. We have our application code and the Dockerfile that describes how to package it. The docker build command is what consumes these assets to produce a new Docker image.
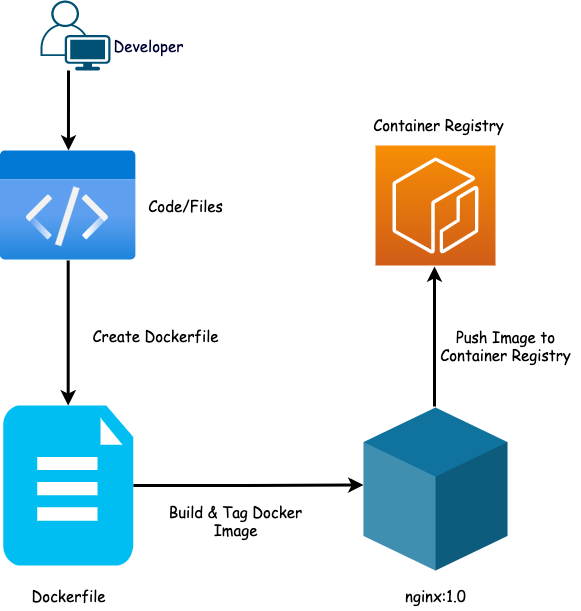
As you can see, we are at the heart of the process: turning our blueprint (Dockerfile) into an actual, usable artifact (the image).
2. The docker build Command
The command to build an image is docker build. Let's examine its structure and the options we'll use.
FastAPI in Containers - Build the Docker Image
The official FastAPI documentation provides a concise guide on this process. We'll focus on the section that introduces the build command.
Read the section 'Build the Docker Image'. Pay close attention to the command structure: docker build -t myimage ..
As the documentation shows, the command has three main parts:
docker build: The command itself.-t myimage: The-tor--tagflag. This allows you to "tag" your image with a human-readable name, likefastapi-app. It's common to add a version, e.g.,fastapi-app:1.0. For now, we'll just use a simple name. Tagging is essential for managing different versions of your application..: The build context. This is the path to the directory containing yourDockerfileand all the files needed for the build (like yourappdirectory andpyproject.toml). The.simply means "the current directory". Docker will package this directory (respecting your.dockerignorefile) and send it to the Docker daemon to execute the build.
3. Let's Build Your Image!
Now it's time to run the command. Make sure you are in your terminal, and your current working directory is the root of your FastAPI project (the same folder that contains your Dockerfile).
Run the following command:
docker build -t fastapi-app .
You will see Docker execute each instruction from your Dockerfile step-by-step. Because you're using a multi-stage build, you'll see it first pull the base image for the builder stage, install dependencies, and then move on to the final stage.
The output will look something like this, showing each step:
[+] Building 15.8s (15/15) FINISHED
 => [internal] load build definition from Dockerfile
 => => transferring dockerfile: 856B
 => [internal] load .dockerignore
 => => transferring .dockerignore: 81B
 => [internal] load metadata for docker.io/library/python:3.12-slim
 => [internal] load build context
 => => transferring context: 4.85kB
 => [builder 1/5] FROM docker.io/library/python:3.12-slim
 => [stage-1 1/6] FROM docker.io/library/python:3.12-slim
 => [builder 2/5] WORKDIR /app
 => [builder 3/5] RUN pip install uv
 => [builder 4/5] COPY pyproject.toml uv.lock* ./
 => [builder 5/5] RUN uv venv && uv sync --frozen
 => [stage-1 2/6] WORKDIR /app
 => [stage-1 3/6] RUN addgroup --system appuser && adduser --system --group appuser
 => [stage-1 4/6] COPY --from=builder --chown=appuser:appuser /app/.venv ./.venv
 => [stage-1 5/6] COPY --from=builder --chown=appuser:appuser /app/app ./app
 => exporting to image
 => => exporting layers
 => => writing image sha256:...
 => => naming to docker.io/library/fastapi-app
To see this process in action, let's watch a short video.
Dockerize fastapi app - Python Framework inside docker container
The following video from Bitfumes provides a clear, practical demonstration of the docker build command.
Watch from 06:50 to 07:27. The presenter runs the docker build command with a tag and then shows the resulting image.
4. Verifying the Image
Once the build process completes successfully, how do you know it worked? You can list all the Docker images on your machine with the docker images command.
Run this in your terminal:
docker images
You should see a list of images, including the one you just created.
REPOSITORY      TAG       IMAGE ID       CREATED          SIZE
fastapi-app     latest    a1b2c3d4e5f6   2 minutes ago    185MB
python          3.12-slim 9g8h7j6k5l4m   2 weeks ago      127MB
Notice a few things:
- REPOSITORY: This is the name you provided with the
-tflag:fastapi-app. - TAG: Since we didn't specify a version tag (like
:1.0), Docker defaults tolatest. - SIZE: Look at the size of your
fastapi-appimage. Thanks to the multi-stage build and theslimbase image from the previous lesson, it should be significantly smaller than the nearly 1GB image we saw in the initial, unoptimized example from the ArjanCodes video. This is the direct payoff for your work in the last lesson!
5. The Importance of the Build Context
Remember the .dockerignore file from our last lesson? The docker build command is where it comes into play. By listing files and directories like .git, .venv, and __pycache__, you tell Docker not to include them in the build context sent to the daemon.
This has two key benefits:
- Reduces Image Size: It prevents unnecessary or sensitive files from being copied into your final image with a broad
COPY . .command. - Speeds Up Builds: The build context can be large. By excluding irrelevant files, you reduce the amount of data that needs to be transferred to the Docker daemon, making the build start faster.
Dockerize fastapi app - Python Framework inside docker container
Let's watch another clip from the Bitfumes video that clearly demonstrates the purpose of a .dockerignore file.
Watch from 07:51 to 09:09. The presenter inspects a container and finds an unnecessary venv folder inside. He then adds it to .dockerignore, rebuilds the image, and shows that the folder is now correctly excluded.
This practical demonstration reinforces why a well-configured .dockerignore file is a best practice for every Docker project.
Conclusion
Congratulations! You have successfully transformed your source code and Dockerfile into a self-contained, portable Docker image. This is a fundamental skill in modern software development and the cornerstone of container-based deployment.
Key Takeaways:
- The
docker build -t <name> .command is used to create a tagged image from aDockerfilein the current directory. - Tagging (
-t) is crucial for naming and versioning your images. - The build context (
.) is the set of files sent to the Docker daemon, and it should be kept clean using a.dockerignorefile. - You can verify the successful creation and size of your image using the
docker imagescommand.
In the next lesson, we'll complete the local workflow by taking the image you just built and running it as a container. You'll see your FastAPI application come to life, isolated within its own Docker environment.