Hello! Welcome back to our module on containerizing your FastAPI application.
In the last lesson, we covered the fundamentals of containerization. You learned what Docker is, the difference between a Dockerfile, an image, and a container, and the purpose of basic instructions like FROM, WORKDIR, COPY, RUN, and CMD. We also saw how the order of these instructions can dramatically speed up build times by leveraging Docker's cache.
Today, we'll build on that foundation to tackle a key practice for creating production-ready applications. Our goal is to write a multi-stage Dockerfile to create an optimized and secure FastAPI image. This is a critical skill for deploying applications efficiently, especially to serverless platforms like Google Cloud Run where image size and startup time directly impact performance and cost.
1. The Problem with a Single-Stage Build
In our previous lesson, we designed a simple, single-stage Dockerfile. While functional, this approach has significant drawbacks for production:
- Large Image Size: It bundles all dependencies, including those only needed for building (like compilers and development libraries), into the final image.
- Slower Deployments: Larger images take longer to upload to a container registry and pull down to a server.
- Increased Security Risk: More packages and tools in your image mean a larger "attack surface" with more potential vulnerabilities.
This Is How You Write an Efficient Python Dockerfile
To see this problem in action, let's watch the beginning of a video from ArjanCodes. He starts with a simple FastAPI app and a basic, unoptimized Dockerfile, highlighting the large initial image size and slow build time.
Watch from 00:20 to 02:55. Pay attention to the initial Dockerfile structure and the resulting image size he points out. This demonstrates the typical result of a naive, single-stage build.
An almost 1 GB image for a "hello world" app is clearly not ideal. The solution is to separate the build environment from the runtime environment.
2. The Solution: Multi-Stage Builds
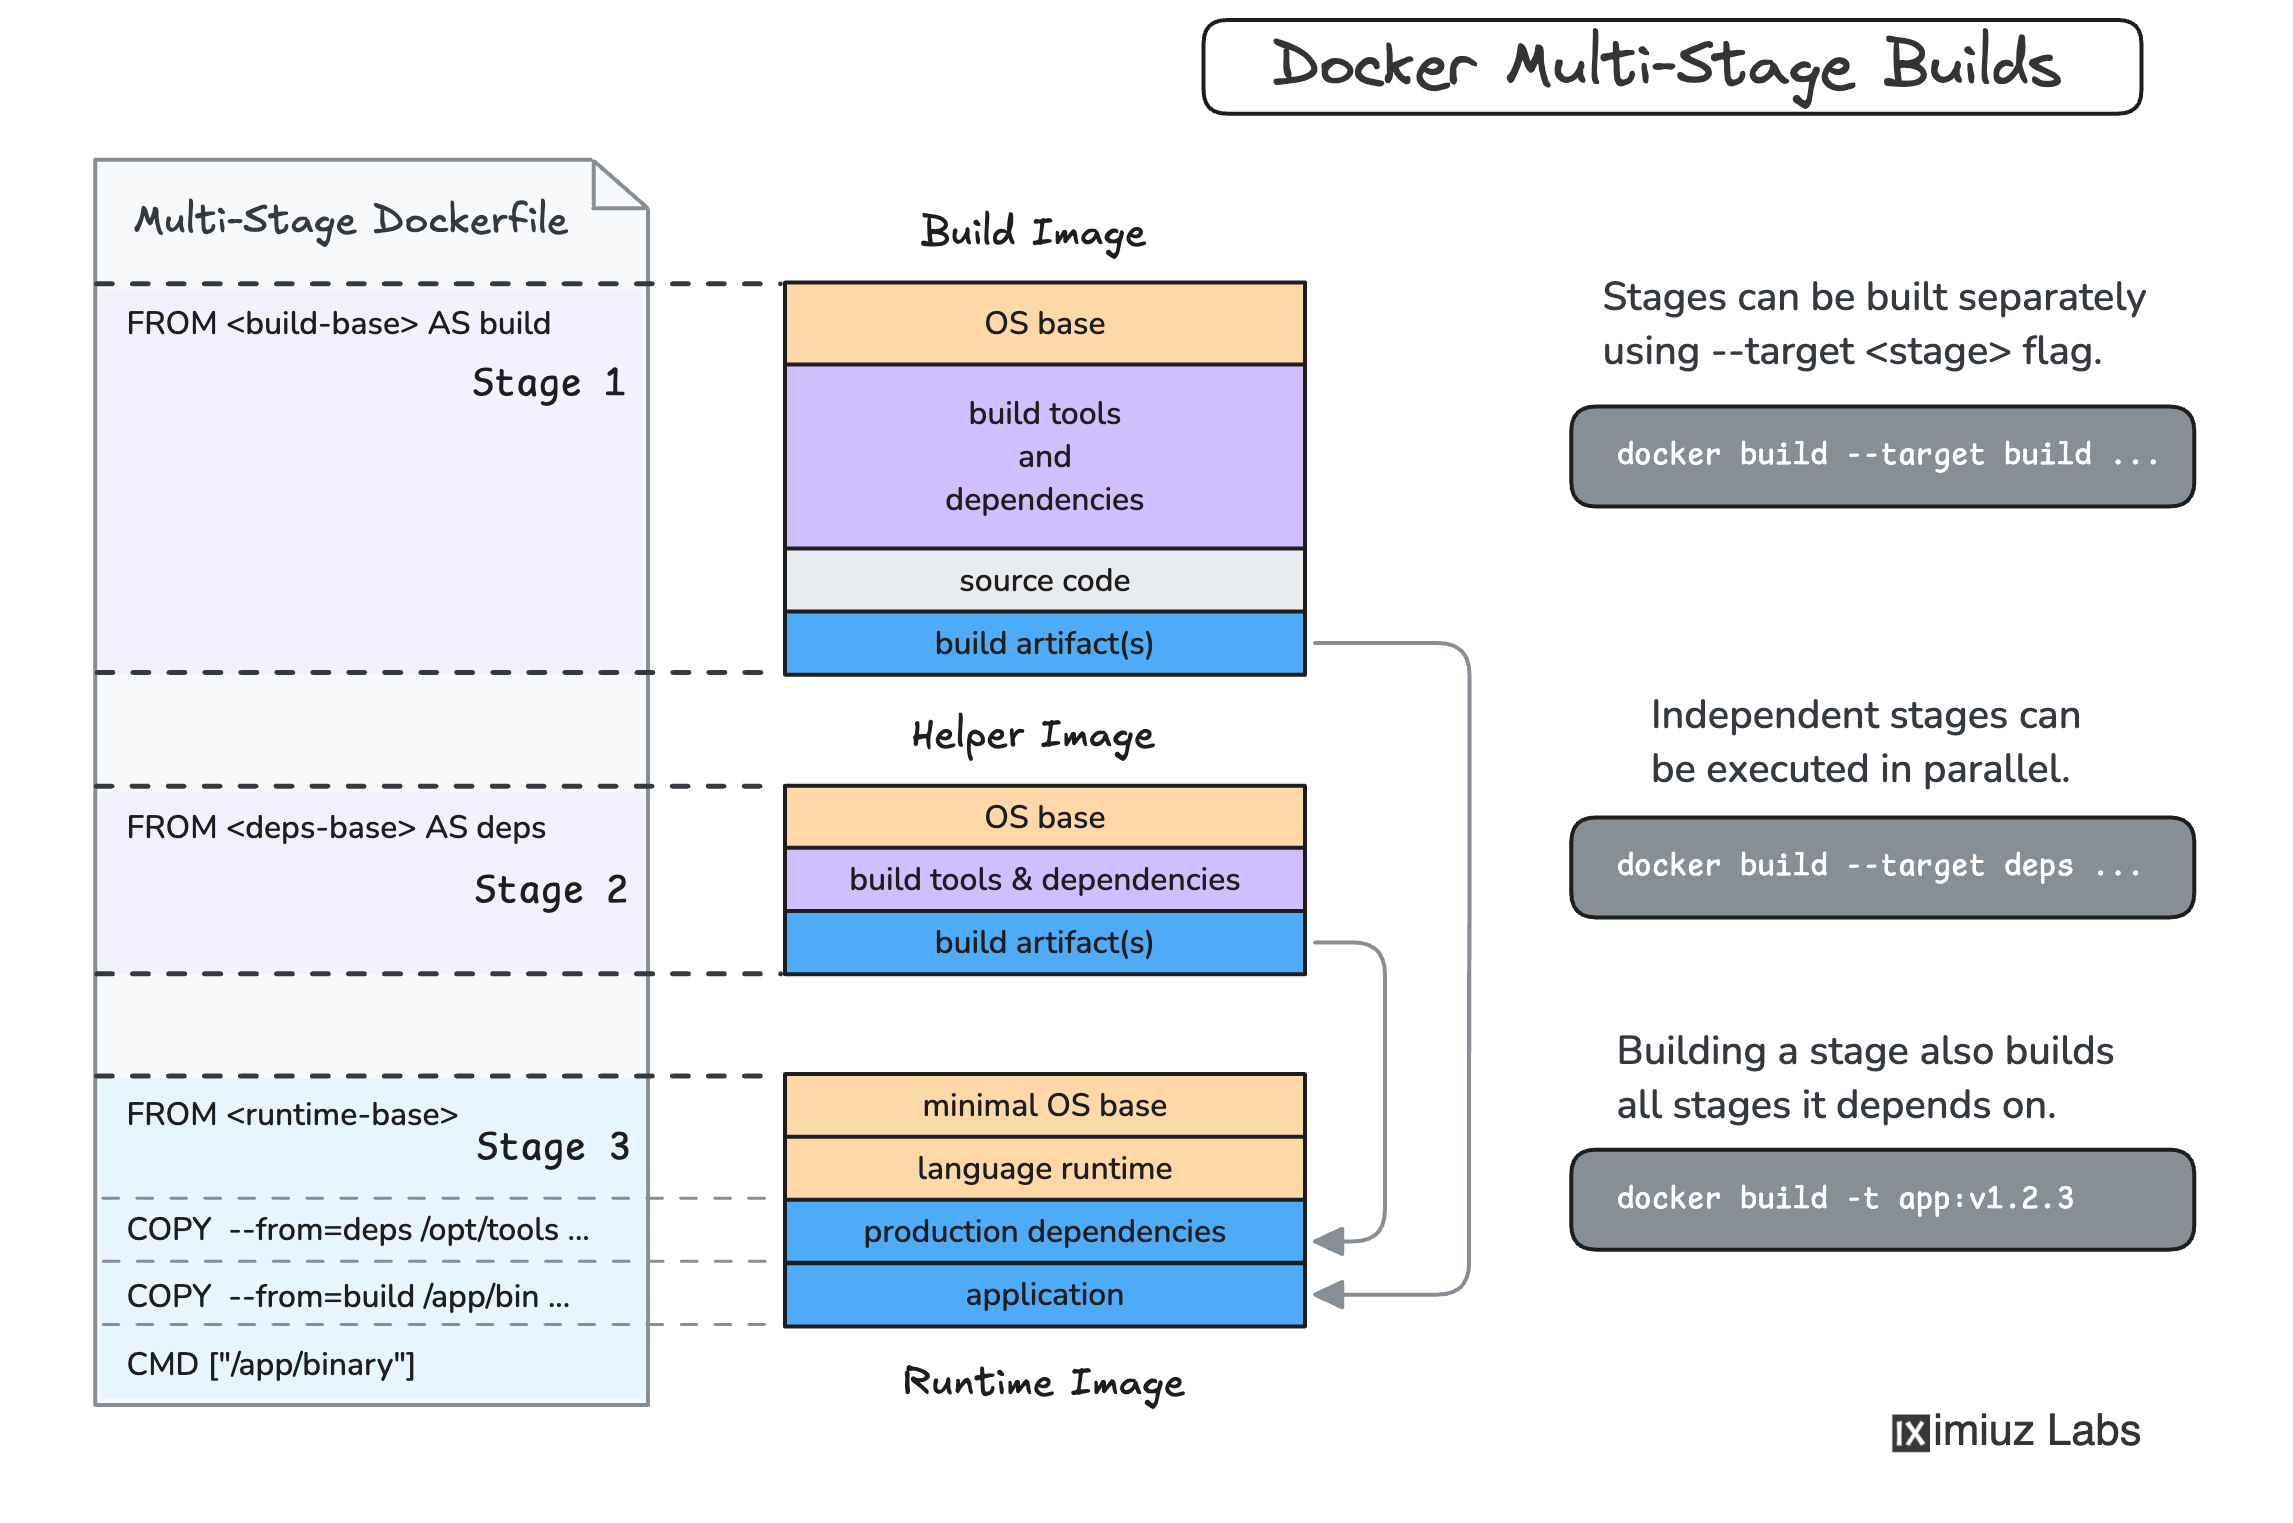
A multi-stage build allows you to use multiple FROM instructions within a single Dockerfile. Each FROM starts a new "stage". You can selectively copy artifacts—like compiled code or installed packages—from one stage to a later one, leaving behind all the build-time tools and temporary files.
The typical pattern is:
- Builder Stage: Start with a full-featured base image. Install build tools, compilers, and all Python dependencies (including development ones) into a virtual environment.
- Final Stage: Start from a fresh, lightweight base image. Copy only the virtual environment and the application code from the builder stage. This final stage becomes your lean, production-ready image.
This diagram perfectly illustrates the concept:
Now, let's read a concise explanation of how this works in practice.
This article from TestDriven.io provides an excellent summary of multi-stage builds and why they are beneficial.
Read the section 'Use Multi-stage Builds'. Notice the size comparison before and after using a multi-stage build. This reinforces the primary benefit of this technique.
3. Writing Your First Multi-Stage Dockerfile
Let's write a multi-stage Dockerfile for our FastAPI project. We'll use uv, the fast Python package manager you're familiar with, to handle our dependencies.
Here is the structure we'll build.
Stage 1: The builder
This stage is responsible for creating a complete, self-contained Python environment with all our dependencies installed.
# Stage 1: The 'builder' stage
# Use a specific Python version for reproducibility. 'slim' is a good balance of size and features.
FROM python:3.12-slim AS builder


# Prevent Python from writing .pyc files. Not strictly necessary but can keep things clean.
ENV PYTHONDONTWRITEBYTECODE 1


# Ensure Python output is sent straight to the terminal without being buffered.
ENV PYTHONUNBUFFERED 1


# Set the working directory inside the container.
WORKDIR /app


# Install uv, our package manager.
RUN pip install uv


# Copy only the dependency definition files first to leverage Docker's cache.
COPY pyproject.toml uv.lock* ./


# Install all dependencies into a virtual environment within the /app directory.
# This creates a self-contained environment that we can copy later.
RUN uv venv && uv sync --frozen


# Copy the rest of your application's source code.
COPY ./app ./app
Breaking it down:
FROM python:3.12-slim AS builder: We start with a slim Python image and name this stagebuilder. The name is arbitrary but descriptive.COPY pyproject.toml uv.lock* ./: We copy the dependency files first. If these don't change, this layer and the next one will be cached.RUN uv venv && uv sync --frozen: First, we create a virtual environment in the current directory (.venv). Then,uv syncinstalls the exact versions of the dependencies specified inuv.lockinto that virtual environment.COPY ./app ./app: Finally, we copy our application code.
At the end of this stage, we have a /app directory containing our source code (/app/app) and a complete virtual environment (/app/.venv).
Stage 2: The final Image
This stage builds the small, clean image that will actually be deployed.
# Stage 2: The 'final' stage
# Start from the same clean base image.
FROM python:3.12-slim

ENV PYTHONDONTWRITEBYTECODE 1
ENV PYTHONUNBUFFERED 1

WORKDIR /app


# --- Security Best Practice: Create a non-root user ---
# Create a new user and group called 'appuser'.
RUN addgroup --system appuser && adduser --system --group appuser


# Copy the virtual environment from the builder stage.
# The --chown flag sets the owner of the copied files to our new user.
COPY --from=builder --chown=appuser:appuser /app/.venv ./.venv


# Copy the application code from the builder stage.
COPY --from=builder --chown=appuser:appuser /app/app ./app


# Switch to the non-root user.
USER appuser


# The command to run the application.
# It uses the uvicorn executable from our copied virtual environment.
CMD ["./.venv/bin/uvicorn", "app.main:app", "--host", "0.0.0.0", "--port", "80"]
The magic happens here:
FROM python:3.12-slim: We start fresh. None of the build tools or temporary files from thebuilderstage are present.COPY --from=builder ...: The--from=builderflag tells Docker to copy files from the stage we namedbuilder. We grab the virtual environment and the application code.RUN addgroup ...andUSER appuser: This is a crucial security step. By default, containers run as therootuser, which poses a security risk. If an attacker were to exploit a vulnerability in your application, they would gain root access to the container. By creating and switching to a dedicated, unprivileged user (appuser), we limit the potential damage an attacker can do.
4. Further Optimizations and Best Practices
The Dockerfile above is already very good. Let's incorporate a few more best practices to make it truly production-grade.
This Is How You Write an Efficient Python Dockerfile
The ArjanCodes video we saw earlier continues to show a series of excellent optimizations. Let's watch the rest of it to see how to refine our image.
Watch from 09:02 to 16:34. This covers three key topics: Multi-stage builds (which we've just implemented). Copying only necessary files to avoid including sensitive data or unnecessary files like .vscode settings. Security practices like running as a non-root user and handling secrets (though we'll focus on the non-root user aspect).
The video reinforces what we've learned and introduces another key practice: being selective about what you copy.
Use a .dockerignore File
Instead of copying everything with COPY . ., it's better to be explicit (COPY ./app ./app) and to use a .dockerignore file. This file works just like a .gitignore file, telling Docker to exclude certain files and folders from the build context entirely. This prevents accidental inclusion of sensitive files (.env), local development artifacts, and version control directories.
Create a file named .dockerignore in your project's root directory with the following content:
# Git
.git
.gitignore


# Docker
Dockerfile
.dockerignore


# Python
__pycache__/
*.pyc
*.pyo
*.pyd
.venv
.env


# IDE / Editor
.vscode/
.idea/
This ensures your build context is small and clean, which can speed up builds and prevent sensitive information from leaking into your image.
5. The Complete Production-Ready Dockerfile
Let's assemble everything we've learned into a final, well-commented Dockerfile. This is a template you can confidently use for your FastAPI projects.
# =========================================================================================
# Stage 1: The 'builder' stage
# Installs dependencies into a virtual environment.
# =========================================================================================
FROM python:3.12-slim AS builder


# Set environment variables for clean Python execution.
ENV PYTHONDONTWRITEBYTECODE 1
ENV PYTHONUNBUFFERED 1


# Set the working directory.
WORKDIR /app


# Install 'uv' for fast package management.
RUN pip install uv


# Copy only the dependency files to leverage Docker caching.
COPY pyproject.toml uv.lock* ./


# Create a virtual environment and install dependencies from the lock file.
RUN uv venv && uv sync --frozen


# Copy the application source code into the builder stage.
COPY ./app ./app


# =========================================================================================
# Stage 2: The 'final' or 'production' stage
# Creates the final, lightweight, and secure image.
# =========================================================================================
FROM python:3.12-slim


# Set environment variables.
ENV PYTHONDONTWRITEBYTECODE 1
ENV PYTHONUNBUFFERED 1


# Set the working directory.
WORKDIR /app


# Create a non-root user to run the application for security reasons.
RUN addgroup --system appuser && adduser --system --group appuser


# Copy the virtual environment created in the builder stage.
# Set the owner of the copied files to the new non-root user.
COPY --from=builder --chown=appuser:appuser /app/.venv ./.venv


# Copy the application source code from the builder stage.
COPY --from=builder --chown=appuser:appuser /app/app ./app


# Switch to the non-root user.
USER appuser


# Set the default command to run when the container starts.
# We expose port 80, a standard port for web traffic.
EXPOSE 80
CMD ["./.venv/bin/uvicorn", "app.main:app", "--host", "0.0.0.0", "--port", "80"]
Conclusion
Excellent work! You've moved beyond basic containerization and learned how to craft a Dockerfile that is optimized for performance, size, and security. These principles are fundamental to professional software deployment.
Key Takeaways:
- Multi-Stage Builds: They are the standard for creating lean production images by separating build-time dependencies from runtime requirements.
- Smaller is Better: Using slim base images (
python:3.12-slim) and copying only necessary files reduces image size, leading to faster deployments and lower costs. - Security is Not an Afterthought: Running your application as a non-root user is a simple yet critical step to limit the potential impact of a security vulnerability.
- Control Your Build Context: A
.dockerignorefile is essential for keeping your build context small and preventing sensitive files from being included in your image.
In our next lesson, we'll put this Dockerfile to use. You will build the Docker image from this file and then run the application as a Docker container to test it locally.