Hello! Welcome to the eleventh module of our FastAPI course.
In the previous module, we finished our deep dive into testing by learning how to validate endpoints that handle file uploads. With a thoroughly tested application, the next logical step is to prepare it for deployment so the world can use it. This brings us to a crucial topic in modern software development: containerization.
Today's lesson will introduce you to the "why" and "how" of packaging applications for reliable deployment. We will explain the purpose of containerization and identify the key components of a Dockerfile. This is the first step in moving our FastAPI application from our local machine to a production-ready state, a fundamental skill for deploying any service, including the AI models you're interested in.
1. The Deployment Challenge: "It Works On My Machine"
You've spent weeks building and testing your FastAPI application. It runs perfectly on your development machine. You hand it over to be deployed on a server, but suddenly, it crashes. Perhaps the server has a different version of Python, a missing system library, or an incompatible version of one of your dependencies.
This is a classic, frustrating problem in software development. How can we ensure that an application that works in a development environment will work exactly the same way in testing, staging, and production environments?
The answer is containerization.
How To Use Docker To Make Local Development A Breeze
To understand the core problem that containerization solves, watch the introduction and the following segment from this video by ArjanCodes. He explains how Docker creates consistency between development and cloud environments.
Watch from the beginning to 00:31, and then from 05:04 to 08:49. Pay attention to how he describes the benefits of using an isolated, reproducible environment for both local development and cloud deployment.
As the video explains, containerization packages an application along with all of its dependencies—libraries, system tools, code, and runtime—into a single, isolated unit called a container. This container can run on any machine that has a containerization platform (like Docker) installed, regardless of the underlying operating system or its configuration.
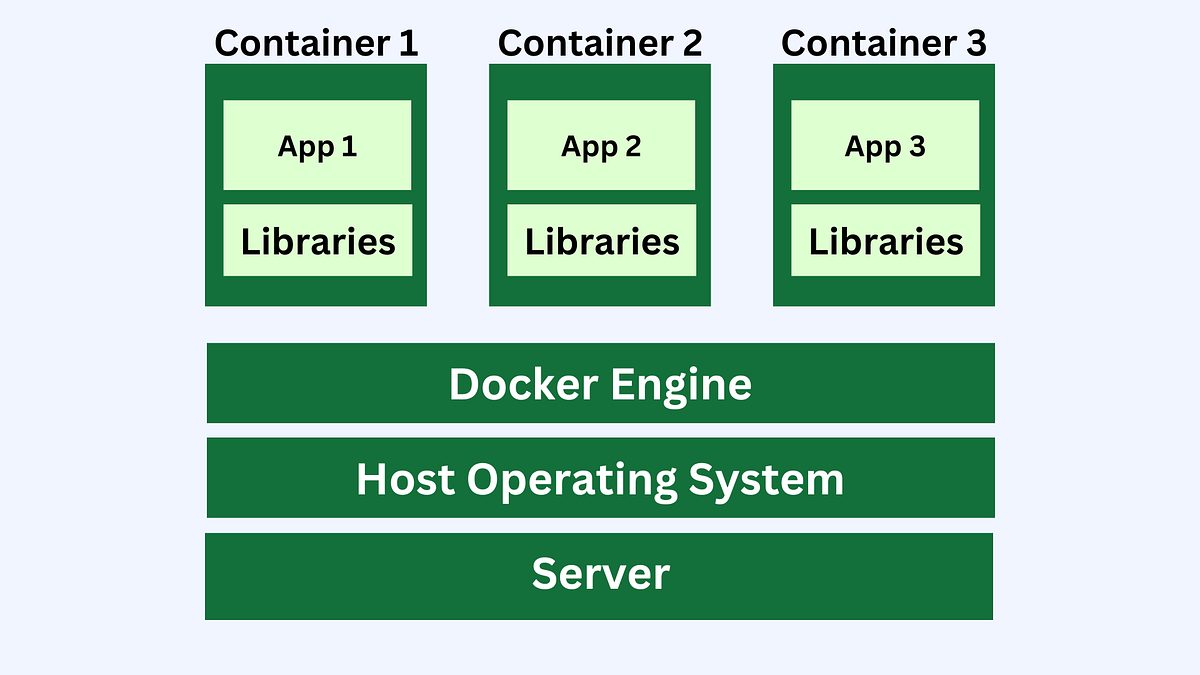
This approach provides several key benefits:
- Consistency: The application runs in the same environment everywhere.
- Isolation: Apps running in different containers don't interfere with each other.
- Portability: A container built on a Mac can run on a Linux server or in the cloud without any changes.
2. The Tools of Containerization: Dockerfile, Image, and Container
The most popular technology for containerization is Docker. To work with Docker, you need to understand three fundamental concepts: the Dockerfile, the Docker Image, and the Docker Container.
Docker Tutorial For Beginners - How To Containerize Python Applications
This short video from Patrick Loeber provides a very clear and concise distinction between these three core components.
Watch from 03:43 to 04:30. Focus on how he defines each of the three terms and their relationship to one another.
Let's solidify those definitions:
- Dockerfile: A text file that contains a list of instructions for how to build a Docker image. It's the blueprint or the recipe for your container.
- Docker Image: A read-only, static template created from the Dockerfile. It includes your application code and all its dependencies. It is the packaged application that you can share and distribute.
- Docker Container: A running instance of a Docker image. It's the live, running application process. You can start, stop, and delete containers.
This workflow is the heart of Docker:

For a more detailed textual explanation, the official FastAPI documentation offers an excellent overview.
FastAPI in Containers - Docker
The FastAPI documentation provides a great summary of what containers and container images are. Reading this will reinforce the concepts from the video.
Read the sections 'What is a Container', 'What is a Container Image', 'Container Images', and 'Containers and Processes'. This will clarify the distinction between an image and a container and how containers relate to running processes.
3. Anatomy of a Dockerfile
Now that we understand the concepts, let's examine the blueprint itself: the Dockerfile. A Dockerfile is a series of commands that Docker executes layer by layer to assemble your image.
The best way to learn is by looking at a real example for a FastAPI application. The official FastAPI documentation provides a clear, well-commented Dockerfile.
FastAPI in Containers - Docker
This section of the FastAPI documentation breaks down a Dockerfile line by line. It is the most important resource for this lesson.
Read the section titled 'Dockerfile' very carefully. It explains the purpose of each instruction: FROM, WORKDIR, COPY, RUN, and CMD. Pay special attention to the numbered annotations in the code block, as they explain each step.
Let's summarize the key instructions you just read about:
-
FROM python:3.9- This is always the first instruction. It specifies the base image to build upon. In this case, we're starting with an official image from Docker Hub that already has Python 3.9 installed.
-
WORKDIR /code- This sets the working directory inside the container for any subsequent
RUN,CMD,COPY, andADDinstructions. It's like runningcd /codeinside the container.
- This sets the working directory inside the container for any subsequent
-
COPY ./requirements.txt /code/requirements.txt- This copies files or directories from your host machine (the first argument,
./requirements.txt) into the container's filesystem (the second argument,/code/requirements.txt).
- This copies files or directories from your host machine (the first argument,
-
RUN pip install --no-cache-dir -r /code/requirements.txt- This executes a command inside the container during the image build process. It's used here to install the Python dependencies. The changes (the installed packages) are committed to a new layer in the image.
-
COPY ./app /code/app- Here we copy the actual application code into the container.
-
CMD ["uvicorn", "app.main:app", "--host", "0.0.0.0", "--port", "80"]- This specifies the default command to execute when a container is started from this image. This is how you start your FastAPI server. Note the "exec form" (a JSON array) is preferred. It ensures your application is the main process and can receive system signals correctly.
The Importance of Order: Docker Cache
You might have noticed the Dockerfile in the documentation copies requirements.txt first, installs the dependencies, and only then copies the application code. This isn't accidental.
FastAPI in Containers - Docker
The FastAPI documentation also explains a crucial optimization technique related to the Docker cache. Understanding this will help you create much faster builds.
Read the section 'Docker Cache'. It explains why the order of instructions in your Dockerfile is so important for build performance.
In short, Docker builds images in layers and caches each layer. If a line in the Dockerfile and the files it depends on haven't changed, Docker reuses the cached layer from a previous build instead of re-running the command.
Your application code (./app) changes frequently, but your dependencies (requirements.txt) change much less often. By installing dependencies before copying the app code, Docker can reuse the cached layer with all the installed packages every time you just change your Python code. This can reduce build times from minutes to seconds!
4. Practical Exercise: Optimize a Dockerfile
Let's test your understanding of Dockerfile structure and caching. Below are the key instructions needed for a FastAPI application's Dockerfile. Arrange them in the optimal order for efficient builds.
Instructions:
COPY . /app(copies all application code)CMD ["uvicorn", "main:app", "--host", "0.0.0.0"]FROM python:3.10-slimRUN pip install -r requirements.txtWORKDIR /appCOPY requirements.txt .
Click for the optimal order and explanation
Here is the best order for the instructions:
-
FROM python:3.10-slim- Reason: Every Dockerfile must start with a
FROMinstruction to define the base image.
- Reason: Every Dockerfile must start with a
-
WORKDIR /app- Reason: Sets the context for all subsequent commands, so we don't have to type
/app/repeatedly. It's good practice to set this early.
- Reason: Sets the context for all subsequent commands, so we don't have to type
-
COPY requirements.txt .- Reason: Copies only the dependency file. Since this file changes infrequently, this layer will often be cached.
-
RUN pip install -r requirements.txt- Reason: Installs the dependencies. Because the previous
COPYstep is likely cached, this step will also be cached, saving significant time during rebuilds.
- Reason: Installs the dependencies. Because the previous
-
COPY . /app- Reason: Copies the application code. This code changes frequently, so this instruction is placed after the dependency installation. When your code changes, Docker only has to re-run this step and the ones after it, not the slow dependency installation.
-
CMD ["uvicorn", "main:app", "--host", "0.0.0.0"]- Reason: This is the command to run the application, which should be the final instruction as it defines the container's runtime behavior.
Conclusion
Great job! You've taken your first and most important step into the world of containerization. This knowledge is not just applicable to FastAPI but is a cornerstone of modern cloud-native development and MLOps.
Key Takeaways:
- Purpose of Containerization: To solve the "it works on my machine" problem by packaging an application and its entire environment into a portable, isolated unit called a container.
- Core Docker Concepts: A
Dockerfileis the blueprint, aDocker Imageis the static package built from it, and aDocker Containeris a live, running instance of an image. - Key Dockerfile Components: You now know the purpose of
FROM,WORKDIR,COPY,RUN, andCMD. - Build Optimization: The order of instructions in a
Dockerfilematters. You should install less frequently changed dependencies before copying the more frequently changed application code to leverage Docker's build cache effectively.
In our next lesson, we will get hands-on. You will write a multi-stage Dockerfile to create an optimized and secure FastAPI image and then build that image from the file. We'll take the concepts learned today and apply them directly to our project.