Hello! Welcome to the next lesson in our FastAPI course.
In our last session, we focused on defining and validating incoming data using Pydantic models for request bodies. You learned how to create a POST endpoint that accepts a JSON payload, and how FastAPI automatically validates it against a Pydantic schema, which is a crucial skill for building APIs that create or process data.
Today, we'll look at the other side of the transaction: the data your API sends back. This lesson addresses the learning outcome: Create Pydantic models to define the structure of JSON responses using response_model. This is just as important as input validation, as it allows you to guarantee a consistent, secure, and well-documented contract for your API's clients, bringing you another step closer to building production-ready ML services.
1. Why Define a Response Structure?
So far, our endpoints have returned Python dictionaries. While FastAPI can automatically convert these to JSON, this approach has drawbacks:
- Vague Documentation: Without an explicit response model, your API docs can only show a generic "successful response" message, leaving clients to guess the exact structure of the data they will receive.
- Risk of Data Leakage: You might accidentally return internal or sensitive data that your function uses but shouldn't be exposed to the outside world.
- Inconsistent Responses: It's easy to return slightly different structures from the same endpoint under different conditions, which can break client applications.
The response_model parameter in the path operation decorator solves all these problems.
Let's watch a short clip that clearly illustrates the "before and after" of using a response model.
Python FastAPI Tutorial (Part 4): Pydantic Schemas - Request and Response Validation
Corey Schafer's video provides a great visual demonstration of what the API documentation looks like without a defined response model, highlighting the problem we're about to solve.
Watch from 02:28 to 03:20. Notice how the documentation for the GET endpoints simply says 'successful response' with no details about the fields, types, or structure of the post data being returned.
2. Applying response_model to an Endpoint
As you saw, the documentation is not very helpful. Let's fix that. The response_model parameter takes a Pydantic model and tells FastAPI: "The response from this endpoint must conform to this schema."
FastAPI will then:
- Filter the data you return, ensuring only the fields defined in the
response_modelare sent to the client. - Validate the data. If your function returns data that doesn't match the model (e.g., wrong types, missing required fields), it will raise a server error. This helps you catch bugs in your own code.
- Document the schema automatically in the interactive API docs.
Let's see how to implement this.
The official FastAPI documentation explains how to declare the response model. We'll focus on the primary method: using the response_model decorator parameter.
Read the sections 'Response Model - Return Type' and 'response_model Parameter'. Pay attention to the list of things FastAPI does for you and why you'd use the response_model parameter instead of just a return type hint (we'll see a great example of this soon).
Now, let's watch how to apply this in code and see the immediate improvement in the documentation.
Python FastAPI Tutorial (Part 4): Pydantic Schemas - Request and Response Validation
This clip continues from where the last one left off, showing exactly how to add the response_model and the positive result it has on the API docs.
Watch from 10:33 to 12:39 and then from 15:44 to 16:46. Observe how response_model is added to the @app.get decorators and how the API documentation is instantly updated with a detailed response schema, including field types and validation constraints.
3. A Critical Best Practice: Separating Input and Output Models
One of the most powerful use cases for response_model is security. Imagine a user signs up. The client sends a username, email, and password. Your API should never, ever send the password back in the response.
The standard pattern to prevent this is to have two different Pydantic models:
- An input model (e.g.,
UserIn) that includes sensitive fields likepassword. - An output model (e.g.,
UserOut) that omits those sensitive fields.
You then use UserIn as the request body type hint and UserOut as the response_model. FastAPI handles the filtering automatically.
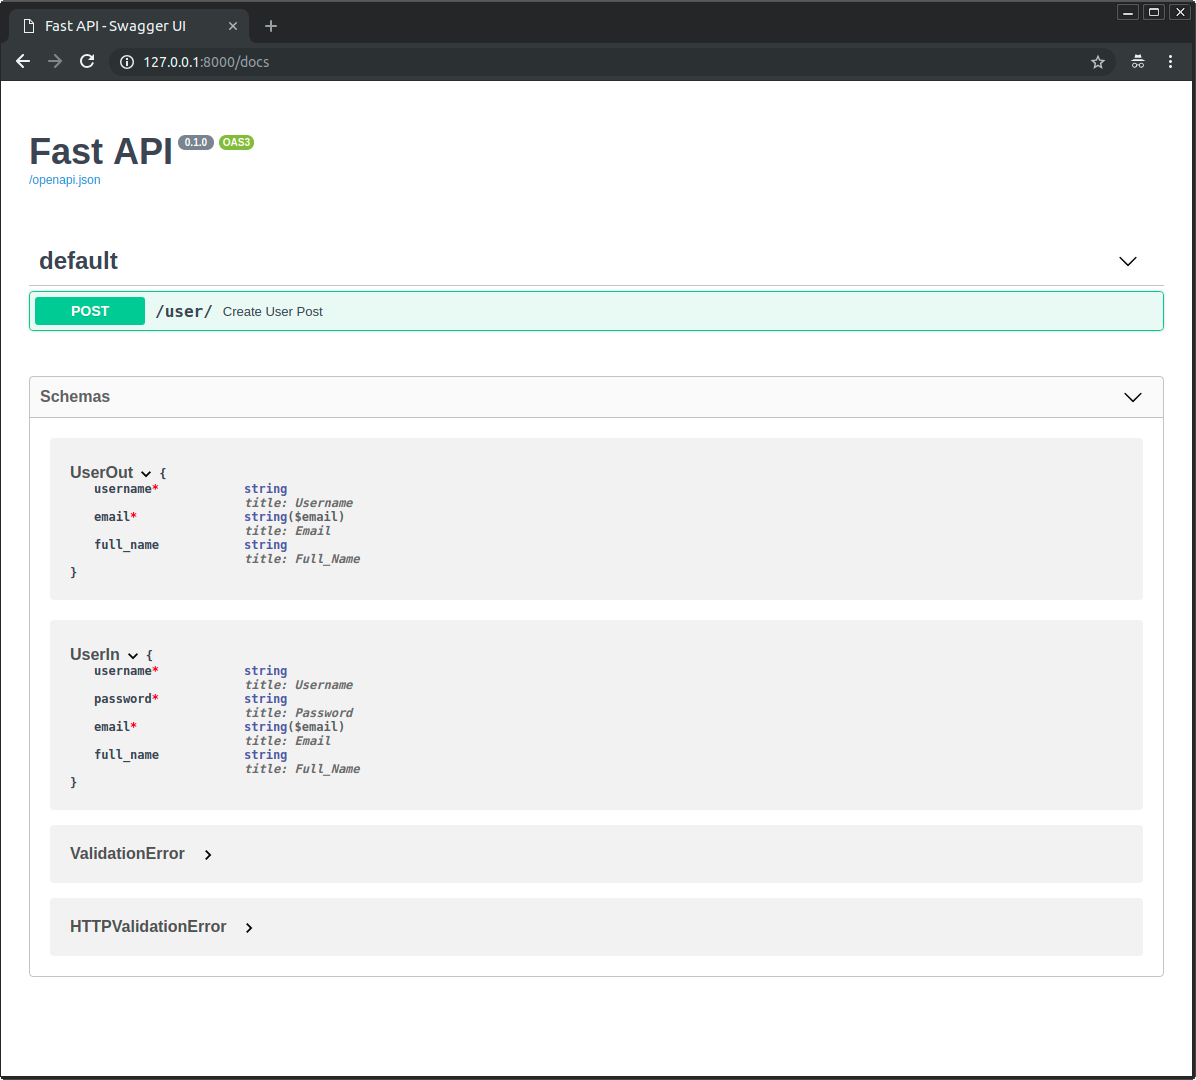
The official documentation has an excellent section on this.
This is a critical security concept. Let's read the official guide on creating separate input and output models to prevent data leakage.
Read the section 'Return a response with a password' and the following section 'Add an output model'. This clearly explains the problem and the solution using UserIn and UserOut models.
This filtering isn't just for security. It's also great for keeping your API contracts clean. Your internal functions might work with objects containing lots of data (debugging info, internal IDs, etc.), but the response_model ensures you only expose what the client needs to know. This is particularly relevant for your goal of serving ML models.
FastAPI Response Model Definition
This article provides a perfect example related to ML model serving, where internal model metadata is automatically filtered out from the final API response.
Read the section 'Defining and Using a Response Model'. Note how the function returns a dictionary with extra fields like internal_model_version, but the client only receives label and confidence as defined in the PredictionResult response model.
4. Keeping Your Code DRY with Model Inheritance
You might have noticed that UserIn and UserOut share many of the same fields. To avoid repeating yourself (following the DRY principle), you can use class inheritance.
- Create a
Basemodel with all the common fields. - Have your
InandOutmodels inherit from thisBasemodel. - Add any unique fields to the child models (like
passwordin theInmodel).
This keeps your code clean and maintainable.
Fast API Tutorial, Part 13: Response Model
This video from JVP Design demonstrates this inheritance pattern very effectively.
Watch from 05:03 to 07:49. The presenter refactors the code to use UserBase, UserIn, and UserOut models. This is the recommended way to structure your schemas.
5. Hands-On Practice: Refining the ML Prediction Endpoint
Let's apply what you've learned to the predict_house_price endpoint from our last lesson. Right now, it takes an input but just returns a dictionary. We're going to make it more robust by defining a clear output model and returning some extra "internal" data that will be automatically filtered out.
Task:
In your main.py file:
- Create a new Pydantic model named
HousePredictionOutput. It should have just one field:predicted_price: float. - Find your
@app.post("/predict/house-price")endpoint. - Add the
response_modelparameter to its decorator, setting it to your newHousePredictionOutputmodel:@app.post(..., response_model=HousePredictionOutput). - Modify the
returnstatement inside the function. Instead of just returning the prediction, return a dictionary that includes both the prediction and some internal data. For example:return { "predicted_price": predicted_price, "model_version": "v1.0.2", "input_data": house_data.model_dump() # Dumps the input data } - Run your app and test the endpoint in the docs. Send a valid request and look at the response you get back. Even though your function returned a dictionary with three keys, you should only see the
predicted_pricein the final JSON response.
Click here for the solution
# In main.py, add the new output model
# You likely already have BaseModel, Field, FastAPI, and HousePredictionInput defined.

class HousePredictionOutput(BaseModel):
  predicted_price: float


# Find your existing endpoint and modify it

@app.post("/predict/house-price", response_model=HousePredictionOutput)
async def predict_house_price(house_data: HousePredictionInput):


  # Dummy prediction logic (same as before)
  predicted_price = 150_000 + (house_data.area_sqft * 150) + (house_data.num_bedrooms * 20_000)
  if house_data.has_garage:
      predicted_price += 25_000


  # Return a dictionary with extra "internal" data
  # FastAPI will filter this down to match HousePredictionOutput
  return {
      "predicted_price": predicted_price,
      "model_version": "v1.0.2",
      "notes": "Prediction based on a simplified linear model."
  }
Conclusion
Great job! You have now mastered the art of controlling both the input and the output of your API using Pydantic models. This is a fundamental pattern for building robust, secure, and self-documenting APIs with FastAPI.
Key Takeaways:
- The
response_modeldecorator parameter defines a strict contract for your API's output. - FastAPI uses the
response_modelto filter, validate, and document the data your function returns. - A critical security and design pattern is to use separate input and output models to prevent leaking sensitive data (like passwords) or internal-only fields.
- Model inheritance is a great way to keep your schema definitions DRY by creating a
Basemodel with shared fields. - This filtering mechanism is perfect for ML endpoints, allowing you to work with rich data objects internally while only exposing the final prediction to the client.
In the last two lessons, you've seen how FastAPI automatically returns a 422 Unprocessable Entity error when validation fails. In our next lesson, we will dive deeper into error handling. You will learn to handle validation errors and interpret FastAPI's automatic error responses, as well as how to raise your own custom HTTP errors for situations beyond data validation.