Hello! Welcome back to our course on FastAPI.
In our last two lessons, we learned how to get data from a client through the URL, using both required path parameters (like /items/{item_id}) and optional query parameters (like /items?limit=10). This is perfect for identifying resources or providing simple filtering options.
However, when a client needs to create or update a resource, the data is often too complex to fit neatly into a URL. For this, we use the request body. Today's lesson is all about handling this, fulfilling the learning outcome: Create Pydantic models to define and validate JSON request bodies. This is a cornerstone of FastAPI and is fundamental for building APIs that create, update, or process complex data—a key step towards your goal of serving ML models.
1. What is a Request Body?
A request body is data sent by the client to your API, typically in JSON format. It's used with HTTP methods like POST (to create a resource), PUT (to replace a resource), or PATCH (to partially update a resource).
To handle this data, FastAPI doesn't just give you a raw dictionary. Instead, it leverages the Pydantic library to define a clear, typed, and validated data structure. This is one of FastAPI's most powerful features.
This diagram gives a great high-level overview of the process: an incoming JSON request is validated against a Pydantic model before it ever reaches your application logic.
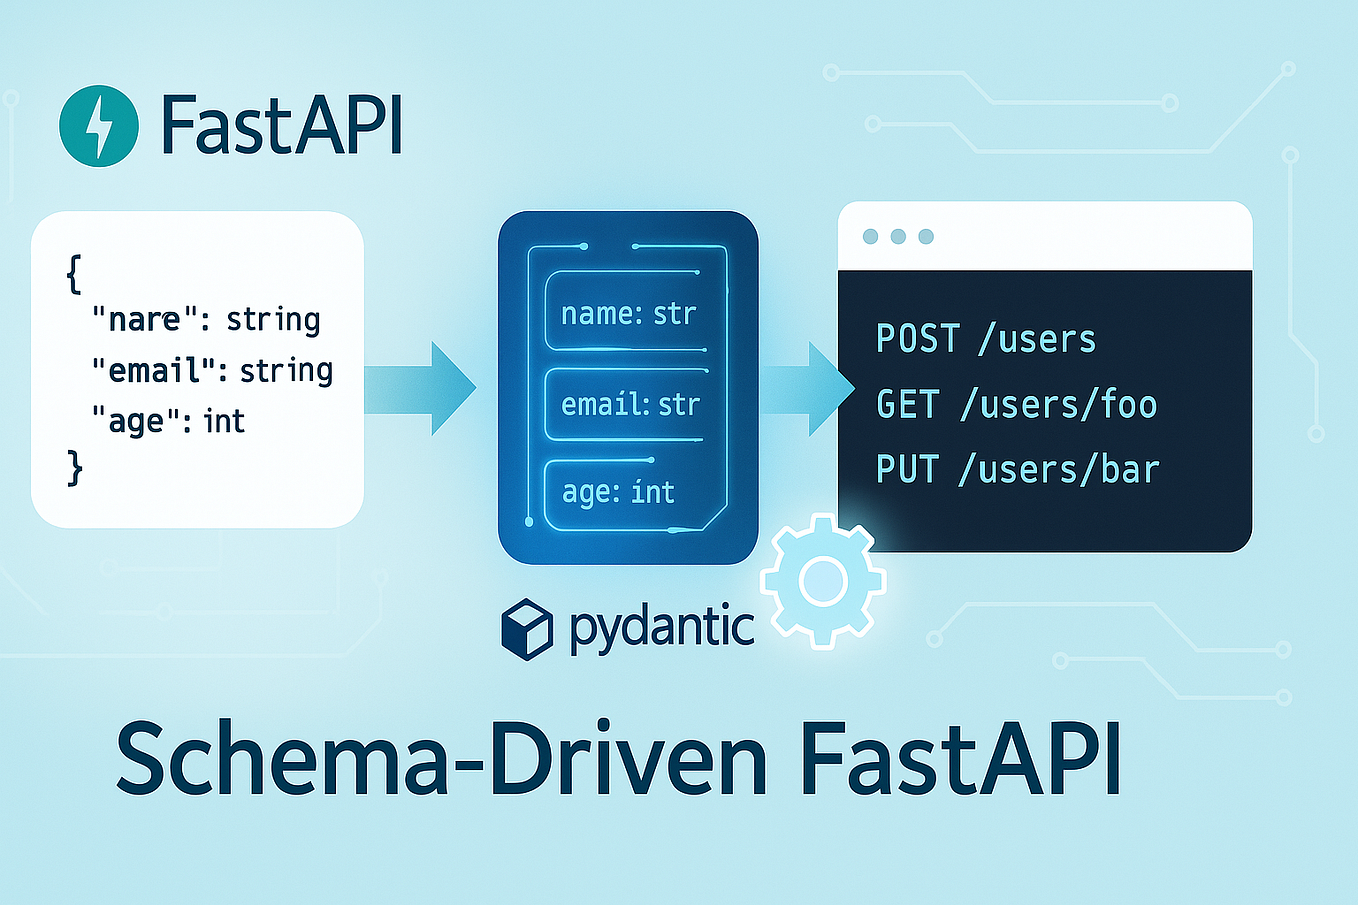
Let's start by reading the official documentation to understand the basics.
The FastAPI documentation provides the most direct explanation for defining a request body model. We'll read the first few sections to get the core idea.
Please read from the beginning of the page down to and including the section 'Create your data model'. Focus on two things: When to use a request body (e.g., with POST requests). How a Pydantic BaseModel class is defined with standard Python type hints.
2. Creating and Using Your First Pydantic Model
As you just read, a Pydantic model is a Python class that inherits from pydantic.BaseModel. You define the fields of your expected JSON object as class attributes with type hints.
Let's apply this. We'll create an endpoint to add a new "item" to our application. An item will have a name, an optional description, and a price.
Step 1: Define the Pydantic Model
In your main.py, add the following code. Make sure to import BaseModel from pydantic.
# In main.py
from fastapi import FastAPI
from pydantic import BaseModel


# ... any other imports you have


# Define your Pydantic model for creating an item
class Item(BaseModel):
    name: str
    price: float
    description: str | None = None # An optional string
    tax: float | None = None       # An optional float

app = FastAPI()


# Your existing path operations (@app.get, etc.) go here
# ...
This Item class serves as your schema. It tells FastAPI that any incoming data for an item must have:
- A
namethat is a string. - A
pricethat is a float. - An optional
descriptionthat is a string. - An optional
taxthat is a float.
Step 2: Use the Model in a POST Endpoint
Now, let's create the POST endpoint that uses this model. The "magic" of FastAPI is that you simply declare your model as a type hint for one of the function's parameters.
Add the following endpoint to your main.py:
# Add this endpoint to main.py
@app.post("/items/")
async def create_item(item: Item):


    # For now, we'll just return the item data back
    # to confirm it was received and validated correctly.
    # The .model_dump() method converts the Pydantic model to a dict.
    return {"status": "success", "item_received": item.model_dump()}
Notice the item: Item parameter. Because Item is a Pydantic model, FastAPI automatically knows to treat it as the request body.
Let's return to the documentation to see exactly what FastAPI does for you when you declare a Pydantic model like this.
Read the sections 'Declare it as a parameter' and 'Results'. Pay close attention to the list of actions FastAPI performs automatically—this is the boilerplate code you don't have to write.
3. Testing Your Request Body Endpoint
With just those few lines of code, you have a fully functional POST endpoint with automatic JSON parsing, type conversion, validation, and documentation. Let's see it in action.
- Make sure your Uvicorn server is running.
- Navigate to your interactive docs at
http://127.0.0.1:8000/docs.
You will see a new POST endpoint for /items/. Expand it and click "Try it out". You'll see an example JSON request body based on your Item model.
The following video clip clearly demonstrates how to test an endpoint like this and, more importantly, what happens when you send invalid data.
Python FastAPI Tutorial (Part 4): Pydantic Schemas - Request and Response Validation
Watching this process is the best way to understand it. This video from Corey Schafer's excellent FastAPI series demonstrates how to test a POST endpoint and how FastAPI handles both valid and invalid data.
Watch from 16:46 to 19:40. Observe how the Pydantic model populates the example in the Swagger UI and how FastAPI automatically returns a detailed 422 Unprocessable Entity error when the input data doesn't match the schema.
As you saw in the video, if you send an invalid payload (e.g., price is a string, or the required name field is missing), FastAPI stops and returns a 422 error. The response body of this error tells the client exactly what went wrong.
This article provides a very clear text-based summary of this request-validation-response cycle, which is excellent for reinforcing what you just watched.
FastAPI Request Body Validation - ApX Machine Learning
This article from ApX Machine Learning provides a concise summary of the validation process with clear examples of valid and invalid JSON payloads.
Read the sections titled 'Validates with Pydantic', 'Example: Valid Request', and 'Example: Invalid Request'. This will solidify your understanding of the automatic validation process and the structure of the 422 Unprocessable Entity error.
4. Adding Advanced Validation with Field
Basic type validation is powerful, but what if you need more specific rules? For example, a price should not be negative, or a name should not be an empty string.
Just as we used Query to add validation to query parameters, we can use Field to add validation to our Pydantic model's attributes.
Let's import Field and enhance our Item model.
# In main.py, update your imports and your Item model

from fastapi import FastAPI, Field
from pydantic import BaseModel

class Item(BaseModel):
    name: str = Field(min_length=1, max_length=100)
    price: float = Field(gt=0, description="The price must be greater than zero.")
    description: str | None = Field(default=None, max_length=300)
    tax: float | None = Field(default=None, gt=0)
Here's what we've added:
name: Must have a length between 1 and 100 characters.price: Must be greater than (gt) 0. We also added a helpful description that will show up in the docs.description: If provided, cannot exceed 300 characters. We explicitly set thedefault=Noneto mark it as optional.tax: If provided, must also be greater than 0.
Restart your server and go back to the /docs. You'll see these new validation rules reflected in the "Schema" section for your Item model. Now, try to create an item with a price of -5 or an empty name "". FastAPI will block it with a 422 error, thanks to Field.
5. Hands-On Practice: An ML Model Input Schema
Your goal is to build APIs for machine learning models. A core part of that is defining the schema for the input features your model expects. Let's create a simple Pydantic model for a hypothetical house price prediction model.
Task:
- Create a new Pydantic model called
HousePredictionInput. - Create a new
POSTendpoint at/predict/house-pricethat accepts this model as its request body. - The function should just return a dummy prediction for now.
Your HousePredictionInput model should have the following fields and validation:
area_sqft: Afloatthat must be greater than 0.num_bedrooms: Anintthat must be greater than or equal to 1.year_built: Anintbetween 1800 and the current year.has_garage: Abool.
Add the model and the new endpoint to your main.py file.
Click here for the solution
# Add this model to your main.py
import datetime # Make sure to import datetime

class HousePredictionInput(BaseModel):
  area_sqft: float = Field(gt=0, description="Living area in square feet")
  num_bedrooms: int = Field(ge=1, description="Number of bedrooms")
  year_built: int = Field(
      gt=1800,
      le=datetime.date.today().year,
      description="Year the house was built"
  )
  has_garage: bool


# Add this endpoint to your main.py
@app.post("/predict/house-price")
async def predict_house_price(house_data: HousePredictionInput):


  # In a real application, you would pass house_data to your ML model here.
  # For now, we'll create a dummy prediction.


  # You can access validated data like object attributes:
  print(f"Received data: area={house_data.area_sqft}, beds={house_data.num_bedrooms}")


  # Dummy prediction logic
  predicted_price = 150_000 + (house_data.area_sqft * 150) + (house_data.num_bedrooms * 20_000)
  if house_data.has_garage:
      predicted_price += 25_000

  return {"predicted_price": predicted_price}
Once you've implemented this, test it thoroughly in the interactive docs. Try valid data and invalid data (e.g., num_bedrooms: 0) to see the validation in action. This pattern is exactly what you'll use when deploying a real ML model.
Conclusion
Excellent work! You've just learned one of the most important and powerful features of FastAPI. By defining the "shape" of your data with Pydantic, you gain immense benefits with very little code.
Key Takeaways:
- Request Bodies are used to send complex data (usually JSON) from a client to an API, typically with
POST,PUT, orPATCHrequests. - You define the structure and data types of a request body by creating a Pydantic model (a class inheriting from
BaseModel). - To use it, you simply add a parameter to your endpoint function with a type hint pointing to your Pydantic model.
- FastAPI automatically parses, validates, and documents the request body. If validation fails, it returns a descriptive
422 Unprocessable Entityerror. - For more specific validation rules (like numeric ranges or string lengths), you can use
Fieldwithin your Pydantic model, much like you usedQueryfor query parameters.
So far, we've focused on validating the data coming into our API. But it's equally important to control the structure of the data we send out.
In the next lesson, we will learn how to create Pydantic models to define the structure of JSON responses using response_model. This will allow you to guarantee that your API's output is always consistent, documented, and free of sensitive or internal data.