Hello! Welcome back to your journey into Backend Engineering.
In our last lesson, you successfully provisioned and secured your first cloud server on AWS EC2. You now have a clean, running virtual machine accessible via SSH, with its firewall configured—a blank canvas waiting for your application.
Today, we will take the code that you've containerized locally and bring it to life on this new server. The learning outcome for this lesson is to deploy the containerized application to the provisioned cloud server. This is a milestone moment, where your application becomes a real, publicly accessible service.
We'll follow a clear, step-by-step process:
- Prepare the EC2 server by installing the necessary software (Docker).
- Transfer your application's code to the server using a professional workflow.
- Configure your application's environment for the cloud.
- Launch the containers and verify the deployment.
Let's begin.
1. Preparing the Server Environment
Your newly provisioned EC2 instance is a bare-bones Ubuntu server. It doesn't know anything about containers yet. Our first task is to install the Docker engine and Docker Compose, which will allow the server to run our containerized application, just like on your local machine.
First, connect to your EC2 instance using the ssh command you learned in the last lesson:
ssh -i /path/to/your-key.pem ubuntu@YOUR_INSTANCE_PUBLIC_IP
Once you're logged in, we'll install Docker and Docker Compose.
Deploying Django to AWS with Docker and Let's Encrypt
The article 'Deploying Django to AWS with Docker and Let's Encrypt' provides a clear, command-by-command guide for installing Docker and Docker Compose on an Ubuntu server. We will follow these steps precisely.
Follow the commands in the section titled 'Install Docker'. Execute these commands one by one in your EC2 terminal. Focus on understanding the purpose of each group of commands: Update and install prerequisites: sudo apt update, sudo apt install apt-transport-https ... Add Docker's official GPG key: curl -fsSL ... | sudo apt-key add - Set up the Docker repository: sudo add-apt-repository ... Install Docker Engine: sudo apt update, sudo apt install docker-ce Allow your user to run Docker commands: sudo usermod -aG docker ${USER} (You will need to log out and log back in for this to take effect!) Install Docker Compose: The two curl and chmod commands will download and install Docker Compose.
After running sudo usermod -aG docker ${USER}, you must log out of the SSH session and then log back in. This re-evaluates your user's group permissions. Once you're back in, you can verify your installation by running docker --version and docker-compose --version. You should see the version numbers for each tool without any "permission denied" errors.
2. Getting Your Code on the Server
With the server's environment ready, we now need to transfer your application code. While you could copy files directly using scp, a far more robust and standard practice is to use a version control system like Git. This workflow treats your Git repository as the single source of truth.
The process is:
- Push your latest project code to a GitHub repository (if you haven't already).
- Install Git on the EC2 instance.
clonethe repository onto the instance.
This video demonstrates this exact workflow.
Deploy Django on EC2 using Docker compose and GIT | Django AWS deployment part 5
The video 'Deploy Django on EC2 using Docker compose and GIT' by Talha Anwar provides a practical walkthrough of the deployment process we are following. The relevant sections show installing Git, cloning the repository, and preparing it for launch.
Watch the segment from 05:50 to 07:15 and then 10:37 to 10:55. You don't need to install Docker again as we've already done that. Focus on these two key actions: Installing Git: Note the command used to install Git on the server. Cloning the repository: Observe how the git clone command is used to pull the project code from GitHub onto the EC2 instance.
Now, perform these steps in your EC2 terminal:
- Install Git:
sudo apt update sudo apt install git - Clone your project: Navigate to your home directory (
cd ~) and clone your application repository from GitHub.git clone https://github.com/your-username/your-repo-name.git - Navigate into your project directory:
cd your-repo-name
Your code is now on the server!
3. Environment Configuration
This is a critically important step. Your docker-compose.yml file is now on the server, but your .env file, which contains your secrets (like SECRET_KEY and database credentials), should not be in your Git repository. You must create this file manually on the server.
This separation is a core security principle: code is the same across all environments, but configuration is specific to each environment.
-
Create the
.envfile:
Use a terminal-based editor likenanoto create and edit the file.nano .env -
Populate the
.envfile:
Copy the contents from your local.envfile into this new file. However, you must make one crucial change. YourALLOWED_HOSTSvariable must be updated.# .env on the EC2 server DEBUG=0 # Always 0 in production! SECRET_KEY=a-different-long-random-string-for-production DJANGO_ALLOWED_HOSTS=<your_ec2_public_ip>,www.<your_ec2_public_ip> # <-- CRITICAL CHANGE # ... your database settings, etc.Replace
<your_ec2_public_ip>with the Public IP (or Elastic IP) of your EC2 instance. This tells Django that it is safe to serve requests for this host. -
Save and exit
nanoby pressingCtrl+X, thenY, thenEnter.
Test your understanding!
A developer pushes their Django project, including the settings.py file, to a public GitHub repository. In settings.py, the SECRET_KEY is hardcoded as 'my-super-secret-key'. Why is this a major security risk, and how does the .env file approach we are using solve this problem?
Show answer
This is a major security risk because the SECRET_KEY is used by Django for cryptographic signing (e.g., session data, password reset tokens). If it's exposed in a public repository, an attacker can use it to forge trusted information and potentially gain control of user accounts or the entire application.
The .env file approach solves this by separating configuration from code. The settings.py file is modified to read the SECRET_KEY from an environment variable. The .env file, which contains the actual secret value, is never committed to the Git repository (it's listed in .gitignore). This way, the code remains public, but the secrets are kept private and are set manually on each deployment server.
4. Build, Launch, and Verify
You now have the Docker runtime, your code, and your environment configuration all in place on the server. It's time to bring your application to life.
- Build the images: From your project directory on the EC2 instance, run the build command. This will take your
Dockerfileand build the container images directly on the server.docker-compose build - Launch the services: Now, start the containers in "detached" mode (
-d), which runs them in the background.docker-compose up -d
Your application should now be running!
- Verify: Open a web browser and navigate to your server's public IP address:
http://<your_ec2_public_ip>. You should see your Django application's homepage.
Troubleshooting: If you get an error or a blank page, the first place to look is the container logs. Run this command from your project directory on the server:
docker-compose logs
This will show you the output from all your containers (Nginx, Gunicorn, Django) and will often contain the exact error message you need to solve the problem. Common issues include:
- Security Group: You forgot to add an inbound rule for HTTP traffic on port 80 in the AWS console.
ALLOWED_HOSTS: The IP address in your.envfile is incorrect.- Database Connection: The database credentials in
.envare wrong, or the database container failed to start.
5. A More Advanced Workflow: The Container Registry
The method we just used—cloning the repo and building on the server—is simple and effective for a first deployment. However, in larger teams and for automated pipelines, a more common approach is to use a Container Registry.
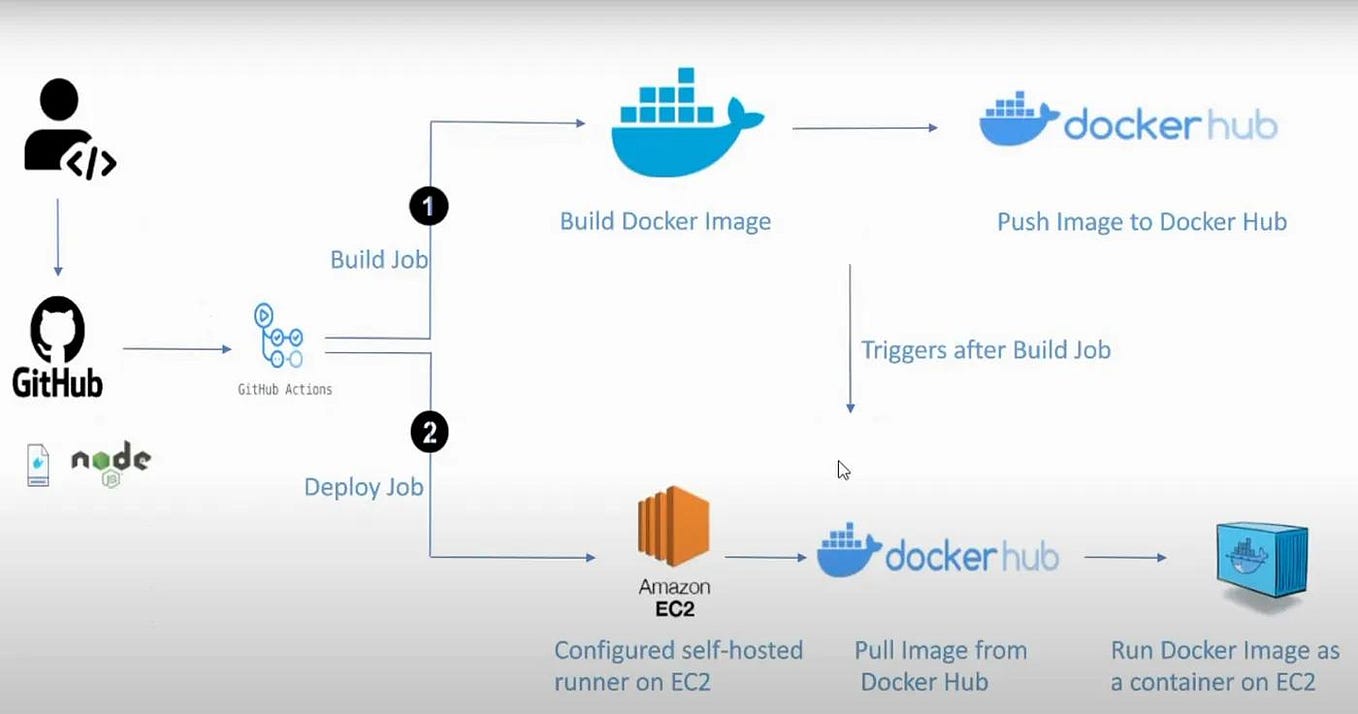
In this workflow:
- You build the Docker image on your local machine or in a CI/CD pipeline.
- You "push" this image to a central storage location called a container registry (e.g., Docker Hub, AWS ECR).
- On the server, you simply "pull" the pre-built image from the registry and run it. You don't need to
git clonethe source code or rundocker-compose buildon the server at all.
This has the advantage of decoupling the build process from the deployment process and ensures that the exact same artifact (the image) is run in every environment. We will explore this powerful technique in the final module on CI/CD.
Conclusion
You have successfully deployed a multi-container Django application to the cloud. This is a huge step and forms the core of modern backend deployment.
Key Takeaways:
- A provisioned cloud server is a blank slate that must be prepared with necessary runtimes like Docker and Docker Compose.
- Using Git to transfer code is a standard, version-controlled approach for deployment.
- Never commit secrets. Configuration containing sensitive data must be managed outside of version control, typically through environment files created on the server.
- The deployment process involves bringing the code and configuration together on the server and using
docker-composeto build and launch the application. docker-compose logsis your best friend for troubleshooting a remote deployment.
Preview of the Next Lesson:
Your application is live, but it's only accessible via a raw IP address. This isn't user-friendly or secure. In our next lesson, we will configure DNS and set up HTTPS for the deployed application using TLS/SSL certificates. You'll learn how to map a custom domain name (like www.yourapp.com) to your server and secure the traffic with a free SSL certificate from Let's Encrypt.