Hello! Welcome back to your course on Backend Engineering.
In our last lesson, we built a production-grade deployment stack for our Django application, combining Nginx as a reverse proxy and Gunicorn as a WSGI server, all orchestrated with Docker Compose. We now have a self-contained, deployable artifact.
Today, we take the crucial next step: preparing the home for our application on the internet. Our learning outcome is to provision a cloud server (e.g., AWS EC2) and configure its basic security (firewall, SSH). We will move from the local environment to the cloud, setting up a virtual server from scratch. This lesson will bridge the gap between your containerized application and its future live deployment.
1. From Localhost to the Cloud: Infrastructure as a Service
So far, "deployment" has meant running containers on your local machine. To make your application accessible to the world, you need a server that's always on and connected to the internet. This is where cloud providers like Amazon Web Services (AWS) come in.
We'll be using a service model called Infrastructure as a Service (IaaS). In IaaS, a cloud provider gives you the fundamental computing resources—virtual servers, storage, and networking—over the internet. You are responsible for managing the operating system and the applications you run on top. This gives you maximum control, which is perfect for our learning goals.
Our tool of choice will be Amazon Elastic Compute Cloud (EC2), which is AWS's service for providing scalable virtual servers.
To start, let's get a high-level overview of what EC2 is and the core concepts you'll be working with.
AWS EC2 Tutorial Beginners to Advance - Full course with Hands On Labs 2023
The video 'AWS EC2 Tutorial Beginners to Advance' by Cloud Champ provides a concise introduction to EC2. This first segment explains its role as an IaaS offering and introduces key components you'll encounter shortly.
Watch the segment from 01:34 to 03:22. Focus on understanding: What EC2 stands for and that it is an IaaS product. The components you can choose: operating system (OS), compute power (CPU/RAM), storage, and firewall rules.
2. Step 1: Provisioning Your First Cloud Server
"Provisioning" is the process of setting up IT infrastructure. In our case, it means launching and configuring a new EC2 instance. This involves making several key decisions that define your server's characteristics and security posture.
Let's walk through the practical process. The following video and text resources provide a step-by-step guide. I recommend having the AWS Console open in another window to follow along.
AWS EC2 Tutorial Beginners to Advance - Full course with Hands On Labs 2023
This segment from the same 'AWS EC2 Tutorial' visually walks you through the process of launching an instance in the AWS console. It's helpful to see the interface in action.
Watch from 04:57 to 08:02. Pay close attention to the choices being made: Selecting the Amazon Machine Image (AMI) - the operating system. Choosing the Instance Type - the hardware specs (we'll use the free-tier t2.micro). Creating a Key Pair - this is critical for secure access.
For a detailed text reference you can follow, the official AWS documentation is excellent.
The 'Get started with Amazon EC2' guide provides the official steps for launching an instance. It's a useful reference to have open as you perform these actions.
Read the 'Overview' to reinforce the key components. Then, follow the steps in 'Step 1: Launch an instance'. Don't worry about understanding every single option; focus on the ones we discuss below.
Here is a breakdown of the essential choices you are making during the launch process:

- Amazon Machine Image (AMI): This is the software template for your server, which includes the operating system. For this course, a popular and robust choice is Ubuntu Server (choose the latest LTS version that is Free Tier eligible).
- Instance Type: This determines the hardware resources (CPU, memory, storage). To stay within the AWS Free Tier, select
t2.micro. It's more than enough for our current needs. - Key Pair: This is your first major security configuration. AWS uses a key pair for authentication instead of a password. It consists of:
- A public key, which AWS places on the EC2 instance.
- A private key (a
.pemfile), which you must download and store securely on your own computer.
You will not be able to download the private key again after you create it. Guard this file carefully; it is the only way to access your server. We will explore exactly how this works in the next section.
- Network Settings (Security Group): This acts as a virtual firewall that controls inbound and outbound traffic to your instance. By default, AWS may create a security group that allows SSH access from anywhere (
0.0.0.0/0). We will refine this shortly.
Once you click "Launch instance," AWS will provision your virtual server. After a minute or two, its status will change to running, and it will be assigned a Public IP address.
3. Step 2: Securing Access with SSH
You've downloaded a .pem file. This is your private key, and it's used with a protocol called Secure Shell (SSH) to log in to your server. Your interest in "under the hood" mechanisms will be well served here, as understanding SSH is fundamental to secure backend management.
How SSH Works
SSH replaces insecure protocols like Telnet by creating an encrypted communication channel between your computer (the client) and the EC2 instance (the server). The key pair you created is used for asymmetric cryptography to verify your identity without ever sending a password over the network.
The following video gives an excellent explanation of the entire process.
How SSH Works | Keys, Encryption & Real-World Examples
The video 'How SSH Works' by ByteMonk explains the cryptographic principles behind SSH and key-based authentication. It's a perfect deep dive into why this method is so secure.
Watch these two key segments: The Cryptography (01:47 - 04:01): This explains the initial handshake using public/private keys to establish a shared secret, and the subsequent use of faster symmetric encryption for the session. Key-Based Authentication (04:01 - 05:37): This shows exactly how your private key and the server's public key are used to authenticate you without a password. It explicitly mentions connecting to an EC2 instance.
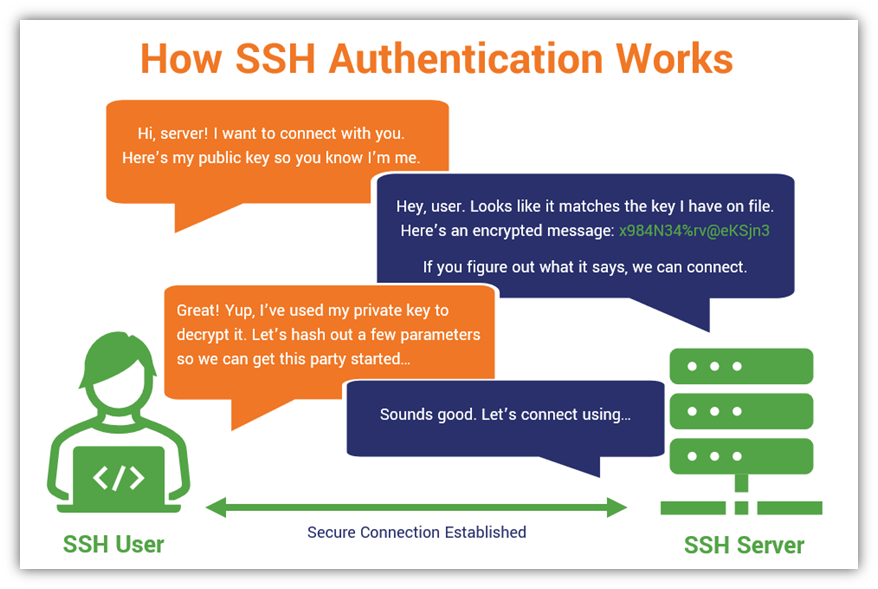
Connecting to Your Instance
Now, let's use your private key to connect.
- Locate your private key file (
.pem) that you downloaded from AWS. - Set the correct permissions. Your private key must be protected from being read by other users on your system. On Linux or macOS, open a terminal and run this command:
chmod 400 /path/to/your-key.pem - Connect using the
sshcommand. The command structure is as follows:ssh -i /path/to/your-key.pem ubuntu@YOUR_INSTANCE_PUBLIC_IP-i: Specifies the identity file (your private key).ubuntu@...: The default username for Ubuntu AMIs isubuntu. For Amazon Linux, it'sec2-user.YOUR_INSTANCE_PUBLIC_IP: Find this in the EC2 console.
You can find the exact command to use by selecting your instance in the EC2 console and clicking the "Connect" button.
The AWS documentation 'Connect to your instance' provides the precise command format and troubleshooting tips for connecting via SSH.
Review 'Step 2: Connect to your instance'. You can copy the example ssh command provided by the AWS console directly.
The first time you connect, you'll see a message about the authenticity of the host. Type yes to proceed. If successful, you'll be greeted with the command prompt of your new cloud server!
4. Step 3: Configuring the Firewall (Security Groups)
A firewall is a non-negotiable security control. In AWS, the Security Group associated with your EC2 instance acts as this firewall. It's a stateful firewall, meaning if you allow an incoming request, the corresponding outgoing response is automatically allowed.
You configure it by defining inbound rules (traffic coming to your server) and outbound rules (traffic going from your server).
For our application, we need to allow two types of inbound traffic:
- SSH (Port 22): This allows you to manage the server. For maximum security, you should restrict the source to your own IP address (
My IPin the AWS console), not the defaultAnywhere(0.0.0.0/0). This prevents anyone else on the internet from even attempting to connect. - HTTP/HTTPS (Ports 80/443): This will allow users to access your web application. For a public website, the source must be
Anywhere(0.0.0.0/0for IPv4 and::/0for IPv6).
Go to the EC2 console, find "Security Groups" in the left navigation pane, select the group attached to your instance, and edit the inbound rules to reflect the above.
Test your understanding!
You've launched an EC2 instance for your web application. You can successfully connect to it via SSH, but when you type the server's public IP into a browser, the connection times out. You have confirmed that your Nginx server is running correctly on port 80 inside the instance.
What is the most likely cause of this issue, and how would you fix it?
Show answer
The most likely cause is that the Security Group for the instance does not have an inbound rule to allow traffic on port 80 (HTTP). SSH works because a rule for port 22 exists, but without a rule for port 80, the firewall is blocking all incoming web traffic.
To fix it, you would edit the security group's inbound rules and add a new rule:
- Type:
HTTP - Protocol:
TCP - Port Range:
80 - Source:
Anywhere (0.0.0.0/0)
5. Essential Concepts for a Stable Deployment
To build a truly robust backend, there are two more concepts you should be aware of.
Elastic IP Address: A Static IP
By default, the public IP address of your EC2 instance will change if you stop and start it. This is a major problem for a live server, as any DNS records pointing to it would break. The solution is an Elastic IP address—a static public IP that you can allocate to your account and attach to your instance. It will remain associated with your instance until you explicitly release it.
This video demonstrates the problem and the solution perfectly.
AWS EC2 Tutorial Beginners to Advance - Full course with Hands On Labs 2023
This final segment from the 'AWS EC2 Tutorial' clearly illustrates why a dynamic IP is problematic and how to allocate and associate an Elastic IP to get a permanent address for your server.
Watch the segment from 14:01 to 19:01. Understanding this is critical for any real-world deployment.
IAM Roles: Securely Granting Permissions
In the future, your application might need to interact with other AWS services (like S3 for file storage). The most secure way to grant these permissions is not by storing secret keys on your server, but by attaching an IAM Role to your EC2 instance. The role grants the instance temporary, secure credentials to access specific services. We won't need this for our immediate next step, but it's a core security best practice you should know about.
Conclusion
Congratulations! You have successfully stepped into the world of cloud infrastructure. You've gone from a theoretical concept to provisioning and securing your own virtual server on the internet.
Key Takeaways:
- Provisioning a server in the cloud involves launching a virtual machine like an AWS EC2 instance, choosing its OS (AMI) and hardware (Instance Type).
- SSH with key pairs is the secure standard for remote server administration. Your private key is your password—protect it.
- Security Groups are your server's virtual firewall, controlling all inbound and outbound traffic based on port and source IP. Restricting access is a critical security measure.
- For a stable production server, you need a static IP address, which you can get by using an Elastic IP.
Preview of the Next Lesson:
We now have a clean, secure, and accessible cloud server waiting for our application. In the next lesson, we will deploy the containerized application to the provisioned cloud server. This will involve installing Docker on our new EC2 instance, transferring our project files, and finally running our Nginx-Gunicorn-Django stack in the cloud.