Hello! Welcome to the final lesson in our deployment module.
In our last session, you successfully deployed your containerized Django application to an AWS EC2 instance. Your app is now live on the internet, accessible via its public IP address. This is a fantastic achievement. However, for a real-world application, we need two more things: a professional domain name and security.
Today, we will address both. The learning outcome for this lesson is to configure DNS and set up HTTPS for the deployed application using TLS/SSL certificates. We will replace the raw IP address with a custom domain name (e.g., yourapp.com) and secure the communication between your users and your server with an SSL/TLS certificate, turning http:// into https://.
We'll cover:
- The fundamental concepts behind HTTPS and the TLS/SSL handshake.
- How the Domain Name System (DNS) works to map your domain to your server.
- A complete, step-by-step implementation of HTTPS using Nginx, Let's Encrypt, and Certbot, all integrated within your Docker environment.
- How to automate the certificate renewal process.
Let's get started.
1. The "Why": Understanding TLS/SSL and HTTPS
Before we implement anything, it's crucial to understand what problem we're solving. As we discussed, HTTP sends data in plain text. HTTPS (HTTP Secure) is an extension of HTTP that uses an encryption protocol, either TLS (Transport Layer Security) or its predecessor, SSL (Secure Sockets Layer), to secure the communication.
This security is built on two types of encryption:
- Asymmetric Encryption (Public/Private Key): Used during an initial "handshake" to securely exchange a secret key. Data encrypted with a public key can only be decrypted by its corresponding private key.
- Symmetric Encryption (Shared/Session Key): Used after the handshake for the actual data transfer. Both client and server use the same shared secret key to encrypt and decrypt data, which is much faster than asymmetric encryption.
To understand how these concepts come together in the TLS handshake, please watch the following video.
The video 'SSL, TLS, HTTPS Explained' from ByteByteGo provides an excellent high-level overview of how the TLS handshake establishes a secure connection. It directly addresses the kind of 'under the hood' details you're interested in.
Watch the video from the beginning until 04:10. Focus on how the client and server use a combination of asymmetric and symmetric encryption to establish a secure channel for communication.
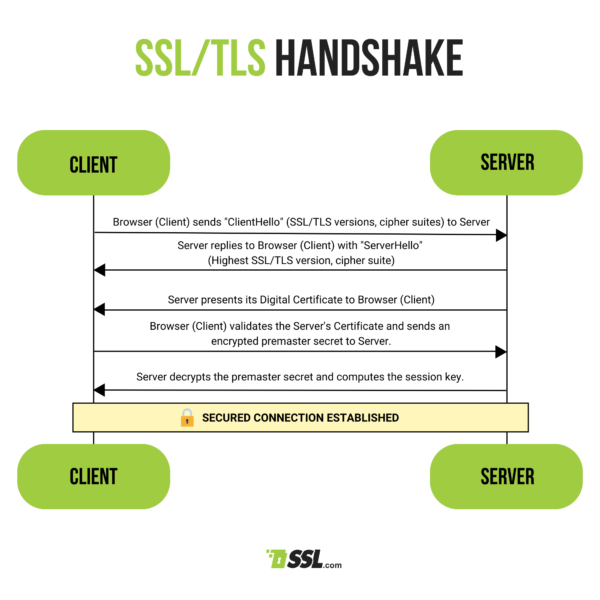
The process you just watched is visualized in the diagram below. The server presents its SSL certificate, which is issued by a trusted Certificate Authority (CA). This certificate proves the server's identity and contains its public key. Let's Encrypt is a free and widely used CA, and we will use a tool called Certbot to automatically request and manage certificates from it.
2. The "What": Configuring the Domain Name System (DNS)
To get a certificate, you must prove you own a domain name. DNS is the internet's phonebook; it translates human-friendly domain names (like google.com) into machine-readable IP addresses (like 172.217.169.14).
You need to create a DNS record that points your domain to your EC2 server. The two most common types of records for this are:
- A Record: Maps a domain name directly to an IPv4 address. You should use this if you have a static IP address for your server (like an AWS Elastic IP).
- CNAME (Canonical Name) Record: Maps a domain name to another domain name. You can use this to point your domain to the public DNS name provided by AWS for your EC2 instance (e.g.,
ec2-xx-xx-xx-xx.compute-1.amazonaws.com).

To set this up, you'll log into your domain registrar (the service where you bought your domain, like GoDaddy, Namecheap, AWS Route 53, etc.) and add a new A or CNAME record pointing to your EC2 instance.
The following video segment demonstrates this process using AWS Route 53, but the principles are identical for any DNS provider.
Django Docker Deployment with HTTPS using Letsencrypt
In the video 'Django Docker Deployment with HTTPS using Letsencrypt', the author walks through setting up a domain in AWS Route 53. This practical demonstration will show you what the DNS configuration process looks like.
Watch the portion from 01:17:34 to 01:21:32. The key action is creating a record (in this case, a CNAME record) that points a subdomain to the Public IPv4 DNS of the EC2 instance. You will perform a similar action in your own domain registrar's control panel.
After configuring your DNS, it may take anywhere from a few minutes to a few hours for the changes to propagate across the internet. You can use a tool like nslookup yourdomain.com in your terminal to check if it has resolved to your server's IP.
3. The "How": Implementing HTTPS with Certbot and Nginx
Now for the main implementation. We will modify our Docker setup to include Certbot for certificate management and reconfigure Nginx to handle HTTPS traffic. This approach keeps all parts of our deployment neatly containerized.
3.1. Architectural Overview
We will evolve our docker-compose.yml to orchestrate three main services: app (your Django application), proxy (Nginx), and certbot. They will communicate and share data using Docker volumes.
This short video segment explains the architecture we're about to build.
Django Docker Deployment with HTTPS using Letsencrypt
Understanding the interaction between Nginx and Certbot is key. This clip explains how they use shared volumes to perform the 'HTTP-01 challenge' required by Let's Encrypt to verify domain ownership.
Watch from 00:02:09 to 00:05:17. Pay close attention to the roles of the three volumes: certbot-web (for the challenge), certbot-certs (for storing certificates), and proxy-dhparams (for strengthening encryption).
3.2. Configuration Files
We will now create the necessary configuration files for Nginx and Certbot. Instead of typing everything from the video, which is prone to error, we'll use the official companion blog post as a reference for the code.
Django Docker Deployment with HTTPS using Letsencrypt
This blog post, 'Django Docker Deployment with HTTPS using Letsencrypt', contains all the code snippets we need. We'll use it to create our Nginx and Certbot configurations.
SSH into your EC2 instance and navigate to your project directory. We will now add all the necessary files. For each step below, create the specified file and copy its contents directly from the blog post. Nginx Config: In the section 'Add NGINX Docker Image', create the following files with their content: docker/proxy/nginx/default.conf.tpl docker/proxy/nginx/default-ssl.conf.tpl docker/proxy/nginx/options-ssl-nginx.conf docker/proxy/nginx/uwsgi_params docker/proxy/run.sh (make sure to chmod +x this file) docker/proxy/Dockerfile Certbot Config: In the section 'Add certbot Docker Image', create these files: docker/certbot/certify-init.sh (make sure to chmod +x this file) docker/certbot/Dockerfile Docker Compose: In the section 'Add deployment Docker Compose', create the deployment-specific compose file: docker-compose.deploy.yml Your project structure should now include these new docker subdirectories.
Test your understanding!
In the Nginx run.sh script, there is logic that checks if [ ! -f "/etc/letsencrypt/live/${DOMAIN}/fullchain.pem" ]. What is the purpose of this check, and why are two different Nginx template files (default.conf.tpl and default-ssl.conf.tpl) needed?
Show answer
The purpose of this check is to determine if an SSL certificate already exists.
- If the certificate does NOT exist (on the first run), the script uses
default.conf.tpl. This template only configures Nginx to listen on port 80 (HTTP). This is essential because Certbot needs to communicate over HTTP to prove domain ownership via the ACME challenge. - If the certificate DOES exist, the script uses
default-ssl.conf.tpl. This template configures Nginx to listen on both port 80 (to redirect to HTTPS) and port 443 (HTTPS), using the SSL certificate paths.
If we tried to use the SSL configuration before the certificates were created, Nginx would fail to start because it wouldn't be able to find the specified certificate files. This two-stage approach solves that problem.
3.3. Environment and Django Settings
Our new docker-compose.deploy.yml file uses environment variables like DOMAIN. We must provide these.
-
Update
.envfile: On your EC2 server, open your.envfile (nano .env). You need to add variables for your domain and a contact email for Let's Encrypt.# .env DEBUG=0 SECRET_KEY=your-production-secret-key # Update this line DJANGO_ALLOWED_HOSTS=yourdomain.com,www.yourdomain.com # Add these new lines DOMAIN=yourdomain.com ACME_DEFAULT_EMAIL=your-email@example.com # ... your other variablesMake sure to replace
yourdomain.comand your email address. TheDJANGO_ALLOWED_HOSTSmust match the domains you are serving. -
Django
settings.py: Because Nginx is now handling the SSL termination (it decrypts the HTTPS traffic), the request that reaches your Django application is plain HTTP. Django needs to know it's running behind a secure proxy.
{
"type": "reading",
"title": "The Complete Guide to Deploying Django with SSL, Nginx, ...",
"id": "LINK",
"url": "https://dev.to/ajitkumar/from-ip-to-identity-the-complete-guide-to-deploying-django-with-ssl-nginx-and-docker-a90",
"relevant_section_indices": [
4
],
"par_intro": "The article 'The Complete Guide to Deploying Django...' clearly explains the Django settings required when behind an SSL-terminating proxy.",
"par_directions": "Read section '5. Django Security Settings'. You don't need to change your handling of ALLOWED_HOSTS as it's already set up. The key is to add the SECURE_PROXY_SSL_HEADER setting to your settings.py file. This tells Django to trust the X-Forwarded-Proto header that Nginx will send, confirming the original request was HTTPS.",
"estimated_time": "5 minutes"
}
    Add this line to your `settings.py`:
    ```python
    # settings.py

    # ...
    SECURE_PROXY_SSL_HEADER = ('HTTP_X_FORWARDED_PROTO', 'https)
    CSRF_TRUSTED_ORIGINS = [f"https://{host}" for host in os.getenv("DJANGO_ALLOWED_HOSTS", "").split(",") if host]
    # ...
    ```
    The `CSRF_TRUSTED_ORIGINS` setting is also important for security, ensuring that POST requests can only originate from your secure domain.

### 4. Execution: Bringing It All Live

With all the configuration in place, it's time to execute the plan. This involves a three-step command sequence.

```grasp
{
  "type": "video",
  "title": "Django Docker Deployment with HTTPS using Letsencrypt",
  "id": "[LINK](https://www.youtube.com/watch?v=3_ZJWlf25bY)",
  "video_id": "3_ZJWlf25bY",
  "relevant_section_indices": [
    6
  ],
  "par_intro": "This final practical segment shows the exact commands to run to generate the certificate for the first time and then relaunch the services with HTTPS enabled.",
  "par_directions": "Watch from **01:23:12 to 01:28:00**. You'll see the three crucial commands being run in sequence. Follow along in your own terminal."
}
Here are the commands to run from your project directory on the EC2 instance:
-
Generate the Initial Certificate:
This command runs thecertbotservice using ourcertify-init.shscript. It will build the new images, start the proxy on port 80, wait for it, and then request the certificate.docker-compose -f docker-compose.deploy.yml run --rm certbot /opt/certify-init.shThis may take a few minutes as Nginx generates its
dhparamsfile. If successful, you will see a "Successfully retrieved certificate" message. -
Stop the HTTP-only Server:
Now that we have the certificate, we need to stop the temporary services.docker-compose -f docker-compose.deploy.yml down -
Launch with HTTPS:
This is the final launch. Therun.shscript in the proxy container will now detect the certificate and use the SSL configuration. We use the-dflag to run it in the background.docker-compose -f docker-compose.deploy.yml up -d
Navigate to https://yourdomain.com. You should see your application, and your browser should show a lock icon, indicating a secure connection!
5. Automation: Certificate Renewal
Let's Encrypt certificates are only valid for 90 days. Manually renewing them is not a reliable strategy. We must automate it. We can do this using cron, a standard time-based job scheduler on Linux.
Django Docker Deployment with HTTPS using Letsencrypt
To make your deployment truly production-ready, you must automate certificate renewal. This final clip shows how to set up a simple cron job to handle this task.
Watch from 01:29:41 to 01:34:08. The process involves creating a small shell script to run the renewal command and then adding that script to the user's crontab to run weekly.
Follow the steps from the video to create a renew.sh script and add it to your crontab -e to run weekly. This ensures your site will remain secure without manual intervention.
Conclusion
Congratulations! You have taken your deployed application to a fully professional and production-ready state. This is the culmination of everything we've learned about containerization and deployment.
Key Takeaways:
- HTTPS uses a combination of asymmetric and symmetric encryption to secure web traffic, initiated by a TLS handshake.
- DNS maps human-readable domain names to server IP addresses using records like
AandCNAME. - You can integrate Certbot and Nginx into a Docker Compose setup to fully automate SSL certificate acquisition and management.
- The
HTTP-01challenge is how Let's Encrypt verifies you own a domain, requiring your server to be temporarily available over HTTP. - When using a reverse proxy for SSL termination, Django needs to be configured with
SECURE_PROXY_SSL_HEADERto understand that the original connection was secure. - Automating certificate renewal with
cronis a critical final step for any production deployment.
Preview of the Next Lesson:
You have now completed a full, manual deployment. You've provisioned a server, configured it, pushed your code, and secured it. While effective, this process is manual and time-consuming. What if we could automate it? In our next module, we'll dive into Continuous Integration (CI) and Continuous Deployment (CD). You will learn how to set up a pipeline that automatically tests, builds, and deploys your application every time you push a change to your Git repository.