Hello! Let's get started with today's lesson.
In our last session, we significantly enhanced our API by adding powerful filtering, searching, and ordering capabilities. So far, you've been interacting with your API primarily through the browsable API that Django REST Framework provides. While convenient for quick checks, it's not how client applications (like a web frontend or mobile app) consume your backend.
Today, we'll bridge that gap. This lesson is dedicated to the learning outcome: Test API endpoints using an API client like Postman or Insomnia. You will learn how to use a professional tool to simulate client requests, giving you a much deeper understanding of how your API behaves and a robust way to verify its functionality. This is a fundamental, everyday skill for a backend engineer.
1. Why Use a Dedicated API Client?
When you build a backend, you're creating a service that other applications will communicate with over the network. These communications follow specific protocols, primarily HTTP. An API client is a tool designed specifically for crafting and sending these HTTP requests and analyzing the responses in detail.
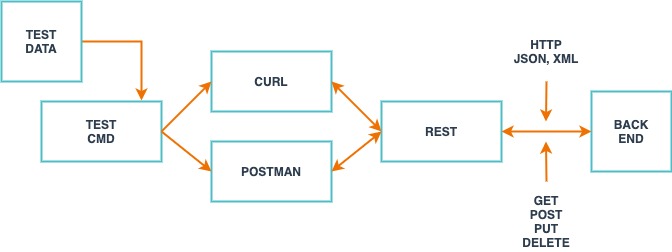
While there are many tools available, Postman and Insomnia are two of the most popular in the industry for their user-friendly interfaces and powerful features. For this course, we will focus on Postman, but the concepts are directly transferable to Insomnia or any other API client.
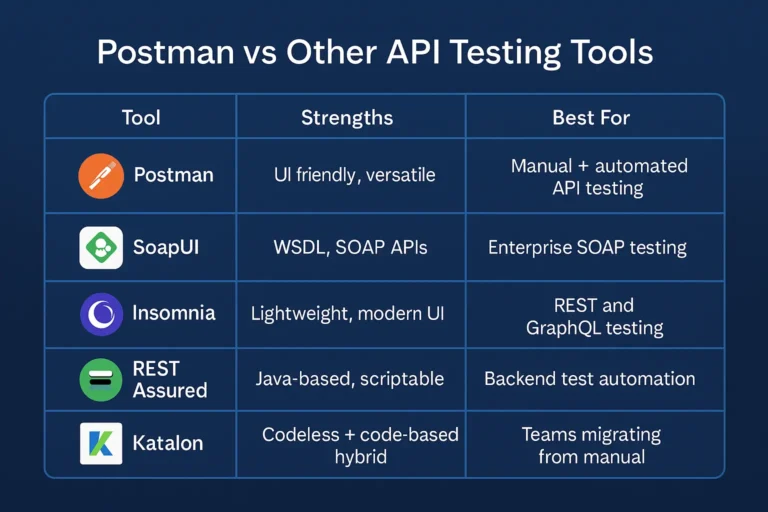
Our goal is to use Postman to systematically test every endpoint and method available in our Task API.
2. Getting Started with Postman
Postman provides a graphical interface for all the things we've discussed conceptually: setting HTTP methods, URLs, headers, and request bodies.
First, you'll need to download and install the Postman desktop application from their official website: www.postman.com/downloads/.
Once installed, the interface can seem a bit overwhelming. Let's get a guided tour.
Learn Postman for API Testing (Step-by-Step Tutorial)
The video 'Learn Postman for API Testing' from the Automation Step by Step channel provides a fantastic introduction. This first segment will walk you through the user interface.
Please watch from 03:32 to 08:35. This section covers: Creating an account (optional but recommended for syncing). An overview of the main UI components: the Header, Sidebar, Builder Area, and Status Bar. Don't worry about memorizing everything; just get a feel for where the main components are located.
3. Testing Read Operations (GET)
Let's start by testing the endpoints that retrieve data. Make sure your Django development server is running (python manage.py runserver).
3.1. Listing All Tasks
Your first request will be to fetch the list of all tasks.
Learn Postman for API Testing (Step-by-Step Tutorial)
This next segment from the same video demonstrates how to create your very first GET request. We will apply this process to our own API.
Watch from 17:08 to 22:04. Pay close attention to these steps: Creating a new request using the '+' tab. Selecting the GET method. Entering the request URL. Sending the request and inspecting the response (status code, body).
Now, apply what you just saw to our Task API:
- Open a new tab in Postman.
- The method should default to GET.
- In the URL field, enter:
http://127.0.0.1:8000/api/tasks/ - Click the Send button.
You should see the response section at the bottom populate. Notice a few key things:
- Status:
200 OK. This confirms a successful request. - Body: You'll see the JSON response, which should be a paginated list of your tasks, identical to what the browsable API showed.
- Headers: You can inspect the response headers, such as
Content-Type: application/json.
Test your understanding!
Using Postman, how would you test the filtering, searching, and ordering features you built in the last lesson? Try to retrieve a list of all incomplete tasks with a high priority, sorted by their due date (oldest first).
Show answer
You would add query parameters to the URL. The final URL in Postman would be:http://127.0.0.1:8000/api/tasks/?is_complete=false&priority=H&ordering=due_date
This directly tests the filterset_class and ordering_fields you configured in your TaskViewSet.
3.2. Retrieving a Single Task
Now let's fetch a specific task by its ID.
- Create another GET request.
- Use the URL for a detail view, e.g.,
http://127.0.0.1:8000/api/tasks/1/(replace1with an actual ID from your database). - Click Send.
You should receive a 200 OK status and the JSON object for that single task. Try requesting an ID that doesn't exist; you should get a 404 Not Found status, correctly handled by your ViewSet.
4. Testing Write Operations (POST, PUT, DELETE)
This is where API clients become essential, as browsers cannot easily send POST, PUT, or DELETE requests with JSON bodies.
4.1. Creating a Task (POST)
Let's add a new task to the database.
Django REST Framework - Build an API from Scratch
The video 'Django REST Framework - Build an API from Scratch' by Caleb Curry shows exactly how to send a POST request from Postman to a DRF API. This will be our guide.
Watch from 25:13 to 26:57. The key steps to observe are: Changing the HTTP method to POST. Navigating to the Body tab. Selecting the raw and JSON format options. Pasting the JSON data for the new object.
Now, let's do it for our Task model.
-
Create a new request in Postman.
-
Change the method to POST.
-
Set the URL to
http://127.0.0.1:8000/api/tasks/. -
Go to the Body tab below the URL bar.
-
Select raw and from the dropdown on the right, choose JSON.
-
In the text area, enter the JSON for a new task. The keys must match the fields in your
TaskSerializer.id,created_at, andupdated_atare read-only, so you don't need to provide them.{ "title": "Test API with Postman", "description": "Learn to send POST requests.", "due_date": "2024-12-31T12:00:00Z", "is_complete": false, "priority": "M" } -
Click Send.
The response should be a 201 Created status, and the body will contain the full JSON of the task you just created, now including its new id. You can verify this by running your GET request for all tasks again.
4.2. Updating a Task (PUT)
To update a task, you send a PUT request to its specific URL.
-
Create a new request and set the method to PUT.
-
Set the URL to a specific task, e.g.,
http://127.0.0.1:8000/api/tasks/1/. -
Go to the Body tab and again select raw and JSON.
-
Enter the complete JSON object for the task with your desired changes. A
PUTrequest expects the full resource representation.{ "title": "UPDATED: Test API with Postman", "description": "Learn to send PUT requests to update a resource.", "due_date": "2024-12-31T18:00:00Z", "is_complete": true, "priority": "H" } -
Click Send.
You should get a 200 OK status and a response body containing the updated task data.
4.3. Deleting a Task (DELETE)
Finally, let's remove a task.
- Create a new request and set the method to DELETE.
- Set the URL to a specific task, e.g.,
http://127.0.0.1:8000/api/tasks/3/. - No request body is needed for a
DELETEoperation. - Click Send.
The expected response is a 204 No Content status. This indicates success, and as the name implies, there will be no response body. If you try to GET that same task ID again, you will now receive a 404 Not Found.
5. A Better Workflow: Collections and Variables
You've probably noticed that re-typing URLs and request bodies is tedious. Postman provides features to make this workflow much more efficient.
How to do API Testing with Postman
The article 'How to do API Testing with Postman' explains two fundamental concepts for organizing your work: Collections and Variables.
Please read the subsections titled 'Postman Collections and Variables' and 'Working with Request Parameters'. Focus on understanding: What a Collection is and why it's used to group related API requests. What a Variable is (specifically a collection variable). How to create a baseURL variable to avoid hardcoding the server address in every request.
Let's apply this to our project:
- Create a Collection: On the left sidebar, click the '+' button or 'Create Collection'. Name it "Task Manager API".
- Save Your Requests: For each of the tabs you have open, click the "Save" button (or
Ctrl/Cmd + S). Give each request a descriptive name (e.g., "Get All Tasks", "Create New Task") and save it into your "Task Manager API" collection. You will see them appear in the sidebar. - Create a
baseURLVariable:- Click on your "Task Manager API" collection in the sidebar.
- Go to the Variables tab.
- Add a new variable. Name it
baseURL. - In the "INITIAL VALUE" column, enter
http://127.0.0.1:8000. Postman will automatically copy this to "CURRENT VALUE". - Click "Save" (the floppy disk icon).
- Use the Variable: Go back to one of your saved requests (e.g., "Get All Tasks"). Change the URL from
http://127.0.0.1:8000/api/tasks/to{{baseURL}}/api/tasks/. The{{...}}syntax tells Postman to substitute the variable. When you hover over{{baseURL}}, it should show you its value.
Now if your server address changes, you only have to update it in one place!
Conclusion
Excellent work! You have now mastered the fundamental skill of testing a REST API from an external client's perspective. This is a crucial step away from relying on framework-specific tools and towards understanding how your backend will be used in the real world.
Key Takeaways:
- API Clients like Postman are essential for thoroughly testing backend services by allowing you to craft any HTTP request.
- You can test all CRUD operations by selecting the appropriate HTTP method:
- GET: To retrieve data (list or detail).
- POST: To create new data (requires a JSON body).
- PUT: To update existing data (requires a full JSON body).
- DELETE: To remove data (no body needed).
- Always inspect the status code (
200,201,204,404, etc.) and the response body to verify the outcome of a request. - Using Collections to group requests and Variables (like
{{baseURL}}) to avoid repetition are professional best practices that streamline your testing workflow.
Preview of the Next Lesson:
Our API is fully functional but completely public. Anyone can create, view, update, and delete tasks. In our next module, we will dive into API Authentication. You will learn the difference between authentication and authorization, implement user registration and login endpoints, and discover how to secure your API. We will then revisit Postman to see how to add authentication tokens to our requests to access these newly protected endpoints.