Hello! Welcome back to our module on API Security and Best Practices.
In our last lesson, we explored vulnerabilities that often occur within a single application's context, such as SQL Injection, Cross-Site Scripting (XSS), and Cross-Site Request Forgery (CSRF). We saw how Django provides powerful, built-in defenses against these threats.
Today, we'll shift our focus from security within an application to security between applications. This is especially relevant for modern web development, where it's common to have a frontend application (e.g., built with React or Vue.js) running on one domain, communicating with a backend API (our Django app) on a completely different domain.
This lesson directly addresses the learning outcome: Implement Cross-Origin Resource Sharing (CORS) policies to control browser access to the API. We'll uncover why browsers restrict these cross-domain requests by default and how we, as backend developers, can explicitly and securely grant access to trusted clients.
1. The Core Problem: The Same-Origin Policy
Before we can understand CORS, we must first understand the security rule it's designed to relax: the Same-Origin Policy (SOP). The SOP is a critical security mechanism built into every modern web browser. It dictates that a script running on a web page can only make requests to a server from the same origin.
An origin is defined by the combination of three things:
- Protocol (e.g.,
http,httpss) - Domain (e.g.,
api.myapp.com) - Port (e.g.,
:8000,:443)
If any of these three parts differ between the client page and the server it's trying to contact, the request is considered cross-origin.
| Origin A | Origin B | Same Origin? | Reason |
|---|---|---|---|
http://myapp.com |
http://myapp.com/api |
Yes | Same protocol, domain, port (default :80) |
http://myapp.com |
https://myapp.com |
No | Different protocol |
http://myapp.com |
http://api.myapp.com |
No | Different domain (subdomain) |
http://localhost:3000 |
http://localhost:8000 |
No | Different port |
To understand why this restriction is so vital for web security, let's watch the beginning of the following video.
🔓 Mastering CORS: How to Securely Enable Cross-Origin Requests
The video 'Mastering CORS' from ByteMonk starts by clearly explaining the security motivation behind the Same-Origin Policy and why browsers need to block requests between different origins by default.
Please watch from the beginning until 01:36. Focus on the example of the banking website and the malicious hacker site to grasp the type of threat the SOP is designed to prevent.
As the video explains, without the SOP, a malicious website open in one browser tab could use your browser's credentials (like session cookies) to silently make requests to your bank, social media, or email in another tab, potentially stealing data or performing actions on your behalf.
But what about our legitimate use case, where a frontend at http://localhost:3000 needs to fetch data from our Django API at http://localhost:8000? This is where Cross-Origin Resource Sharing (CORS) comes in.
2. The Solution: How CORS Works
CORS is not a Django-specific feature; it's a standard mechanism built on HTTP headers that allows a server to tell a browser which origins are permitted to access its resources. The browser initiates the cross-origin request, and the server responds with specific CORS headers to indicate whether the request should be allowed.
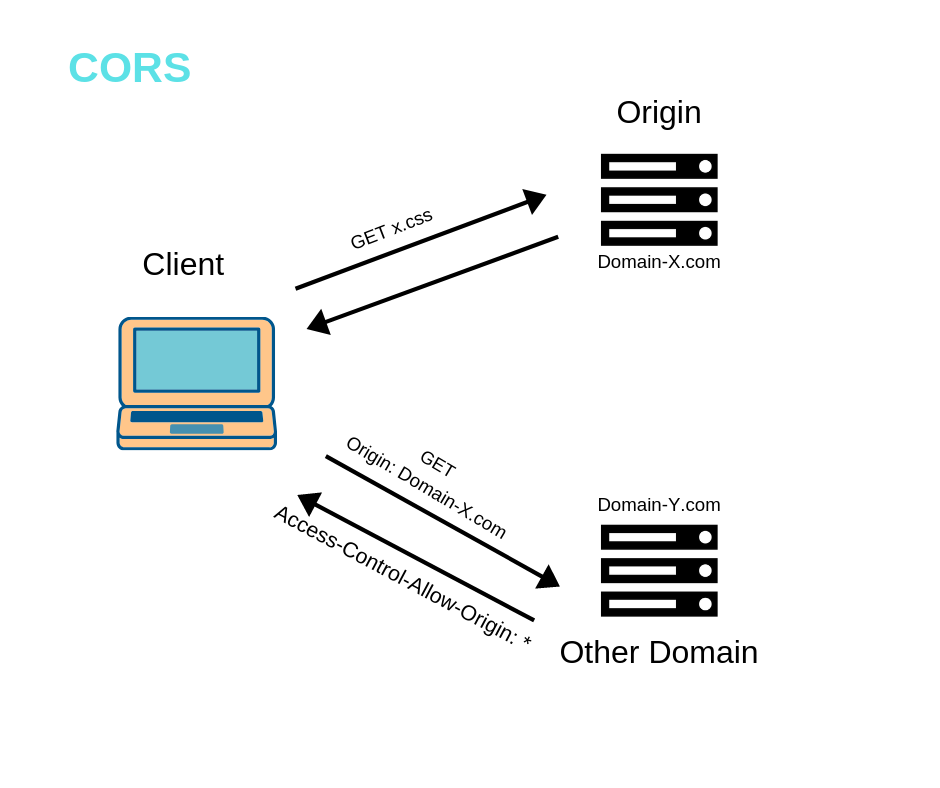
The two most fundamental headers in this exchange are:
Origin(Request Header): The browser automatically adds this header to any cross-origin request, indicating where the request came from.Access-Control-Allow-Origin(Response Header): The server includes this header in its response. Its value tells the browser which origins are allowed. It can be a specific origin (e.g.,https://my-frontend.com) or a wildcard (*), which allows any origin.
Simple vs. Pre-flighted Requests
Not all cross-origin requests are treated equally. The CORS standard defines two types: simple requests and pre-flighted requests. Your background in designing complex systems might lead you to appreciate this distinction—it's a way of minimizing overhead for "safe" requests while adding a layer of verification for potentially "unsafe" ones.
To dig into the mechanics of this, please study the following material.
Cross-Origin Resource Sharing (CORS) - MDN Web Docs
The MDN Web Docs on CORS are the definitive guide. We will read a specific section that details the two types of requests and provides clear examples of the HTTP exchange.
Please read the section titled 'Examples of access control scenarios'. Focus on understanding the difference between 'Simple requests' and 'Preflighted requests'. For preflighted requests, pay close attention to the purpose of the initial OPTIONS request and the Access-Control-Request-* headers.
To summarize the key points from the reading:
Simple Requests:
A request is "simple" if it meets all these conditions:
- Method is
GET,HEAD, orPOST. - It includes only a few specific, "safe" headers.
- The
Content-TypeforPOSTrequests is limited toapplication/x-www-form-urlencoded,multipart/form-data, ortext/plain.
For a simple request, the browser sends the request directly, and if the server responds with a matching Access-Control-Allow-Origin header, the browser allows the JavaScript code to read the response.
Pre-flighted Requests:
Any request that doesn't meet the "simple" criteria is pre-flighted. This is common for modern APIs that use:
- Methods like
PUT,PATCH, orDELETE. - A
Content-Typeofapplication/json. - Custom headers, like
Authorizationfor token-based authentication.
The "pre-flight" is an automatic, preliminary OPTIONS request that the browser sends to the server to ask for permission before sending the actual request. This OPTIONS request includes headers like Access-Control-Request-Method and Access-Control-Request-Headers. The server then responds with headers like Access-Control-Allow-Methods and Access-Control-Allow-Headers to indicate what it will accept. If the server's response approves the pre-flight check, the browser then sends the actual PUT or POST request.

3. Implementing CORS in Django
Now let's move from theory to practice. If you try to connect a separate frontend application to your DRF API, you will see a CORS error in your browser's developer console. We need to configure our Django server to send the correct CORS headers.
The standard way to do this in the Django ecosystem is with a package called django-cors-headers. This package provides a middleware that automatically adds the appropriate headers to your API's responses.
The following video provides a perfect, practical walkthrough of encountering the CORS error and fixing it.
How to Fix CORS Issue with Django Rest Framework (Content Feed) | Part 5
This video by Max Goodridge demonstrates exactly how to fix the CORS issue in a Django REST Framework project using the django-cors-headers library. It shows the process from start to finish.
Watch from the beginning to 00:57 to see the CORS error in action. Then, skip to 01:55 and watch until the end (05:48). This will guide you through installing the package, adding it to your Django settings, and whitelisting a specific origin.
Let's break down the configuration steps shown in the video into a clear, referenceable list.
Configuration Steps
-
Install the package:
pip install django-cors-headers -
Add
corsheaderstoINSTALLED_APPSinsettings.py:
Make sure to add it to your list of installed applications so Django knows about it.# settings.py INSTALLED_APPS = [ # ... other apps 'corsheaders', 'rest_framework', # ... ] -
Add the
CorsMiddlewareto yourMIDDLEWARElist insettings.py:
Its position is important. It should be placed as high as possible, especially before any middleware that can generate responses, like Django'sCommonMiddleware.# settings.py MIDDLEWARE = [ 'django.middleware.security.SecurityMiddleware', 'django.contrib.sessions.middleware.SessionMiddleware', 'corsheaders.middleware.CorsMiddleware', # Add this 'django.middleware.common.CommonMiddleware', 'django.middleware.csrf.CsrfViewMiddleware', 'django.contrib.auth.middleware.AuthenticationMiddleware', 'django.contrib.messages.middleware.MessageMiddleware', 'django.middleware.clickjacking.XFrameOptionsMiddleware', ] -
Configure the allowed origins:
This is the most critical step. You need to tell the middleware which frontend origins are allowed to make requests. The recommended setting for this isCORS_ALLOWED_ORIGINS.# settings.py # This should be a list of strings representing the origins # that are allowed to make cross-site HTTP requests. CORS_ALLOWED_ORIGINS = [ "http://localhost:3000", # The origin for your React/Vue dev server "http://127.0.0.1:3000", "https://my-frontend-app.com", # The origin for your production frontend ]For development, you'll typically add
localhostand127.0.0.1with the port your frontend development server uses. For production, you'll add the actual domain of your deployed frontend.
Test your understanding!
You have deployed your Django API to https://api.example.com. Your frontend team has deployed their React application to https://app.example.com. When they try to make a POST request with a JSON body and an Authorization header to your API, the browser blocks it.
What two things are happening here, and what is the minimal change you need to make in your settings.py to fix this?
Show answer
-
What's happening:
- The request is cross-origin because the domains (
api.example.comandapp.example.com) are different. - The request is being pre-flighted by the browser. This is because it uses a
Content-Typeofapplication/jsonand includes a customAuthorizationheader, so it does not qualify as a "simple request". The browser sends anOPTIONSrequest first to check for permissions.
- The request is cross-origin because the domains (
-
The fix:
Assuming you havedjango-cors-headersinstalled and the middleware is in place, the minimal change is to add the frontend's origin to the allowlist:# settings.py CORS_ALLOWED_ORIGINS = [ "https://app.example.com", ]The
django-cors-headersmiddleware is smart enough to handle the pre-flightOPTIONSrequest automatically based on your API's configuration, so you generally don't need to explicitly configure allowed methods or headers unless you have very specific requirements.
Other Configuration Options
While CORS_ALLOWED_ORIGINS is the main setting you'll use, it's good to be aware of a few others:
CORS_ORIGIN_ALLOW_ALL: Setting this toTruewill allow requests from any origin. This can be useful for fully public APIs but is generally a security risk and should be avoided for applications that handle sensitive data.CORS_ALLOW_CREDENTIALS: Set this toTrueif you need to allow cross-origin requests to include cookies. When this isTrue, you cannot use a wildcard (*) forCORS_ALLOWED_ORIGINS.CORS_ALLOW_METHODS: A list of HTTP methods that are allowed, e.g.,['GET', 'POST', 'PUT'].CORS_ALLOW_HEADERS: A list of non-standard HTTP headers that are allowed, e.g.,['authorization', 'content-type'].
For most use cases, django-cors-headers handles the allowed methods and headers automatically, so you often only need to specify the origins.
Conclusion
In this lesson, we demystified CORS by tracing it back to its root cause: the browser's Same-Origin Policy. By understanding the problem, the solution—a negotiation via HTTP headers—becomes much clearer. You now have both the theoretical knowledge and the practical steps needed to correctly configure your Django API to communicate securely with frontend applications hosted on different domains.
Key Takeaways:
- The Same-Origin Policy (SOP) is a browser security feature that restricts scripts on one origin from accessing resources on another.
- CORS is the W3C standard that allows servers to relax the SOP in a controlled way using special HTTP headers.
- Browsers automatically handle CORS by sending an
Originheader and, for complex requests, a pre-flightOPTIONSrequest. - The server must respond with an
Access-Control-Allow-Originheader and other related headers to grant permission. - In Django, the
django-cors-headerspackage is the standard tool to manage this. The primary configuration involves adding its middleware and defining a whitelist of trusted origins inCORS_ALLOWED_ORIGINS.
Preview of the Next Lesson:
We've now controlled who can access our API from the browser. Next, we'll look at controlling how much they can access it. In the upcoming lesson, we will apply rate limiting to API endpoints to prevent abuse and ensure service stability.