Hello! Welcome to your first lesson in game development with Unity. We're embarking on a journey to turn your game idea into a playable demo, and our first step is to get acquainted with our primary tool: the Unity Editor.
This lesson is designed to help you confidently navigate the Unity interface. We'll explore the main windows you'll be working with every day: the Scene view, where you'll build your world; the Project window, which holds all your assets; the Hierarchy, which lists everything in your current level; and the Inspector, which lets you see and change the details of any object. By the end of this hour, you'll understand how these pieces fit together, giving you a solid foundation for everything that follows.
Let's begin by setting up your workshop.
Getting Started: Your First Unity Project
Before we dive into the interface, you need a project to explore. The video below from the "Game Maker's Toolkit" channel provides an excellent, beginner-friendly guide to installing Unity and creating your first project. Since you're starting fresh, this is the perfect place to begin.
The Unity Tutorial For Complete Beginners
This video will walk you through the entire setup process, from downloading Unity to creating a blank 2D project. It then provides a fantastic initial tour of the main interface panels, which we will explore in more detail afterwards.
First, watch the section on installing Unity. If you already have Unity Hub and a recent version of the editor installed, you can skip this part. Then, watch the interface overview, where the creator explains the core windows while adding a simple character to the screen. Follow along and create your own blank 2D project as shown.
A Guided Tour of the Unity Editor
As you saw in the video, the Unity Editor is organized into several distinct, dockable windows, each with a specific purpose. Think of it like a workshop: you have your main workbench (the Scene view), your toolbox (the Project window), a list of parts for your current assembly (the Hierarchy), and a magnifying glass with measurement tools for examining each part (the Inspector).
Let's take a closer look at each of these areas using Unity's official documentation. This will solidify the concepts from the video.
Project Window vs. Hierarchy Window
It's crucial to understand the difference between what's in your project and what's in your scene. The Project window holds every single file your game might use, while the Hierarchy shows only the objects currently active in the level you're editing.
This reading from Unity Learn will clarify the roles of the Project and Hierarchy windows.
In the article, read the sections describing the Project window and the Hierarchy window. Pay close attention to the highlighted difference between the two.
In short:
- Project Window: Your entire asset library (art, code, sound files, etc.).
- Hierarchy Window: A list of objects (called GameObjects) placed in the current level, or "Scene."
GameObjects and Components: The Building Blocks
The video and article both mention GameObjects and Components. These are the most fundamental concepts in Unity.
- A GameObject is essentially an empty container in your scene. It has a name and a Transform (position, rotation, and scale), but nothing else.
- Components are what give GameObjects their functionality. You add components to a GameObject to make it do things. A Sprite Renderer component makes it visible, a Rigidbody 2D component gives it physics, and a C# script component gives it custom behavior.
The following reading provides a concise definition of this relationship.
Get Started with the 2D Game Kit - Unity Learn
Let's get a formal definition of these core concepts.
Read the short paragraph under the heading GameObjects and components. This explains how these two concepts work together.
Scene View and Game View: Building and Playing
You'll spend most of your time building your game in the Scene View. This is your interactive, god's-eye view of the world. You can fly around, select objects, and arrange them precisely.
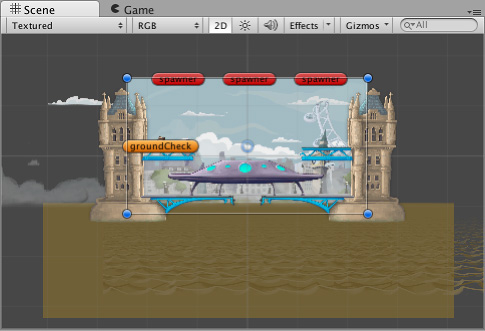
The Game View, on the other hand, shows what the player will see through the game's camera. You can't directly move objects here; you can only see the game in action when you enter "Play Mode."
The Inspector: The Details Panel
Whenever you select a GameObject in the Hierarchy or Scene view, or an asset in the Project window, the Inspector window comes to life. It shows you all the details, properties, and components of the selected item, allowing you to modify them.
Now let's see how the Inspector, Scene View, and Game View work together.
First, read the section on the Inspector. Then, review the section on the Game view and Play mode to understand how to test your game. Note the important warning about changes made in Play mode not being saved!
Time to Explore
Now it's your turn to get comfortable. Spend the next 15-20 minutes in the blank 2D project you created. Don't worry about making anything specific; just explore.
Here's a checklist to guide your exploration:
- Create a GameObject: Right-click in the Hierarchy window and choose
Create Empty. Select it. - Examine the Inspector: With your new GameObject selected, look at the Inspector. Notice it only has a
Transformcomponent. - Use the Transform Tools: Use the tools in the top-left of the Scene view (Hand, Move, Rotate, Scale) to manipulate your GameObject. Watch the
Transformvalues change in the Inspector. - Enter Play Mode: Click the "Play" button at the top-center of the editor. The Game view will become active.
- The Play Mode Rule: While still in Play Mode, select your GameObject and change its position in the Inspector. Then, click the Play button again to exit Play Mode. Notice that your change was reverted. This is a classic beginner's trap: changes made in Play Mode are temporary and are not saved!
- Arrange Your Workspace: Try clicking and dragging the tab of any window (e.g., the "Project" tab) to move it somewhere else. You can customize the layout to your liking. If you get lost, you can always reset it by going to the top-right corner, clicking the "Layout" dropdown, and selecting "Default".
Key Takeaways
In this lesson, you've taken the first crucial step in your game development journey by familiarizing yourself with the Unity Editor.
- The Project window is your asset library for the entire game.
- The Hierarchy lists all the GameObjects currently in your active Scene (level).
- The Scene View is your interactive workspace for building levels.
- The Game View is the player's view, primarily used when testing in Play Mode.
- The Inspector is a context-sensitive window that displays the properties and Components of any selected item, allowing you to edit them.
You now have the foundational knowledge to navigate your new digital workshop.
Next Steps
In our next lesson, we'll bring your GameObjects to life. You'll write your very first C# script to control a GameObject's properties, bridging the gap between the static world you see in the editor and the dynamic, interactive experience of a real game.