Hello! In our last lesson, we established the core principle of database views and mastered the foundational trio: Table, Board, and List. You learned how to transform a single data source into an administrative overview, a dynamic Kanban board, and a clean, minimalist list—a crucial first step in designing versatile Notion templates.
Today, we'll build on that foundation by focusing on the dimension of time. Your goals of building project managers and content calendars depend entirely on being able to visualize tasks, deadlines, and schedules effectively. This lesson is dedicated to the two views designed for exactly that: Calendar and Timeline. By the end of our session, you'll be able to create intuitive, time-based visualizations for any project or plan.
1. The Calendar View: Your Scheduling Hub
The Calendar view does exactly what you'd expect: it plots your database items onto a traditional monthly or weekly calendar grid. It is the perfect tool for scheduling discrete events, deadlines, and appointments.
- Core Principle: The Calendar view is driven by a
Dateproperty. Each database item will appear on the calendar on the date specified in that property. - Best For:
- Content calendars (scheduling publish dates).
- Meeting schedules.
- Tracking single-day deadlines or events.
- How it Works: If your
Dateproperty includes an end date, the item will span across the corresponding days on the calendar. You can also drag and drop items to reschedule them, which automatically updates theirDateproperty.
To see this in action, let's watch the official Notion guide to Calendar views.
This video from Notion's official YouTube channel provides a clear, concise walkthrough of creating and using a Calendar view.
Please watch the entire video (it's short!). Pay special attention to: How to add a new Calendar view (00:13). The absolute necessity of having a Date property (02:15). How you can use multiple date properties to create different calendar views from the same data (03:34). Switching between monthly and weekly layouts (04:24).
Customizing Your Calendar
A busy calendar can quickly become cluttered. The key to a useful calendar is displaying only the most relevant information. You can choose which properties (like 'Status' or 'Platform') are visible directly on the calendar entries.
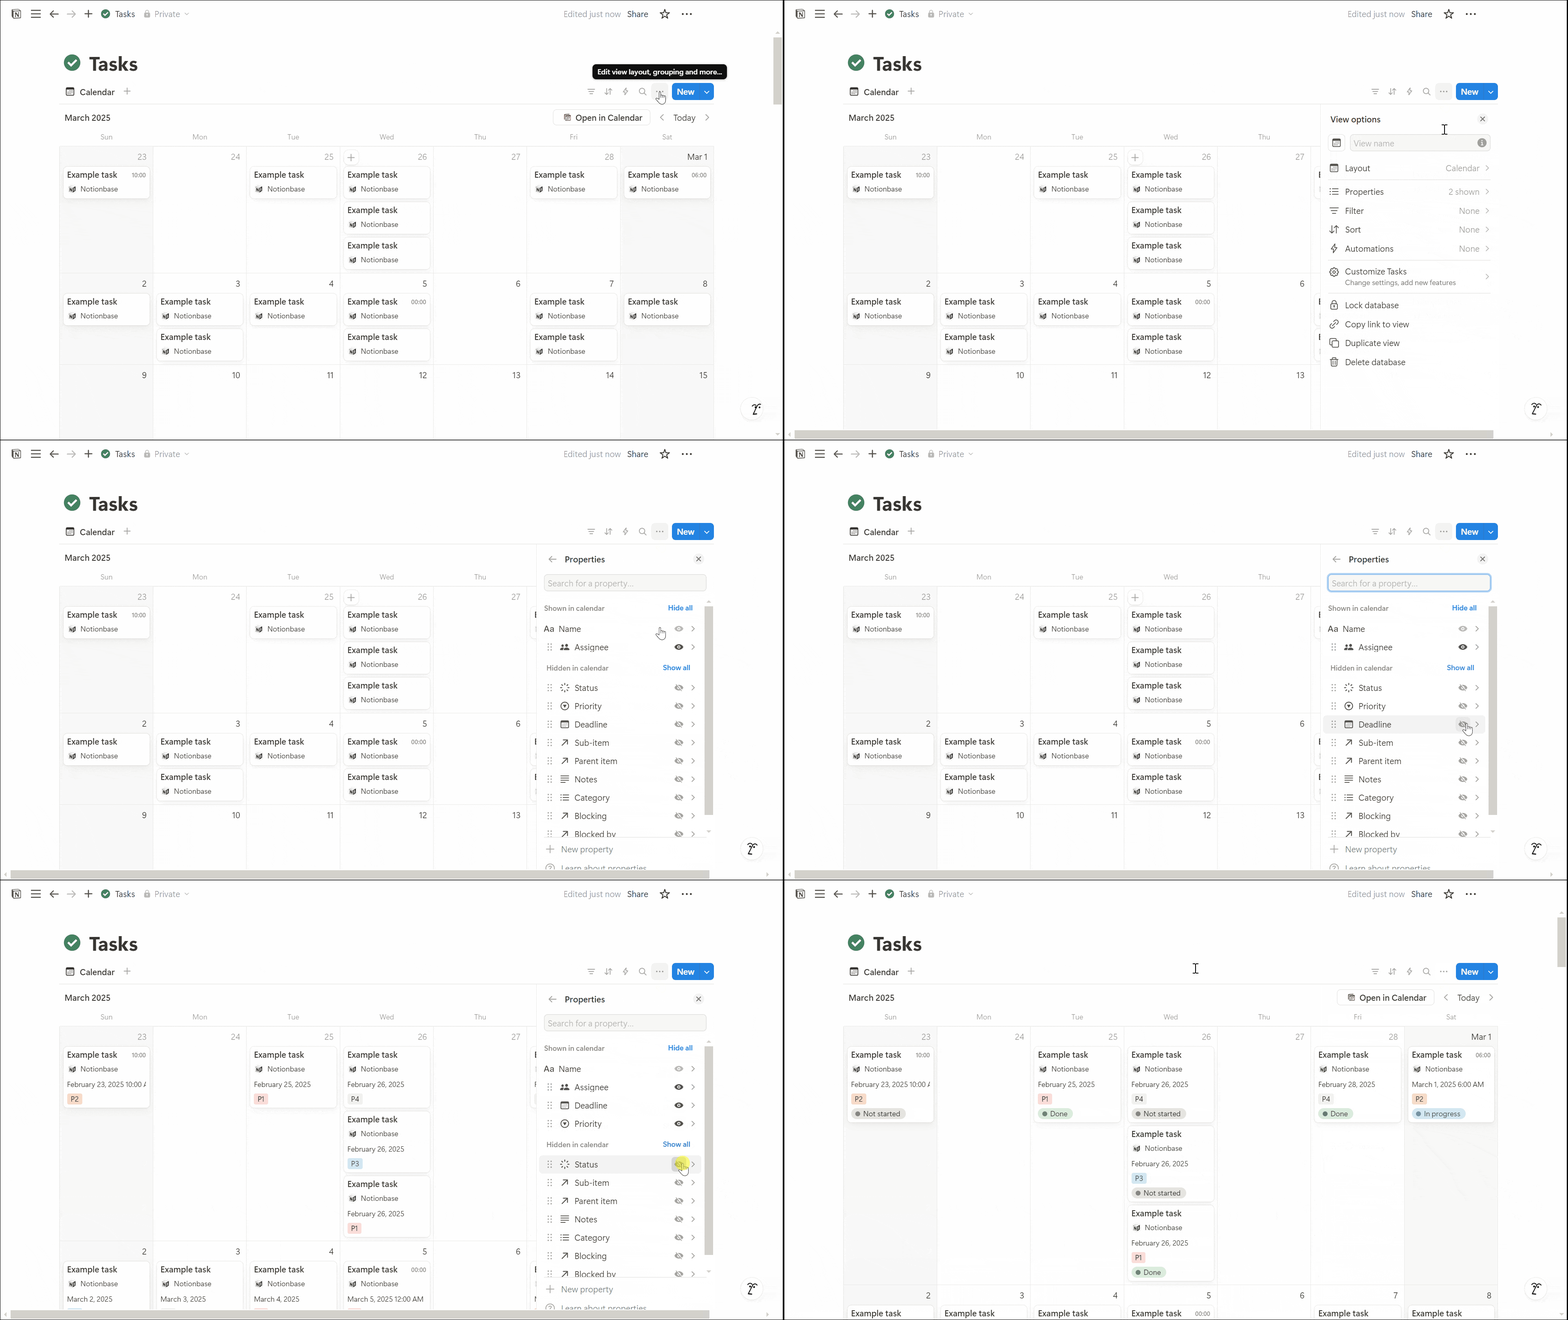
For a quick written reference on how calendars work, including navigation, you can review this article.
Compare and Configure Notion's Database Formats
This section from a Notion.vip article provides a great text-based summary of the Calendar format's features and customization options.
Read the section titled 'Calendar'. It serves as a good recap of what you saw in the video, reinforcing how Date properties work and how to customize the view.
2. The Timeline View: Your Project Roadmap
While a calendar is great for when things happen, a Timeline view is designed to show the duration and flow of projects over time. It displays your database items as horizontal bars on a linear timeline, similar to a Gantt chart—a classic tool in project management.
- Core Principle: Like the calendar, the Timeline view is driven by a
Dateproperty. However, it becomes most powerful when thatDateproperty has an End Date enabled, creating a range that defines the length of the bar on the timeline. - Best For:
- Project management (visualizing project phases and durations).
- Product roadmaps.
- Tracking overlapping tasks or events.
- Key Features:
- Variable Timescale: You can zoom in and out from an hourly view to a yearly overview.
- Associated Table: You can display a table next to the timeline to show more properties without cluttering the chart itself.
- Dependencies: You can visually link tasks to show that one must be completed before another can begin.
Let's dive into the official tutorial for Timelines.
This comprehensive video from Notion covers everything from the basics of creating a timeline to its more advanced project management features.
Watch the following segments: 00:00 - 00:21: A quick introduction to what Timelines are for. 02:04 - 03:15: Understand how entries are represented and how to adjust the timeline's scale (e.g., from days to months). 03:15 - 05:08: Learn about key customizations, like showing the accompanying table and controlling which properties are visible. 07:34 - 09:51: Get a preview of Dependencies, a powerful feature for project management that visually connects tasks. We will use this in our future projects.
Customizing Your Timeline
The ability to change the timescale is one of the timeline's most powerful features. For a high-level quarterly plan, you can zoom out. For a detailed daily work plan, you can zoom in.

The timeline offers many customization options. For a detailed guide you can refer back to later, the official Notion Help Center article is an excellent resource. It covers adjusting the timeframe, showing/hiding the table, and using different date properties in depth. Don't worry about memorizing it all now; just know this is a great reference for when you start building. You can find it under the title "Timeline view – Notion Help Center" (ID: [LINK](https://www.notion.com/help/timelines)).
Test your understanding!
You are designing a template for a freelance writer. They need to manage two things:
- Their submission deadlines for various magazines.
- The writing process for a book, which has overlapping phases like "Researching," "Drafting," and "Editing," each lasting several weeks.
Which view would you use for each requirement?
Show answer
- A Calendar view is perfect for tracking the submission deadlines. These are discrete, single-day events that fit naturally onto a monthly calendar.
- A Timeline view is ideal for managing the book-writing process. It can visually represent the duration of each phase, show how they overlap, and even use dependencies to ensure "Drafting" doesn't start before "Researching" is complete.
✍️ Exercise: Building Your Time-Based Views
Let's apply these concepts. We'll continue working with the Tasks database you've been developing.
-
1. Create a "Deadlines" Calendar
- Navigate to your
Tasksdatabase. - Click the
+next to your existing view tabs to add a new view. - Name the new view
Deadlines Calendar. - In the layout options, select Calendar.
- Notion should automatically use your
Due Dateproperty to place the tasks. If you had multiple date properties, you could choose which one to use in the...menu underLayout→Calendar by. - Click on a few tasks to see them open. Drag and drop a task to a different day and notice how its
Due Dateproperty updates automatically.
- Navigate to your
-
2. Create a "Project Timeline"
- First, we need a date range. Go to your
All Tasks - Admin(Table) view. - Click on your
Due Dateproperty, selectEdit property, and turn on the End date toggle. Now you can specify a start and end for your tasks. Add a start and end date for a few tasks so they span several days. - Now, create another new view by clicking
+. - Name this view
Project Timeline. - Choose Timeline as the layout.
- You will now see the tasks you gave a date range to appear as bars on the timeline.
- Experiment with the timescale dropdown at the top right, switching between
Day,Week, andMonthto see how the visualization changes.
- First, we need a date range. Go to your
You now have five distinct views of your single Tasks database, each serving a unique purpose. This is the essence of building powerful, user-friendly Notion systems.
Conclusion
Congratulations! You've just unlocked the ability to visualize and manage time in Notion. This skill is not just a feature; it's the engine behind the very templates you aim to build, from project roadmaps to content schedules.
Key Takeaways:
- Calendar View: Best for scheduling discrete, single-day events on a traditional grid (e.g., publish dates, meetings).
- Timeline View: Best for visualizing the duration and overlap of projects and tasks over a linear timescale (e.g., project phases, multi-day campaigns).
- The
DateProperty is Key: Both views are fundamentally driven byDateproperties. Timelines are most effective when using a date range (start and end dates). - Customization is Power: Use timescale adjustments, property visibility, and the associated table in timelines to create clear and focused views for your users.
Preview of the Next Lesson:
We've covered tables, boards, lists, calendars, and timelines. In our next lesson, we'll explore the final core view type: the Gallery view. This view is all about visual presentation and is perfect for creating portfolios, mood boards, and recipe books—another essential tool for your template design arsenal.