Hello! In our last lesson, we focused on visualizing time with Calendar and Timeline views, rounding out your knowledge of views for planning and scheduling. This gave you the tools to build the core of project managers and content calendars.
Today, we'll explore the last of the six fundamental database views: the Gallery view. This view is all about visual presentation. As a designer and content creator, you'll find it indispensable for creating beautiful, engaging templates that showcase information in a highly aesthetic way. By the end of this lesson, you will be able to create a visual portfolio for any set of database entries, a key skill for building the sellable templates you're aiming for.
Let's start with an example. Imagine a personal library or a portfolio of creative work. The Gallery view turns a simple list of items into an engaging visual grid.
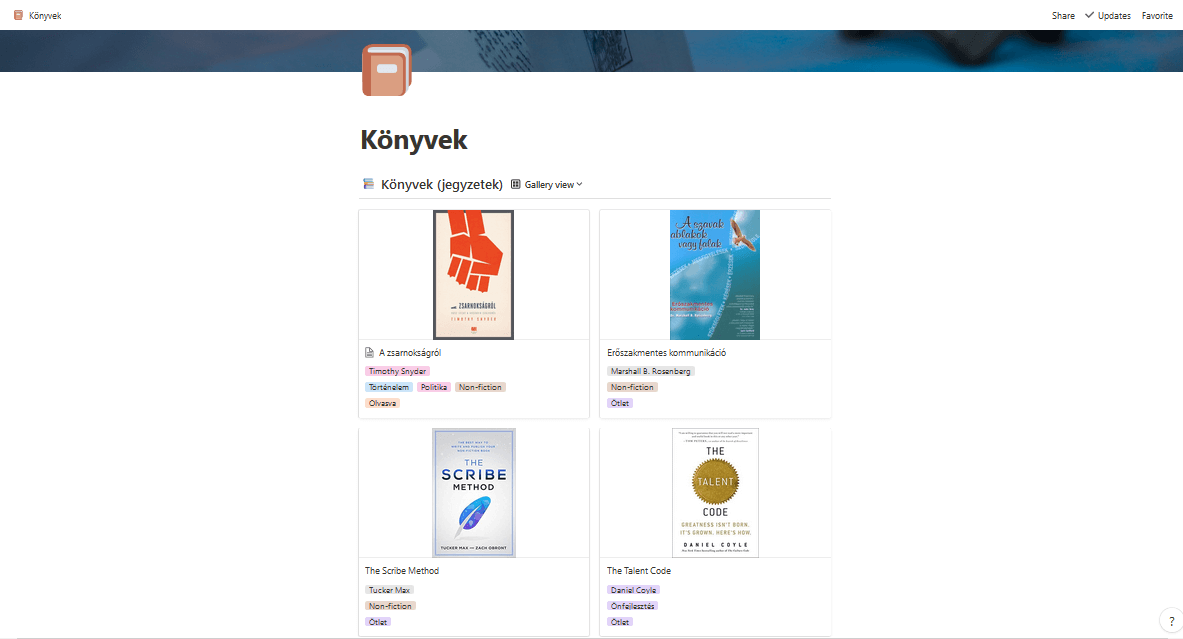
1. Understanding the Gallery View
A Gallery view displays your database pages as a grid of cards. Unlike a table or list that prioritizes text, a gallery prioritizes an image. This image can come from one of three places:
- The Page Cover: The cover image you set at the top of a page.
- The Page Content: The first image that appears inside the page's body.
- A
Files & MediaProperty: An image you upload to a dedicated property within the database entry.
This flexibility allows you to create everything from project portfolios and team directories to recipe books and mood boards. To see how to create and customize a gallery, let's watch a focused tutorial.
Make your Notion AESTHETIC with Gallery View ✨
This video from The Organized Notebook provides an excellent, quick overview of how to create a Gallery view and configure its most important visual settings.
Watch the video from the beginning until 03:25. Pay close attention to: How to create a new Gallery view from scratch (00:08). The different 'Card preview' options: Page content vs. Page cover (01:07). The hidden but powerful option to use a Files & Media property for the preview (02:15). How to adjust card size and hide the page title for a clean, aesthetic look (01:56 & 02:50).
2. Customizing Your Gallery for a Professional Look
As you saw in the video, the power of the Gallery view lies in its customization options. Mastering these settings is crucial for designing templates that are not only functional but also visually appealing. Your background in design will be a great asset here as you think about hierarchy, spacing, and visual impact.
Let's break down the key settings, which you can find under the ... menu in the top-right of your database.
Layout Options (... → Layout)
- Card Preview: This is the most important setting. It determines the source of the image on your gallery card.
Page Cover: The most common and direct way to create a visual portfolio.Page Content: Useful if the main content of your pages is an image or document.Files & MediaProperty: A fantastic "pro" option. It allows you to have a separate cover image for the page itself and a dedicated image for the gallery card, giving you more control.

- Card Size: You can choose
Small,Medium, orLarge. This allows you to control the density of your gallery. Larger cards make a bigger impact but show fewer items at once. - Fit Image: This toggle controls how the image fits in the card frame.
- On: The entire image will be visible, potentially leaving empty space (letterboxing).
- Off: The image will fill the entire card frame by cropping into it. You can then
Repositionthe image to get the perfect crop.
Property Visibility (... → Properties)
Just like with other views, you can control which properties are displayed on the cards. For a portfolio, you might show Tags or Client Name. For a minimalist mood board, you might hide everything—including the page title—for a pure, image-only grid.
For a comprehensive written guide on these options, the official Notion documentation is an excellent resource to bookmark.
Gallery view – Notion Help Center
This official Notion Help Center article serves as a great text-based reference for all the customization options available in Gallery view.
Read the sections titled 'Create a gallery' and 'Customize your gallery'. Focus on the descriptions for 'Change card preview' and 'Display, hide, and order properties'. You don't need to memorize it, just familiarize yourself with where to find these options.
Test your understanding!
You are building a recipe template. For the main recipe database, you want the Gallery view to show a beautiful photo of the finished dish. Inside each recipe page, you plan to have step-by-step photos. If you set Card Preview to Page Content, what might happen, and what's a better alternative?
Show answer
If you set Card Preview to Page Content, the gallery card will show the first image it finds in the page—which would likely be the photo for "Step 1," not the photo of the finished dish.
A better alternative is to set the beautiful photo of the finished dish as the Page Cover for each recipe page, and then set the Card Preview to Page Cover. This ensures the correct, most appealing image is always shown in the gallery.
✍️ Exercise: Build a Visual Mood Board
Let's put this into practice by creating a component you could use in a future template for designers or content creators: a Mood Board.
-
1. Create the Database
- On a new page, type
/galleryand selectGallery view. - Click
+ New databaseand name itMood Board.
- On a new page, type
-
2. Add Sample Entries and Images
- You'll see a few empty cards. Click on the first one, name it
Vibrant Color Palette, and clickAdd cover. Search for an image (e.g., "vibrant colors") and select one. - Create two more cards:
Minimalist UIandBold Typography. Add a relevant cover image to each.
- You'll see a few empty cards. Click on the first one, name it
-
3. Add a
TagsProperty- Open one of your cards. Click
+ Add a property. - Select
Multi-selectas the type and name itCategory. - Add some relevant tags to your entries, like
Color,UI/UX, andTypography.
- Open one of your cards. Click
-
4. Configure the Gallery View
- Go back to your Mood Board database. Click the
...menu in the top-right corner. - Go to
Layout.- Ensure
Card previewis set toPage Cover. - Set
Card sizetoMedium.
- Ensure
- Go to
Properties.- Click the eye icon next to
Categoryto make it visible.
- Click the eye icon next to
- Go back to your Mood Board database. Click the
-
5. Final Polish
- Experiment with hiding the
Nameproperty (...→Properties→ toggle offName) to see how it creates a clean, image-only look. - Try changing the card size between
Small,Medium, andLargeto see the effect.
- Experiment with hiding the
You now have a functional and visually appealing mood board, a perfect reusable component for many types of templates!
Conclusion
You have now mastered all six of the core database views in Notion! The Gallery view completes your toolkit, giving you the power to present information in a visually compelling way. This is not just a nice-to-have feature; for creating sellable templates, aesthetics and user experience are paramount, and the Gallery view is your primary tool for achieving that.
Key Takeaways:
- Gallery View is for Visuals: It displays database entries as a grid of cards, ideal for portfolios, mood boards, or any image-heavy collection.
- The Image Source is Key: The card image is controlled by the
Card Previewsetting, which can pull from thePage Cover,Page Content, or aFiles & Mediaproperty. - Customize for Aesthetics: Use card size, image fit, and property visibility to fine-tune the look and feel, balancing beauty with information.
Preview of the Next Lesson:
So far, we've learned how to display data in different formats. But what if you only want to see some of that data? In our next lesson, we will cover three of the most powerful tools in your Notion arsenal: Filter, Sort, and Group. These functions work across all the views you've learned and are the secret to turning a massive database into a focused, context-aware dashboard (e.g., showing only "High Priority" tasks or grouping a content calendar by "Status").