Hello! In our last lesson, we wrapped up our tour of database views by mastering the Gallery view, giving you a powerful tool for visual presentation. You now know how to display the same data in many different formats, from a simple table to an aesthetic portfolio.
Today, we move from how data is displayed to what data is displayed. You'll learn to use one of Notion's most powerful features: filters. By applying filters, you can take a massive database with hundreds of entries and instantly create a focused view showing only the specific items you need.
This skill is fundamental to achieving your goal of creating sellable templates. A great template doesn't just store information; it presents the right information at the right time. For example, a project management template might have a master task list, but the dashboard will use filters to show views like "Tasks Due Today" or "High-Priority Items." Mastering filters is the key to building these intelligent, context-aware systems.
1. What Are Filters?
Filters are rules you apply to a database view to hide entries that don't meet your criteria. The original data is never deleted; it's simply hidden from that specific view. This allows you to have one central database (a single source of truth) and create dozens of unique, focused views from it.
Think of it like sifting for gold. Your database is the entire riverbed full of rocks, silt, and gold. A filter is the pan that helps you isolate only the valuable nuggets you're looking for at that moment.
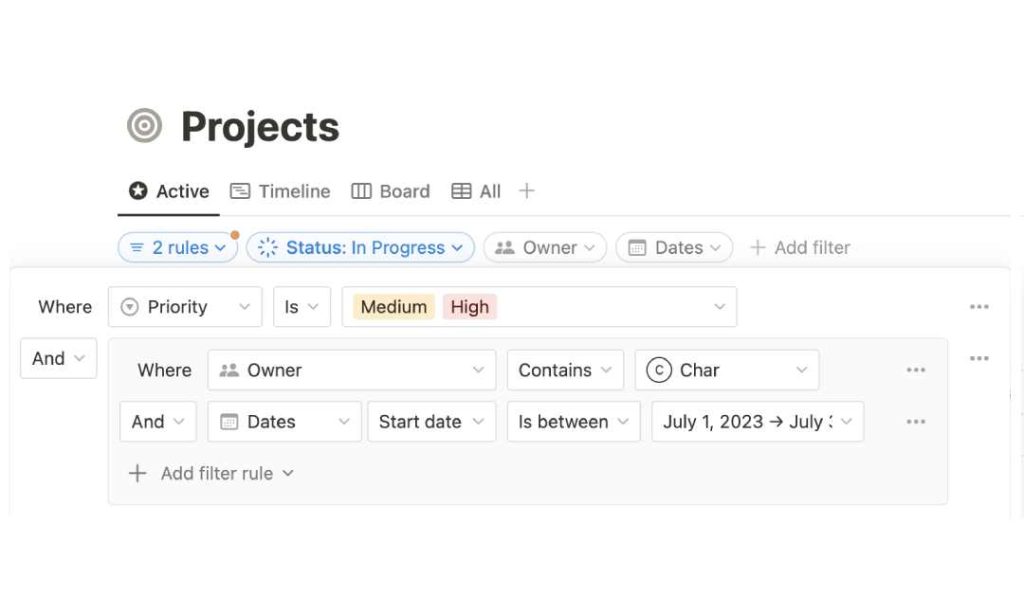
Every filter is built on a simple structure:
Property → Condition → Value
For example:
Status(Property) →is(Condition) →Done(Value)Due Date(Property) →is on or before(Condition) →Today(Value)Priority(Property) →is not(Condition) →Low(Value)
To get a solid foundation on the concept and mechanics of filters, let's start with a comprehensive written guide.
Notion Databases: The Ultimate Beginner's Guide
The article 'Notion Databases: The Ultimate Beginner's Guide' by Thomas Frank provides one of the clearest explanations of filters available. We'll focus on the sections covering simple and advanced filters.
Please read the sections titled 'Filters' and 'Simple Filters'. Pay close attention to the Property → [Criteria] → Value convention, as this is the building block for everything we'll do with filters.
2. Simple Filters: Your First Step to a Smarter View
A simple filter involves applying a single rule to a database view. This is the most common type of filtering you'll do.
Let's see it in action. This short video will walk you through creating your first filter.
Notion Databases: Filter, Group & Sort (Beginners Tutorial) in under 10 Minutes
This clip from Productive Setups gives a fast-paced but clear demonstration of how to add a filter to a database view.
Watch from the beginning until 01:58. Notice how the filter is added via the 'Filter' button at the top of the database and how changing the filter criteria instantly updates the view. Also, note the key point made: filters only change the view, not the underlying database.
The conditions available in the filter menu change depending on the property type. For example:
- A Text property will offer conditions like
contains,does not contain,starts with. - A Number property has
greater than,less than,is equal to. - A Date property includes powerful relative options like
is today,is within the next week, oris in the past month.
Test your understanding!
You have a content calendar database with a Select property called "Status" (with options: Idea, Drafting, Editing, Published) and a Date property called "Publish Date".
How would you create a view that shows only content that has already been published?
Show answer
You would create a filter with the rule: Status → is → Published.
Alternatively, you could also filter by date: Publish Date → is on or before → Today. Combining both would make the filter even more robust.
3. Advanced Filters: Combining Rules with AND / OR Logic
The real power of filters is unlocked when you start combining rules. Notion allows you to do this in two ways:
-
ANDLogic: Shows entries that match all the filter rules. This narrows down your results.- Example: Show tasks where
PriorityisHighANDStatusisNot Started.
- Example: Show tasks where
-
ORLogic: Shows entries that match any of the filter rules. This broadens your results.- Example: Show content where
PlatformisBlogORPlatformisNewsletter.
- Example: Show content where
When you add multiple simple filters, they are linked by AND logic by default. To use OR logic or create more complex combinations, you need to use an advanced filter. Advanced filters also allow you to create filter groups, which let you nest rules to build highly specific logic.
This official video from Notion provides an excellent walkthrough of building an advanced filter from scratch.
The 'Advanced database filters' video from Notion is perfect for understanding how to combine AND and OR logic to create sophisticated, purpose-driven views.
Watch from the beginning until 02:59. Focus on: The example of combining 'OR' logic for a start date with 'AND' logic for a location (00:50). How to add a second filter rule and how Notion defaults to AND (02:12). The concept of a 'filter group' for mixing AND and OR logic.
For a deeper dive into the "why" and "how" of filter groups, the Thomas Frank guide has another excellent section with practical examples.
Notion Databases: The Ultimate Beginner's Guide
Let's return to the 'Notion Databases' guide to solidify our understanding of advanced filters and filter groups.
Read the section titled 'Advanced Filters'. The movie-watching preference example is a brilliant illustration of how nested filter groups can solve complex real-world problems.
4. Filters for Professional Template Design
Applying filters correctly is what separates a basic template from a professional, sellable one. Here are two key concepts you must master:
A. Saving Filters for Everyone
When you create a filter in a shared database (or a template you intend to share), you must click "Save for everyone". If you don't, the filter will only apply to your view, and your customer will see an unfiltered, confusing database.
B. Forcing Functions
This is a powerful technique where a filter pre-fills properties for new entries created in that view. For instance, if you have a view filtered for Status is "Idea", any new page you create in that view will automatically have its status set to "Idea". This creates a much smoother user experience.
The Thomas Frank guide has a fantastic explanation of this concept.
Notion Databases: The Ultimate Beginner's Guide
This final reading covers 'Forcing Functions', a pro-level technique that will make your templates feel much more intuitive and professional.
Read the short section titled 'Forcing Functions'. The example of a filtered view automatically checking a box is a perfect demonstration of the power of this feature.

✍️ Exercise: Create Focused Task Views
Let's apply what you've learned. Imagine you have a master Tasks database for a project. Your goal is to create two new, filtered views for a dashboard.
Setup:
- Create a new page and add a Table - Full page database. Name it
All Tasks. - Add the following properties:
Status(Select): With optionsNot Started,In Progress,Done.Priority(Select): With optionsHigh,Medium,Low.Due Date(Date).
- Add 5-7 sample tasks with a mix of different statuses, priorities, and due dates (including some for today, this week, and next week).
Your Tasks:
-
1. Create a "Today's Focus" View
- Duplicate the default table view and rename it
Today's Focus. - Apply a filter where
Due DateisToday. - Apply a second filter where
Statusis notDone. - Ensure both rules are connected by
AND. - Click "Save for everyone".
- Duplicate the default table view and rename it
-
2. Create a "High-Impact" View
- Create another new view (or duplicate the original) and name it
High-Impact. - Apply an advanced filter to show tasks that meet the following criteria:
- (
PriorityisHighANDStatusis notDone) OR (Due DateisTodayANDStatusis notDone)
- (
- This will require a filter group to correctly nest the
ANDandORlogic. - Click "Save for everyone".
- Create another new view (or duplicate the original) and name it
This exercise mimics exactly how you would build a functional dashboard for a project management template.
Conclusion
You have now learned how to wield one of the most transformative features in Notion. Filters are the bridge between a simple data repository and an intelligent, dynamic system. By mastering them, you can create views that are perfectly tailored to a specific context, which is the hallmark of a high-value Notion template.
Key Takeaways:
- Filters Hide, Not Delete: They control which entries are visible in a specific view without altering the source database.
- Simple vs. Advanced: Simple filters apply one rule, while advanced filters combine multiple rules with
ANDandORlogic. - Filter Groups for Complexity: Use filter groups to nest rules and create precise, sophisticated logic.
Save for Everyoneis Crucial: This ensures your filtered views work as intended when you share or sell your template.- Forcing Functions Create Magic: Use filters to pre-fill properties on new entries, making your templates smarter and easier to use.
Preview of the Next Lesson:
We've figured out what to show. Next, we'll control the order in which it's shown. In the next lesson, we will cover sorting, which allows you to arrange your database entries by priority, due date, name, or any other property, adding another layer of organization to your views.