Hello!
In our last lesson, you mastered filters, learning how to display precisely what information you need. You can now create focused views like "Tasks Due Today" or "High-Priority Items," which is a massive step toward building intelligent systems.
Today, we'll address the next logical question: how do you control the order in which those items appear? This lesson is all about sorting. You'll learn how to arrange entries in a database view based on their properties, ensuring your information is always presented in the most logical and actionable sequence. For a potential customer using your template, a view that automatically sorts tasks by due date or content ideas by priority isn't just a nice feature—it's what makes the template intuitive and valuable from the very first moment.
1. What is Sorting?
Sorting is the process of arranging the entries (or rows) in your database view according to specific rules. You can sort by almost any property—date, text, number, select tags—in either ascending or descending order.
Unlike filters, which hide data, sorts simply reorder the data that is currently visible in your view. The original information in your master database remains unchanged.
This core function is what allows you to:
- See upcoming deadlines first.
- List tasks alphabetically.
- Arrange content ideas by their "Last Edited" date to see your most recent work.
- Prioritize a project list from highest to lowest priority.
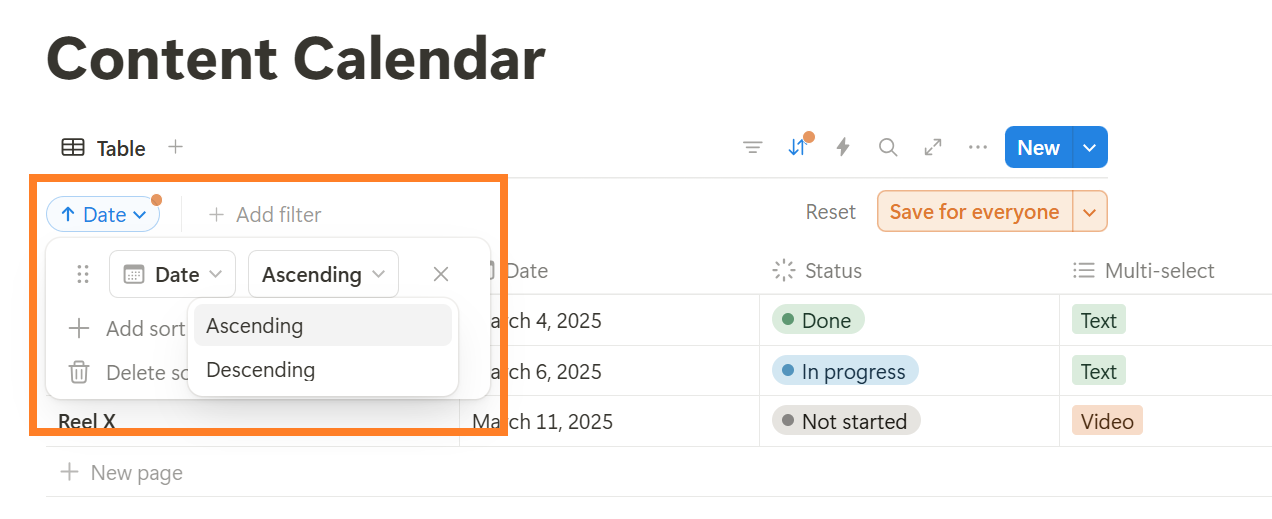
To begin, let's get a clear and concise overview of sorting from a helpful guide.
This resource from Noteforms provides a quick and clear definition of sorting, its usage context, and its benefits. It's a great starting point to frame our understanding.
Please read the 'Definition' and 'Benefits' sections. Focus on the core idea that sorting is a reversible, visual-only change that brings clarity to your data.
2. Applying a Single Sort
The most common use of sorting is to apply a single rule to a view. For example, sorting a task list by its due date is a fundamental feature of any project manager.
You can access the sort menu from the top-right of any database view. From there, you can choose:
- The Property to sort by (e.g.,
Due Date). - The Order:
- Ascending: Sorts A-Z, 0-9, or oldest-to-newest date.
- Descending: Sorts Z-A, 9-0, or newest-to-oldest date.
Let's watch a clear demonstration of this process.
Notion Databases - Full Course for Beginners
In this segment from his comprehensive course, Thomas Frank demonstrates how to apply a basic sort to a task database. This is the foundational skill for this lesson.
Watch from 16:20 to 17:15. Pay close attention to how he opens the sort menu, selects the 'Due' property, and chooses 'Ascending' order to see the soonest tasks first. Also, notice the 'Save for everyone' button that appears—we'll come back to that.
Test your understanding!
You are building a content creation template. You have a Gallery view showing all your published articles, and you want to display your most recently published work first. How would you configure the sort?
Show answer
You would add a sort rule for your Publish Date property and set the order to Descending. This arranges the entries from newest to oldest.
3. Layering Multiple Sorts for Granular Control
The real power of sorting emerges when you apply multiple rules to the same view. This allows you to create a highly organized, multi-level hierarchy for your data.
For example, you might want to sort a task list first by priority, and then by due date. This would group all your "High" priority tasks together, and within that group, order them by which is due soonest.
When you add multiple sorts, the order matters. Notion applies the sort at the top of the list first, then the second, and so on. You can drag and drop the sort rules to change their priority.
This next video provides an excellent visual demonstration of this drag-and-drop prioritization.
Notion Databases: Filter, Group & Sort (Beginners Tutorial) in under 10 Minutes
This clip from Productive Setups clearly illustrates how to add a second sort rule and, crucially, how to change the sort priority by dragging the rules up or down.
Watch the clip from 05:16 to 06:06. Notice how the database order changes when 'Tags' (Priority) is dragged above 'Date', and vice-versa. This demonstrates the importance of the order of your sort rules.
To reinforce this concept and see how it looks in a detailed guide, let's revisit the Thomas Frank article.
Notion Databases: The Ultimate Beginner's Guide
This section of the 'Notion Databases' guide provides a written explanation of multi-level sorting, complementing the video you just watched.
Please read the section titled 'Sorting'. Pay attention to the example of sorting a shot list first by 'Type' and then by 'B-Roll Description'. This reinforces the concept of sort hierarchy. Also, take note of the explanation of the 'Save for Everyone' button, which is critical for template design.
As the guide mentions, whenever you create or change a sort in a database that will be shared (like a template you sell), you must click "Save for everyone". If you don't, your customer won't see the organized view you designed; they'll see your changes as a temporary sort that they can reset.
✍️ Exercise: Organize Your Task Views
Let's apply sorting to the filtered views you created in the last lesson. This will turn them into truly dynamic and actionable dashboards.
Setup:
- Open the page with your
All Tasksdatabase from the previous exercise. - You should have the
Today's FocusandHigh-Impactviews you already created.
Your Tasks:
-
1. Prioritize Your "Today's Focus" View
- Navigate to your
Today's Focusview. - Add a sort rule to arrange tasks by
Priorityin Ascending order. (Assuming your options are namedHigh,Medium,Low, this will placeHighat the top). - Make sure this view remains filtered for tasks due today and not yet done.
- Click "Save for everyone". Your view should now show today's tasks with the highest-priority ones at the top.
- Navigate to your
-
2. Create a Multi-Level Sort in the "All Tasks" View
- Go to your main
All Tasksview (or whichever view shows all tasks). - Add a two-level sort:
- First, sort by
Statusin Ascending order. This will group your tasks byDone,In Progress, andNot Started. - Second, add another sort for
Due Datein Ascending order. This will order the tasks within each status group by their due date.
- First, sort by
- Click "Save for everyone". This is a powerful way to organize a master task list, as it separates completed work from active work and then prioritizes the active work by deadline.
- Go to your main
Conclusion
Congratulations! You've now added another essential skill to your Notion toolkit. By combining filters (to show the right data) with sorts (to order it logically), you can transform a simple database into an intelligent, purpose-driven system. This combination is at the heart of every great Notion template.
Key Takeaways:
- Sorts Arrange, Filters Hide: Sorting changes the order of visible items, while filtering changes which items are visible.
- Ascending vs. Descending: This fundamental choice determines the direction of your sort for dates, numbers, and text.
- Hierarchy is Key: When using multiple sorts, the order of the rules dictates the final arrangement. Drag and drop to set priority.
Save for Everyoneis Mandatory: For your templates to work as designed for your customers, you must save your sort configurations for everyone.
Preview of the Next Lesson:
We've filtered our data and sorted it into a logical order. But what if you want to visually separate items into columns or sections? In our next lesson, we will explore Grouping, a feature that allows you to create visual categories in your views, forming the basis for powerful layouts like Kanban boards.