Hello! Welcome back to our journey of building a professional-grade project management system in Notion.
In our last two lessons, you built the essential foundations: a 'Projects' database to track high-level initiatives and a 'Tasks' database for the individual action items. Right now, they exist as two separate, powerful lists.
Today, we'll bridge that gap. This lesson is all about one of Notion's most powerful features: the Relation property. You will learn how to connect your 'Tasks' database to your 'Projects' database, creating a dynamic, two-way link between them. This is the step that elevates your system from two simple lists into a truly integrated project manager—a core skill for creating the kind of valuable templates you aim to design and sell.
1. Understanding the Power of Relations
Before we build, let's understand the concept. A Relation in Notion is a special property that lets you link a page from one database to a page in another. Think of it as creating a connection or a "relationship" between two distinct pieces of information.
For our project, it means we can officially tell Notion that a specific task "belongs" to a specific project.
To see this concept explained with a simple and clear analogy, watch the beginning of the following video.
Relations & Rollups in Notion for Beginners [Easy Guide]
This video from Creative Cove provides an excellent introduction to what relations are. It uses the example of connecting a 'Books' database to an 'Authors' database, which is a perfect way to grasp the core idea before we apply it to our more complex system.
Watch the short segment from 00:12 to 00:31. The focus here is just on understanding the high-level concept of what a relation does.
2. Creating the Relation: Connecting Tasks to Projects
Now that you understand the "what," let's get into the "how." We will add a new Relation property to our 'Tasks' database that links it to our 'Projects' database. This process is foundational and is used across all sorts of advanced Notion templates.
The official Notion team provides a perfect, concise demonstration of this exact process.
Using relation & rollup properties
This video from Notion's official channel walks you through the exact steps of relating a 'Tasks' database to a 'Projects' database.
Watch from the beginning to 02:19. Pay close attention to these steps: Adding the Relation property to the 'Tasks' database. Selecting the target database ('Projects'). Assigning a project to a task by clicking in the new property's cell. Noticing that a new property automatically appears in the 'Projects' database.
This visual demonstration makes the process clear. Here is a GIF showing the same core steps for you to reference anytime.
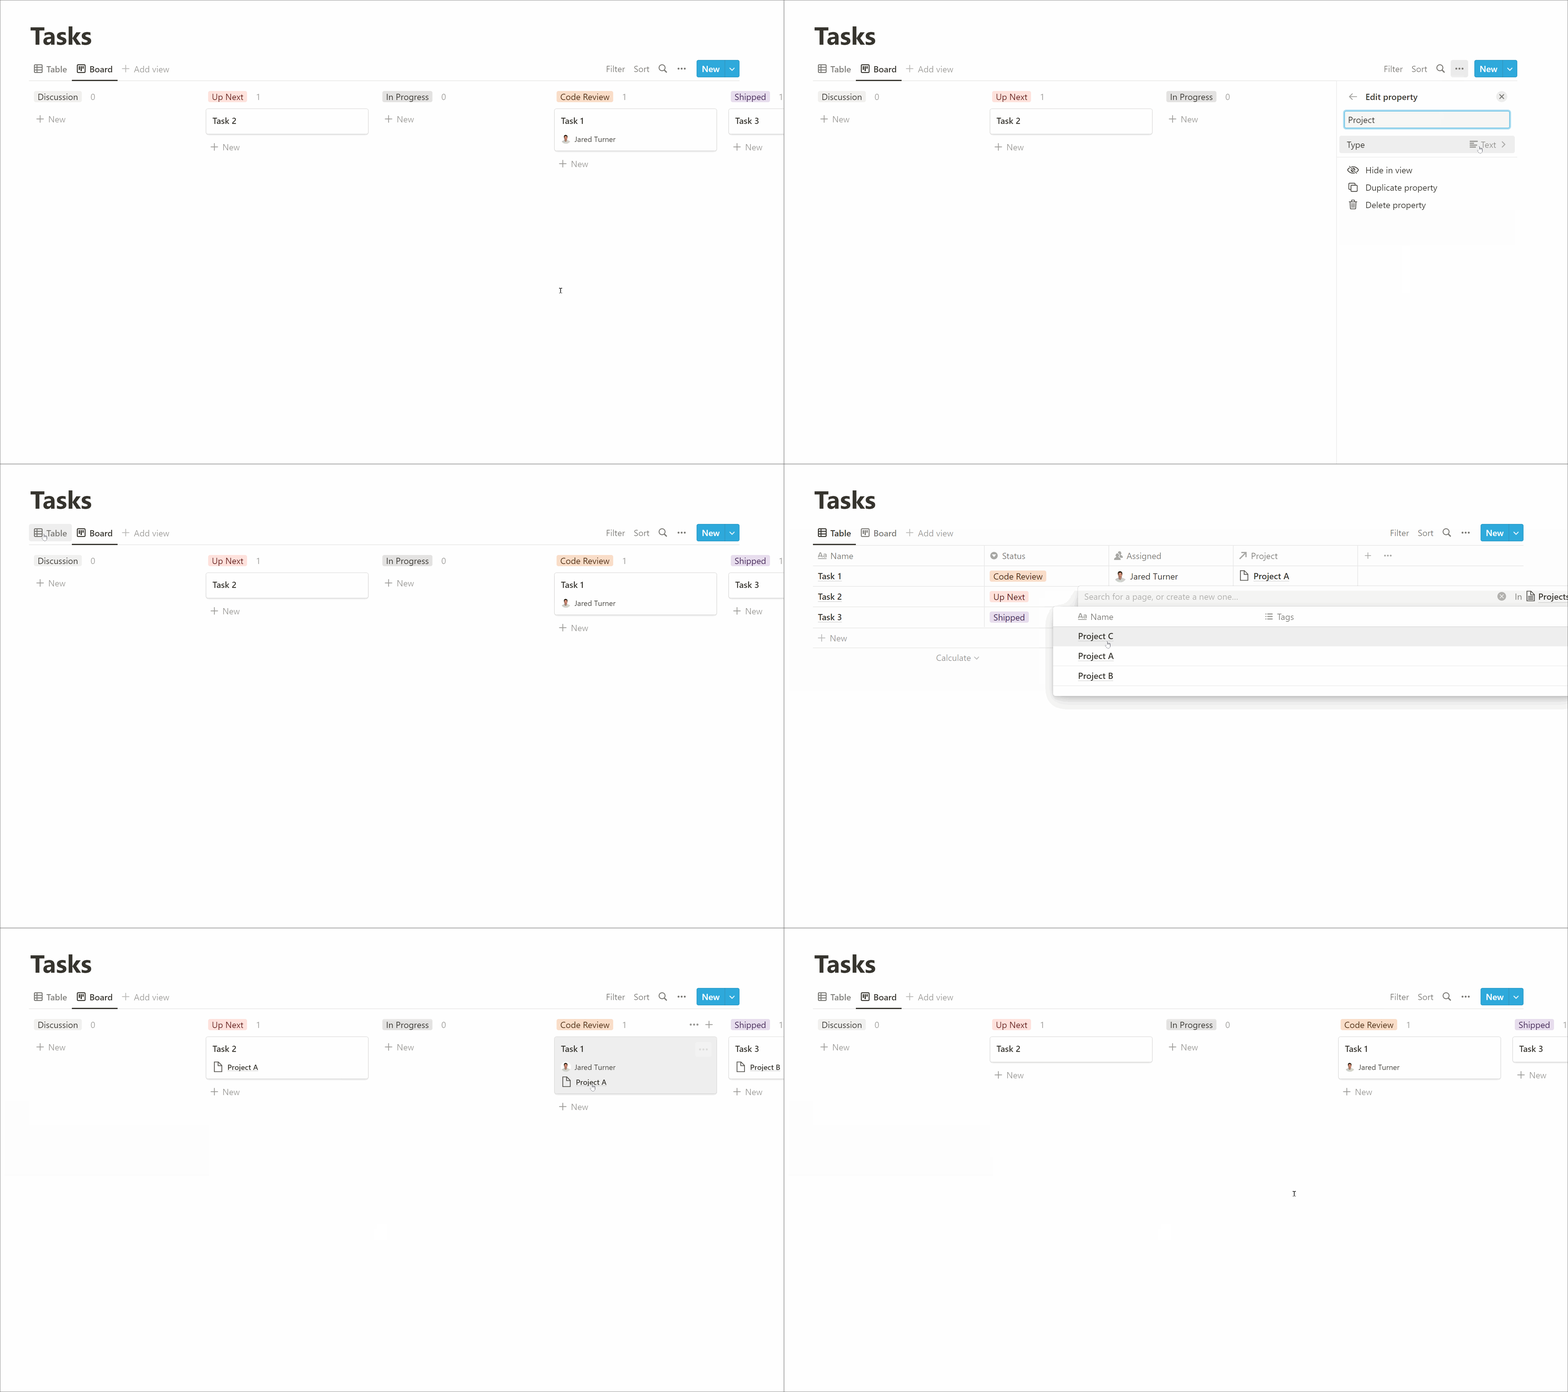
The Two-Way Link (Reciprocal Properties)
As you saw in the video, when you create a relation from Database A to Database B, Notion automatically creates a corresponding Relation property in Database B. This is called a reciprocal property.
The Power of Relations and Rollups
For a deeper understanding of this two-way connection and why it's so powerful, let's turn to an expert guide from Notion.vip.
Read the sections titled 'Relate clients to projects and resources' and 'Configure reciprocal properties.' While the example uses 'Clients,' the principle is identical for our 'Projects' and 'Tasks.' Focus on how creating one relation automatically creates a second, and the importance of renaming it for clarity.
💡 Key Insight: This two-way link is what makes relations so powerful. You can add a task to a project from the 'Tasks' database, or you can go to the 'Projects' database and add tasks directly from there. The information stays perfectly in sync. For a professional template, it's crucial to rename these reciprocal properties to something intuitive (e.g., change "Related to Projects (Tasks)" to simply "Tasks").
Test your understanding!
You've just related your 'Tasks' and 'Projects' databases. You open up your 'Projects' database and see a new column you didn't add, named something like "Related to Tasks (Project)". What is this column and what should you do with it?
Show answer
This is the reciprocal Relation property that Notion automatically created. It shows all the tasks linked to that specific project. You should rename it to something clean and intuitive, like "Tasks".
3. The Result: An Integrated System
Once the relation is established, your system becomes much more intelligent. Each project page now acts as a mini-dashboard for that specific project, automatically displaying all of its associated tasks. This turns a simple project entry into a dynamic container for all related work.
When you're finished, you'll be able to see a clear hierarchy, with tasks nested under their parent projects.

✍️ Exercise: Connect Your Databases
Now it's your turn to implement this in your own Project & Task Manager.
Your Tasks:
-
1. Open your 'Tasks' database.
- Navigate to your
Project & Task Managerpage and find the 'Tasks' database you created in the last lesson.
- Navigate to your
-
2. Add the Relation Property.
- Click the
+icon at the right end of the property headers to add a new property. - Name it
Project. - For the
Type, scroll down and selectRelation.
- Click the
-
3. Configure the Relation.
- In the menu that appears, search for and select your
Projectsdatabase. - You'll see an option
Show on Projects. Make sure this is toggled ON. Notion may name it something like "Related to Tasks (Project)". - Click the blue
Add relationbutton.
- In the menu that appears, search for and select your
-
4. Clean Up Property Names.
- Go to your
Projectsdatabase. Find the new property Notion just added. - Click on its header, and rename it from "Related to..." to simply
Tasks.
- Go to your
-
5. Link Your Tasks to Projects.
- Go back to your 'Tasks' database. For each of your sample tasks, click in the empty cell under the new
Projectproperty. - A menu will pop up showing the entries from your 'Projects' database. Select the appropriate project for each task.
- Go back to your 'Tasks' database. For each of your sample tasks, click in the empty cell under the new
-
6. Verify the Connection.
- Open one of the pages in your
Projectsdatabase. You should now see theTasksproperty, and listed within it are all the tasks you just linked to that project.
- Open one of the pages in your
Conclusion
Fantastic work! You have now executed one of the most important steps in building a Notion system. Your 'Projects' and 'Tasks' are no longer isolated; they are connected in a logical and powerful way. This "parent-child" relationship is the key to organizing complex information and is a hallmark of any well-designed Notion template.
Key Takeaways:
- The
Relationproperty creates a clickable, two-way link between entries in different databases. - Creating a relation automatically adds a reciprocal property in the other database, which should be renamed for clarity.
- This connection allows you to see all related "child" items (tasks) directly from the "parent" item's page (the project).
Preview of the Next Lesson:
With our databases now intelligently linked, we can start building the user interface. In the next lesson, we will build a project-focused dashboard page. You'll learn how to use Linked Databases to create custom views of your tasks that are automatically filtered for a specific project, creating a clean and focused workspace for managing each initiative.